
1 1
FALCON FALCON
WORLD CLASS SECURITY World Class sicurezza
FALCON PREDATOR EVO4+2 Falco predatore EVO4 +2
Vehicle Security System with Remote Starter & LCD Pager Veicolo sistema di sicurezza con telecomando e display LCD di avviamento pager
Installation Manual Manuale di installazione
Table of Contents: Indice:
A) Introduction ..............................................................................................................2 A)
Introduzione ...............................................
.................................................. 2 .............
A-1) Features ......................................................................................................2 A-1) Caratteristiche ............................................. .................................................. 2 .......
A-2) Key Function Table........................................................................................2 A-2) Tasto Funzione Tabella ........................................... ............................................. 2
B) Optional Programming Features ...................................................................................3 B)
Facoltativo Programmazione Caratteristiche
.............................................
...................................... 3
C-1) Programming Option Table .............................................................................3 C-1) Programmazione Opzione Tabella ........................................... .................................. 3
B-2) Explanation of Programming Options ...............................................................4 B-2) Dichiarazione di programmazione Opzioni .......................................... ..................... 4
C) Remote Transmitter Code Learning ..............................................................................7 C)
trasmettitore remoto codice di apprendimento
............................................
.................................. 7
D) Installation Notes ......................................................................................................7 D)
Note di installazione ..............................................
.................................................. ...... 7
D-1) Ignition 2 Connection ....................................................................................7 D-1) accensione di connessione ........................................... 2 ......................................... 7
D-2) Installation without Remote Starter Features ....................................................7 D-2) senza installazione remota Starter Caratteristiche ......................................... ........... 7
E) Suggested Location of Installing the Antenna .................................................................8 E) Posizione suggerita di Installazione .......................................... l'antenna ....................... 8
F) Wiring Diagram..........................................................................................................9 F)
Schema di cablaggio ..............................................
.................................................. .......... 9
G) Wiring Note #1 .......................................................................................................10 G)
Cablaggio Nota # 1 ............................................
.................................................. ......... 10
H) Wiring Note #2 .......................................................................................................11 H)
Cablaggio Nota # 2 ............................................
.................................................. ......... 11
HELPLINE: 0906 700 10 20 Helpline: 0906 700 10 20
(All calls charged at 50p/min) (Tutte le chiamate al costo di 50p/min)
Falcon Security Ltd. Unit 9 Tanning Court, Warrington, Cheshire, WA1 2HF, UK Falco di sicurezza Ltd Unit 9 concia Corte, Warrington, Cheshire, WA1 2HF, Regno Unito
Internet: http://www.falcon-security.com Email: support@falcon-security.com Internet: http://www.falcon-security.com Email: support@falcon-security.com
2 2
A) Introduction A) Introduzione
The Falcon Predator EVO4+2 is a unique Vehicle Security System with Remote Engine Starter Il Falcon Predator EVO4 +2 è un unico sistema di sicurezza dei veicoli a motore Remote Starter
System and is designed to provide the highest level of security and convenience. E il sistema è progettato per fornire il più alto livello di protezione e comodità.
Thanks to the built in two-way interactive communications system the small palm size LCD Grazie alla costruzione in due direzioni sistema di comunicazione interattiva la palma piccole dimensioni LCD
remote transmitter will instantly alert you audibly and if the alarm is triggered. trasmettitore remoto sarà immediatamente avviso audibly e se l'allarme è attivato.
The Falcon Predator EVO4+2 has many programmable functions so please read this manual Il Falcon Predator EVO4 +2 ha molte funzioni programmabili in modo prega di leggere attentamente questo manuale
carefully before installing the Falcon Predator EVO4+2 system. prima di installare il Falcon Predator EVO4 +2 sistema.
A-1) Features A-1) Caratteristiche
�
1 x Two Way LCD Remote Transmitter 1 x bidirezionale LCD remoto trasmettitore
and 1 x one way 2nd remote e 1 x un modo 2a remoto
�
Code Hopping and Code Learning Hopping codice e il codice di apprendimento
Remote System Sistema remoto
�
Up to 4 remote transmitters Fino a 4 trasmettitori remoti
Programmable Programmabile
�
Remote Engine Start with system Motore di telecomando Inizia con sistema
armed/disarmed armato / disarmato
�
Timer Engine Start Inizio timer motore
�
Turbo Timer Turbo Timer
�
Remote Arm/Disarm Remote arm / disarmare
�
Mute Arm/Disarm Mute braccio / disarmare
�
Immobiliser Immobilizzatore
�
Remote Boot Release Uscita di avvio remoto
�
Passive or Active Lock Programmable Passivo o attivo di blocco programmabile
�
Auto Re-arm Auto Re-braccio
�
Ignition Lock/Unlock Accensione bloccare / sbloccare
�
Car Finder Ricerca auto
�
LCD Remote: Vibrate or Audible Alert LCD remoto: vibrare o di avviso acustico
�
LCD Back Light Display Torna luce LCD display
�
LCD Remote: low battery warning LCD remoto: avviso di batteria scarica
�
Audible Intrusion Zone Identification Udibile zona di identificazione delle intrusioni
�
Defective Zone Alert and Bypass Difettosa zona di allarme e di bypass
�
Keyless Entry While Ignition is on Keyless Entry Mentre è a motore ad accensione spontanea
�
Remote Panic Alarm Telecomando allarme di panico
�
Anti-Hijacking Anti-Hijacking
�
Emergency System Override Sistema di emergenza override
�
Remote Valet Mode Valet modalità remota
�
Passive Arming Passiva armare
�
Siren programmable for 30 or 60 Sirena programmabile per 30 o 60
seconds secondo
�
Built in Central Locking Control Costruito nel centro di controllo di bloccaggio
�
Built in Total Closure Control Costruito nel chiusura totale controllo
�
Central Lock Active Time selectable 0.5 Centrale di Active Time Lock selezionabile 0,5
or 3.5 seconds o 3,5 secondi
�
Plug-In Dual Stage Shock Sensor Plug-in fase Dual Shock sensore
�
Shock Sensor Bypass Shock sensore bypass
�
Vehicle Status Report Veicolo status report
�
Interior Light Delay Time Interni luce tempo di ritardo
programmable programmabile
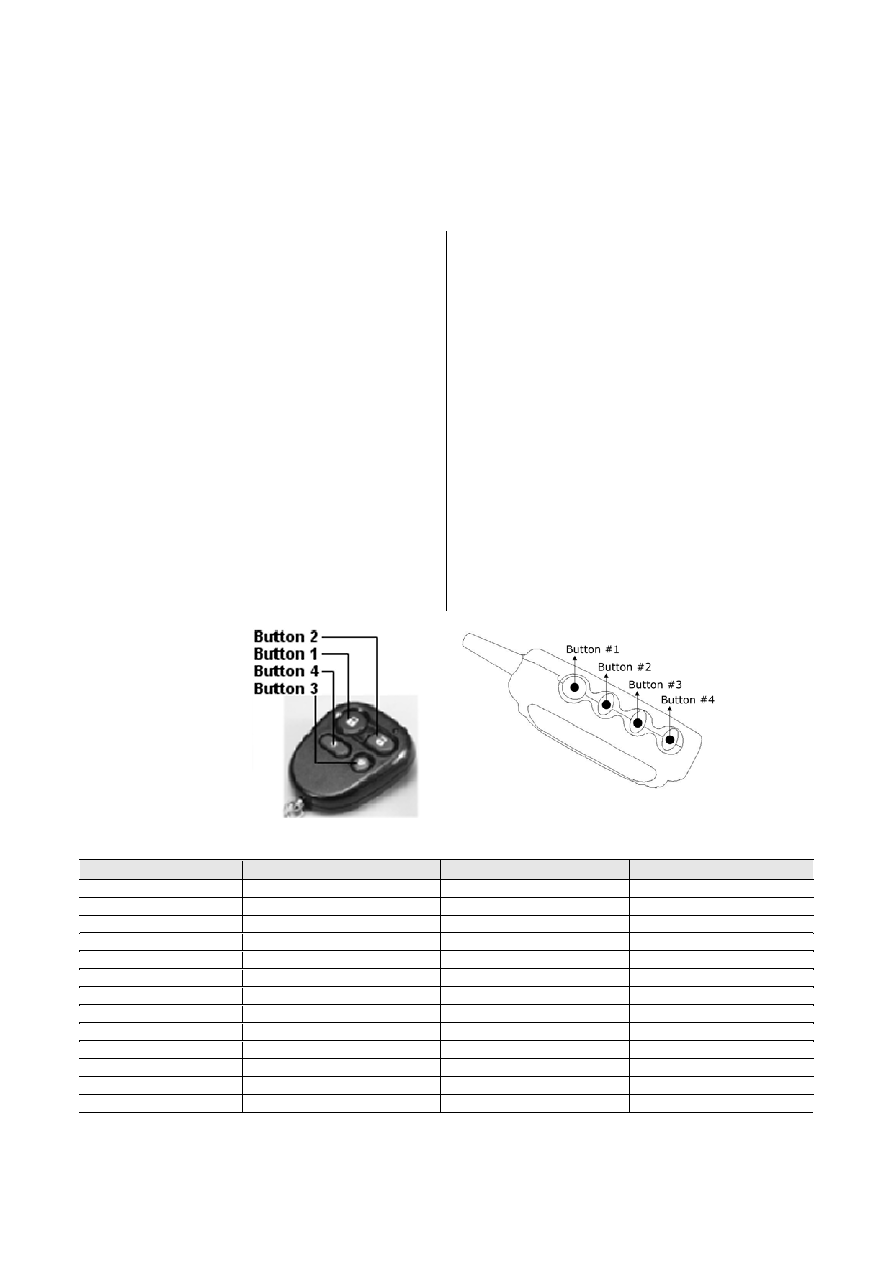
A-2) Key Function Table A-2) Tasto Funzione Tabella
Button Pulsante
Armed Armati
Disarmed Disarmato
Ignition On Il motore ad accensione spontanea
Button 1 once 1 pulsante di una volta
Arm Braccio
Arm Braccio
Button 2 once 2 pulsante di una volta
Disarm Disarmare
Disarm Disarmare
Button 1 for 3 secs 1 pulsante per 3 secondi
Panic Panico
Panic Panico
Panic Panico
Buttons 1+3 for 1 sec 1 +3 pulsanti per 1 sec
Channel 3 Canale 3
Channel 3 Canale 3
Channel 3 Canale 3
Button 3 once 3 pulsante di una volta
Car Finder Ricerca auto
Car Finder Ricerca auto
Anti-Hijacking Anti-Hijacking
Button 3 for 2 secs Tasto 3 per 2 sec
Boot Release Uscita di boot
Boot Release Uscita di boot
RPM Learning RPM Learning
Button 4 for 3 secs 4 pulsante per 3 secondi
Remote Start On/Off Inizio remote on / off
Remote Start On/Off Inizio remote on / off
Button 4 once 4 pulsante di una volta
LCD Remote Back Light Torna LCD remoto luce
LCD Remote Back Light Torna LCD remoto luce
LCD Remote Back Light Torna LCD remoto luce
Buttons 1+2 once 1 +2 pulsanti di una volta
Mute Disarm Mute disarmare
Mute Arm Braccio muto
Valet Mode Modalità valet
Buttons 1+4 for 1 sec 1 +4 pulsanti per 1 sec
Timer Start On/Off Inizio timer on / off
Timer Start On/Off Inizio timer on / off
Buttons 2+3 once 2 +3 pulsanti una volta
Status Report Status Report
Status Report Status Report
Status Report Status Report
Buttons 2+4 once 2 +4 pulsanti di una volta
LCD Remote Power Saving LCD Remote Power Saving LCD remoto di risparmio energetico, display LCD remoto di risparmio energetico
Buttons 3+4 once 3 +4 pulsanti di una volta
Vibrate Alert On/Off Vibrare segnalazione on / off
Vibrate Alert On/Off Vibrare segnalazione on / off
Vibrate Alert On/Off Vibrare segnalazione on / off

3 3
B) Optional Programming Features B) opzionale Caratteristiche di programmazione
The Predator EVO4+ has additional features for different types of vehicles. Il Predator EVO4 + ha caratteristiche aggiuntive per i vari tipi di veicoli.
Read the below programming functions carefully to have the right options programmed for your Leggi qui di seguito le funzioni di programmazione attentamente per avere diritto opzioni programmato per il tuo
vehicle and your needs. veicolo e le vostre esigenze.
a> Under the system disarm mode, keep the door open, and switch the ignition on-off, on-off, a> Nell'ambito del sistema di disarmare modalità di attesa, tenere la porta aperta, e interruttore di accensione on-off, on-off,
on-off and then back to On. on-off e poi di nuovo su On.
b> Siren will chirp for 2 seconds to confirm entering the programming option mode. b> Siren sarà chirp per 2 secondi per confermare che entrano nella modalità di programmazione opzione.
c> To choose the function #1 � 23: Within 20 seconds after taking step b Press button 1 the c> Per scegliere la funzione # 1 23: entro 20 secondi dopo l'assunzione di passaggio b Premere il pulsante 1
same number of times as the function # you wish to program. stesso numero di volte come la funzione # si desidera programmare. Each time you press button 1, a Ogni volta che si preme il pulsante 1, un
single short chirp will follow. chirp singolo breve seguirà. For example, if you want to choose #11 Start Mode Select, press Ad esempio, se si desidera scegliere # 11 Inizio MODE SELECT, premere
button 1 eleven times. 1 pulsante di undici volte.
Pressing Button 4 for 3 seconds will the programming options will be reset to factory default, the 4 il pulsante per 3 secondi, la programmazione opzioni saranno a reimpostare default di fabbrica, la
siren will chirp for 2 seconds to confirm and the system will leave programming mode. sirena si chirp per 2 secondi per confermare e il sistema lascerà la modalità di programmazione.
d> To confirm the selected mode, Press button 2. d> Per confermare la modalità selezionata, Premere il tasto 2. Siren will chirp as many times as you pressed Chirp sirena sarà il numero di volte è stato premuto
button 1 in step C to confirm the function you chose. 1 pulsante di scatto C per confermare la funzione si è scelto. For example, if you press button 1 eleven Ad esempio, se si preme il pulsante 1 undici
times in step C, 11 single short chirps will follow. volte nel passaggio c, 11 singolo breve chirps seguirà.
e> Now you can program the features and settings by pressing buttons 1, 2 or 3. e> Ora è possibile programmare le caratteristiche e le impostazioni premendo i pulsanti 1, 2 o 3.
When you press button 1, a single chirp will sound, for Button 2 two chirps and button 3 three Quando si preme il pulsante 1, un unico chirp suona, per Button 2 due chirps pulsante e 3 tre
chirps to indicate the selected setting has been programmed. chirps per indicare l'impostazione selezionata è stato programmato.
The system will leave the programming mode if there is no action made within 20 seconds your Il sistema lascerà la modalità di programmazione se non vi è alcuna azione entro 20 secondi il tuo
previous action or the ignition is turned off. precedente azione o l'accensione è spento. The siren will sound for 2 seconds to confirm the La sirena suona per 2 secondi per confermare la
system has left programming mode. sistema ha lasciato la modalità di programmazione.
C-1) Programming Option Table C-1) Programmazione Opzione Tabella
No. No
Function Funzione
BTN (1) BYR (1)
Chirp Once Una volta Chirp
BTN (2) BYR (2)
2 Chirps 2 Chirps
BTN (3) BYR (3)
3 Chirps 3 Chirps
01 Chirp 01 Chirp
Confirmation Conferma
On/Off ON / OFF
On Off ON OFF
02 02
Shock Sensor Bypass Shock sensore bypass
Disabled First Both In primo luogo entrambi i disabili
03 Passive 03 Passiva
Arming Disabled Enabled Armare disabili attivato
04 Passive 04 Passiva
Locking Disabled Enabled Bloccaggio disabili attivato
05 Ignition 05 di accensione
Locking Disabled Enabled Lock Bloccaggio disabili attivato Lock
Only Solo
06 Door 06 Porta
Lock Serratura
Time 1 Pulse Tempo 1 Pulse
2 Pulses 2 Legumi
4 Sec. 4 sec.
07 Siren/Horn Siren 07 / Corno
Siren Horn Corno sirena
08 08
Alarm Condition/Cycle Duration Condizione di allarme / ciclo di durata
30 Secs 30 Secs
60 Secs 60 Secs
09 Interior 09 Interni
Light Luce
Delay Disables 15 Disabilita indugio 15
Secs Secs
10 Auto 10 Auto
Rearm Disabled Enabled Riarmarsi disabili attivato
11 Anti-Hijacking 11 lanciare la lotta antifrode
Delay 15 Secs Indugio 15 Secs
60 Secs 60 Secs
12 12
Anti-Hijacking by Remote Control Anti-Hijacking di controllo remoto
Disabled Enabled Attivato disabili
13 13
Anti-Hijacking by Door Opening Anti-lanciare lo sportello di apertura
Disabled Enabled Attivato disabili
14 Turbo 14 Turbo
Timer Disabled Timer disabili
120 Secs 120 Secs
180 Secs 180 Secs
15 Car 15 Autonoleggio
Type Automatic Manual Tipo automatico manuale
16 16
Remote Start Conditions Inizio telecomando condizioni
Arm Normal Braccio normale
17 17
Door Lock/Unlock with Remote Start Porta bloccare / sbloccare con telecomando Inizio
Disabled Enabled Attivato disabili
18 18
Remote Start Mode Avviare la modalità remota
Alternator TACH Alternatore TACH
19 Crank 19 Guarnitura
Time Tempo
600ms 800ms 1000ms 600ms 800ms 1000ms
20 20
Engine Running Time Durata motore
10 Min 10 min
20 Min 20 min
21 Timer 21 Timer
Start 3 Hours Orario di avviare 3
6 Hours 6 Ore
12 Hours 12 Ore
22 Alternator 22 Alternatore
Voltage Tensione
4.5V 9.0V 4.5V 9.0V
23 Channel Canale 23
3 3
Output Disable Enable Disattiva uscita Attiva
*Note: The factory defaults are pre-programmed as per the first column (grey box). * Nota: Tali impostazioni sono pre-programmati come per la prima colonna (casella grigia).

4 4
B-2) Explanation of Programming Options B-2) Dichiarazione di programmazione Opzioni
01) Chirp confirmation on/off: Factory default = On 01) Chirp conferma on / off: default di fabbrica = Su
The siren will chirp once to enter armed mode and twice to enter disarmed mode when La sirena si chirp una volta per entrare in modalità armati e due volte per entrare in modalità disarmato
programmed as on. come programmato. The siren will not chirp if programmed as off. La sirena non chirp se programmato come off.
02) Shock Sensor Bypass: Factory default = Disabled 02) Shock Sensore By-pass: Factory default = disabili
When programmed as Disabled: The shock sensor will work normally Quando programmato come disabili: Lo choc sensore funziona regolarmente
When programmed as First: The 1 Quando programmato come Primo: Il 1
st St
stage shock sensor will be bypass after 3 continual triggers fase shock sensore sarà bypass dopo 3 continua trigger
When programmed as Both: Both stages of the shock sensor will be bypassed after 3 continual Quando Sia come programmato: Entrambe le fasi del sensore di shock verrà ignorato dopo 3 continua
triggers. scatenanti.
03) Passive Arming: Factory default = Disable 03) Passive armi: Factory default = Disattiva
When programmed as Disabled: The feature will not be activated Quando programmato come disabili: La caratteristica non verrà attivato
When programmed as Enabled: The LED will flash rapidly and system will enter the armed Quando programmato come attivato: Il LED lampeggia rapidamente e sistema entra armato
mode automatically after 30 seconds of turning the ignition off and closing the last opened door, modalità automaticamente dopo 30 secondi di trasformare l'accensione e la chiusura fuori l'ultima porta,
the bonnet and boot. il cofano e di boot. The siren will chirp and parking lights flash once to confirm and the La sirena si chirp e parcheggio luci flash, una volta per confermare e il
immobiliser turns on. immobilizzatore si accende.
04) Passive Locking: Factory default = Disabled 04) Blocco passivo: Factory default = disabili
When programmed as Disabled: The doors will not be locked when the passive arming feature is Quando programmato come disabili: Le porte non verrà bloccato quando il passivo funzione è armare
activated. attivato.
When programmed as Enabled: The doors will be locked when the passive arming feature is Quando Attivato programmato come: Le porte verrà bloccato quando il passivo funzione è armare
activated. attivato.
05) Ignition lock: Factory default = Disabled 05) blocco di accensione: Factory default = disabili
When programmed as Disabled: The doors will not be locked when turning the ignition on and Quando programmato come disabili: Le porte non verrà bloccato quando svolta l'accensione e
will not be unlocked when the ignition is off non sarà sbloccata quando l'accensione è spento
When programmed as Enabled: The doors will be automatically locked 15 seconds after the Quando Attivato programmato come: Le porte verrà bloccato automaticamente 15 secondi dopo il
ignition is turned on and the doors will be unlocked immediately upon the accensione è accesa e le porte sarà sbloccato immediatamente dopo il
ignition being turned off accensione sia spento
When programmed as Lock Only: The doors will be locked 15 seconds after turning the ignition Quando programmato come Lock Solo: Le porte sarà bloccato 15 secondi dopo l'accensione di svolta
on but will not be unlocked after turning the ignition off. ma non sarà sbloccato dopo aver acceso l'accensione spento.
06) Door lock time: Factory default = 1 Pulse 06) Porta blocco tempo: default di fabbrica = 1 Pulse
When programmed as 1 Pulse: The system will send one 1 second pulse when locking or Quando programmato come 1 Pulse: Il sistema invierà una 1 secondo impulso di bloccaggio o quando
unlocking the doors. liberare le porte.
When programmed as 2 Pulse: The system will send one 1 second pulse when locking the doors Quando programmato come 2 Pulse: Il sistema invierà una 1 secondo impulso di bloccaggio quando le porte
and two 1 second pulses when unlocking the doors. e due impulsi di 1 secondo quando liberare le porte.
When programmed as 4 sec.: The system will send one 4 second pulse when locking or Quando, come programmato 4 sec.: Il sistema invierà una 4 secondi quando impulsi di bloccaggio o
unlocking the door. sbloccare la porta.
07) Siren/Horn: Factory default = Siren 07) Siren / Corno: Factory default = Siren
When programmed as Siren: The system will send a constant output Quando programmato come Siren: Il sistema invierà una costante di uscita
When programmed as Horn: The system will send an intermittent output with a 0.5 second Quando programmato come Corno: Il sistema invierà un intermittente uscita con un 0,5 secondi
interval between each output. intervallo tra ogni uscita. An extra relay should be added if Horn is selected. Un ulteriore relè devono essere aggiunte se Corno è selezionata.
08) Alarm condition cycle duration: Factory default = 30 seconds. 08) Allarme condizione del ciclo di durata: Factory default = 30 secondi.
To program the alarm time as 30 or 60 seconds. Per programmare il tempo di allarme come 30 o 60 secondi.
09) Interior light delay: Factory default = Disabled 09) Interni luce ritardo: Factory default = disabili
If the vehicle has a delay on turning off the interior light when closing the door, set the Interior Se il veicolo ha un ritardo a spegnersi la luce interiore, quando la chiusura della porta, impostare il Interni
Light Delay to 15 or 40 Secs. Ritardo luce a 15 o 40 secondi.

5 5
When programmed as Disabled: The siren will chirp, hazard lights will flash 3 times and LED will Quando programmato come disabili: La sirena si chirp, pericolo luci lampeggiano 3 volte e LED
show 3 flashes if the door, boot or bonnet is not closed properly. 3 mostra lampeggia se la porta, cofano di boot o non è chiuso correttamente. When the system enters Quando il sistema entra
armed mode the violated zone will be bypassed but all other areas will remain protected. le modalità armati violati zona verrà ignorato, ma tutti gli altri settori rimarranno protetti.
When programmed as 15 or 40 seconds: If the door, boot or bonnet is not closed properly the Quando programmati come 15 o 40 secondi: Se la porta, cofano di boot o non è chiuso correttamente il
siren will chirp, hazard lights will flash 3 times and the LED will show 3 flashes. sirena si chirp, pericolo luci lampeggiano 3 volte e il LED mostrerà 3 lampeggia. 15 or 40 15 o 40
seconds later the system enters armed mode and the violated zones will be bypassed but all secondi più tardi il sistema entra in modalità armati e le zone violati verrà ignorato, ma tutti i
other areas will remain protected. altre zone rimarranno protetti.
10) Auto rearm: Factory default = Disabled 10) Auto riarmarsi: Factory default = disabili
If Auto Rearm is Enabled, the system will be armed again 30 seconds after the system is Se riarmo automatico è attivato, il sistema sarà di nuovo armati 30 secondi dopo che il sistema è
disarmed if a door is not opened. disarmato se una porta non è aperta. Opening a door after disarming the system will disable Auto Aprire una porta dopo disarmare il sistema disattivare Auto
rearm function. riarmarsi funzione.
11) Anti-Hijacking Delay: Factory default = 15 Sec. 11) Anti-lanciare Scadenza: Factory default = 15 sec.
The system will enter anti-hijacking mode 15 or 60 seconds after the anti-hijacking is activated Il sistema entra anti-dirottamento modalità 15 o 60 secondi dopo l'anti-pirateria aerea è attivato
by pressing the remote control or opening the door while the ignition is on. premendo il telecomando o aprire la porta, mentre l'accensione è accesa.
12) Anti-hijacking by remote control: Factory default = Disabled 12) Anti-dirottamento di telecomando: Factory default = disabili
When programmed as Enabled Anti-Hijacking mode can be started by pressing button 3 on the Quando programmato come attivato la lotta antifrode lanciare modalità può essere avviato premendo il tasto 3 sul
remote control telecomando
13) Anti-hijacking by door opening: Factory default = Disabled 13) Anti-dirottamento di apertura: Factory default = disabili
When programmed as Enabled: The anti-hijacking mode will be activated by opening a door Quando Attivato programmato come: l'anti-dirottamento modalità verrà attivato aprendo una porta
with the ignition on. con l'accensione.
14) Turbo timer: Factory default = Disabled 14) Turbo timer: Factory default = disabili
When programmed as 120 or 180 Secs: The ignition will keep on running for 120 or 180 Quando programmato come 120 o 180 Secs: l'accensione non mancherà di tenere a correre per 120 o 180
seconds after turning the ignition key off and closing the door. secondi dopo aver acceso la chiave di accensione largo e chiudere la porta.
Operation is as follows: Funzionamento è il seguente:
- With the ignition key still in on position -- Con la chiave di accensione ancora in posizione a
- Pull up the handbrake -- Tirare verso l'alto il freno a mano
- Turn the ignition key to the off position -- Girare la chiave di accensione per la posizione "off"
- The Ignition and ACC circuits will stay on -- L'accensione e circuiti ACC rimarrà a
- The system will then start the 120 or 180 seconds countdown -- Il sistema quindi avviare il 120 o 180 secondi rovescia
- Open and close the door -- Aprire e chiudere la porta
- The Ignition and ACC circuits will stay on -- L'accensione e circuiti ACC rimarrà a
- After 120 or 180 seconds, the ignition and ACC circuits will be turned off automatically. -- Dopo 120 o 180 secondi, l'accensione e ACC circuiti verrà disattivata automaticamente.
- Pressing button 1 during the 120 or 180 seconds will arm the system (Press buttons 1+2 for -- Premendo il pulsante 1 durante la 120 o 180 secondi, braccio di sistema (Stampa pulsanti per 1 +2
Mute Arm) Mute Arm)
* The turbo time will be functional only when the engine has been running for at least 5 minutes * Il turbo tempo sarà funzionale solo quando il motore è in funzione per almeno 5 minuti
15) Car type: Factory default = Automatic 15) Tipo di macchina: Factory default = automatico
Select Automatic for vehicles with automatic transmission or select manual for vehicles Selezionare Automatica per i veicoli con trasmissione automatica o manuale per selezionare i veicoli
with a manual transmission. con una trasmissione manuale.
16) Remote start conditions: Factory default = Arm 16) Telecomando iniziare condizioni: Factory default = Braccio
When programmed as Arm: The remote start feature will be functional only when the system is Quando programmato come Braccio: Il telecomando iniziare funzione sarà funzionale solo quando il sistema è
armed. armati.
When programmed as Normal: The remote start feature will be functional when the system is Quando programmato come normale: Il telecomando iniziare funzione sarà funzionale quando il sistema è
armed or disarmed mode. armati o disarmati modalità di attesa.
17) Lock/Unlock with remote start: Factory default: Disabled 17) Bloccare / sbloccare con telecomando inizio: default di fabbrica: disabili
When programmed as Disabled: The doors will not lock or unlock before and after the remote Quando programmato come disabili: Le porte non bloccare o sbloccare prima e dopo il telecomando
engine starter operates. motore di avviamento opera.
When programmed as Enabled: If the system is armed: The doors lock once before and after Quando programmato come attivato: Se il sistema è armato: Le porte di blocco una volta prima e dopo
remote starting the engine. telecomando partire il motore.

6 6
If the system is disarmed the door unlocks before and after remote starting the engine. Se il sistema è disarmato sblocca la porta, prima e dopo remoto partire il motore.
18) Remote start mode: Factory default = Alternator 18) avviare in modalità remota: Factory default = Alternatore
To program the Remote Start Mode as Alternator or Tach. Per programmare il telecomando come modalità di avvio Alternatore o Tach.
RPM (TACH) Learning: RPM (TACH) Learning:
- Perform the Tach Learning before using the remote start for the first time -- Eseguire la Tach di apprendimento prima di utilizzare il telecomando per iniziare la prima volta
- Make sure the Tach wire(C4-1 Green) of the alarm system is connected to the negative of the -- Assicurarsi che il filo di Tach (C4-1 verde) del sistema di allarme è collegato al negativo della
coil as shown in the wiring diagram bobina, come mostrato nel diagramma di cablaggio
Before performing the RPM (Tach) learning turn off all electrical devices such as car stereo, FM Prima
di eseguire il numero di giri (Tach) apprendimento disattivare tutti i
dispositivi elettrici come ad esempio car stereo, FM
Radio or air conditioner. Radio o aria condizionata. By doing so, the system will learn lowest RPM, which will make it In tal modo, il sistema RPM imparare più basso, il che renderà
smoother and easier when using the remote starter. più agevole e più facile quando si utilizza il telecomando di avviamento.
Take the following steps to perform the RPM learning: Adottare la seguente procedura per eseguire il numero di giri di apprendimento:
a> Shift the gear to the neutral position and pull up the hand brake. a> Maiusc gli attrezzi in posizione neutra e tirare il freno a mano.
b> Switch the ignition on and start the engine. b> Interruttore di accensione e avviare il motore.
c> Wait until the RPM is running stably (normally vehicle's stable RPM is 900-1,000.) c> Attendere fino a quando il numero di giri è in esecuzione stabile (normalmente stabile del veicolo è 900-1000 giri / min.)
d> Press button 2 for 2 seconds. d> Premere il tasto 2 per 2 secondi. The hazard lights will flash for 2 seconds and then flash twice Il pericolo luci lampeggia per 2 secondi e poi due volte in flash
to confirm that RPM is learned. per confermare che RPM è appreso.
Important: Importante:
* Please make sure to set Start Mode Select as TACH (please refer to # 18 Remote Start Mode of *
Si prega di assicuratevi di impostare la modalità di avvio selezionare
il TACH (si prega di fare riferimento alla # 18 Remote Inizio Modo di
Programming Option Table). Opzione di programmazione tabella).
* The Tach wire (Green) of the alarm system should be connected to the negative of the coil. * Il filo di Tach (verde) del sistema di allarme deve essere collegato al negativo della bobina.
19) Crank time: Factory default = 600ms 19) Guarnitura tempo: Factory default = 600ms
Normally, older vehicles and diesel vehicles need a longer crank time to start the engine. Normalmente, dei veicoli più vecchi e veicoli diesel bisogno di un tempo più lungo manovella per avviare il motore.
However, if the engine doesn't start smoothly, please set the crank time longer. Tuttavia, se il motore non si avvia senza problemi, si prega di impostare la manovella tempo più lungo.
*For diesel vehicles please try to program 1000ms in order make the remote engine start work * Per i veicoli diesel riprova a 1000ms programma per rendere il telecomando motore di iniziare i lavori
smoothly. senza problemi.
20) Engine running time: Factory default = 10 minutes 20) Motore Running Time: default di fabbrica = 10 minuti
Depending on the programmed engine running time the engine will run for 10 or 20 minutes A seconda del motore in funzione programmato tempo il motore avrà una durata di 10 o 20 minuti
and then shut down automatically. e poi spegnere automaticamente.
21) Timer start: Factory default = 3 Hours 21) Timer inizio: Factory default = 3 Ore
With the system armed or disarmed the Timer Start feature can be turned on or off as follows: Con il sistema armati o disarmati Timer Inizio caratteristica può essere attivata o disattivata nel modo seguente:
A) Turn on Timer Start Mode: A) Accendere Start Timer Mode:
- Press buttons 1+4 once, the siren will chirp and hazard lights will flash once to confirm the -- Premere i pulsanti 1 +4 una volta, la sirena si chirp e pericolo luci lampeggia una volta per confermare la
feature has been turned on for 24 hours. funzione è stata attivata per 24 ore.
- The engine will be started every 3, 6 or 12 hours depending on the selection of option feature -- Il motore viene avviato ogni 3, 6 o 12 ore, a seconda del selezione di funzionalità di opzione
#21 # 21
B) To turn off Timer Start Mode Press buttons 1+4 once, the siren will chirp and hazard lights B) Per disattivare la modalità Timer Premere Start pulsanti 1 +4 una volta, la sirena si chirp e pericolo luci
will flash twice to confirm the feature has been cancelled. lampeggia due volte per confermare la funzione è stata annullata.
Timer Start mode will be cancelled in the situations below: Inizio timer modo di essere annullate nelle situazioni qui di seguito:
* When remotes engine start is used. * Quando telecomandi motore di iniziare viene utilizzato.
* If the ignition has been turned on with the system disarmed * Se l'accensione è stato attivato con il sistema disarmato
* The doors are opened with the system armed * Le porte sono aperte con il sistema armati
22) Alternator voltage: Factory default = 4.5V 22) Alternatore tensione: Factory default = 4.5V
This setting should be left set on the default setting of 4.5V unless advised otherwise by the Questa impostazione deve essere impostato a sinistra l'impostazione di default di 4.5V se non altrimenti consigliato dal
technical department of supplier. ufficio tecnico del fornitore.
23) Channel 3 output: Factory default = Disabled 23) Canale 3 output: Factory default = disabili
The channel 3 output is often applied for total closure/comfort closure and the operation is 3 il canale di uscita è spesso richiesto chiusura totale / chiusura comfort e l'operazione è
as follows: come segue:
7 7
When programmed as Enabled: The windows will be closed automatically when Quando Attivato programmato come: Le finestre verrà chiuso automaticamente quando
pressing button 1 or 1+2 to arm the system. premendo il pulsante 1 o 1 +2 a braccio il sistema. With the feature enabled, the CH3 Con la funzione attivata, la CH3
output will be unable to be operated by remote control. uscita non sarà in grado di essere gestita da telecomando.
When programmed as Disabled: The channel 3 output will be activated as long as pressing and Quando programmato come disabili: Il canale di uscita 3 verrà attivato finché e premendo
holding buttons 1+3 for 1 second. azienda pulsanti 1 +3 per 1 secondo.
C) Remote Transmitter Code Learning C) trasmettitore remoto codice di apprendimento
The included remotes control are programmed to the system before they leave the factory. Inclusi i telecomandi di controllo sono programmate per il sistema prima di lasciare la fabbrica.
Follow the below procedure to program a new remote control: Seguire la procedura qui di seguito a un nuovo programma di controllo remoto:
a> Follow the below procedure to program a new remote control. a> Seguire la procedura qui di seguito per programmare un nuovo telecomando.
With the alarm disarmed, and the doors CLOSED, switch the ignition ON/OFF 3 times (within 1 Con l'allarme disarmato, e le porte chiuse, interruttore di accensione ON / OFF per 3 volte (entro 1
second of each other) and then back to the ON position. secondo l'uno dall'altro) e poi torna alla posizione ON.
The siren will sound for 2 seconds to indicate the alarm is in code learning mode. La sirena suona per 2 secondi per indicare che l'allarme è in codice modalità di apprendimento.
b> To program the new remote control press button (1) within 10 seconds. b> Per programmare il nuovo telecomando premere il pulsante (1) entro 10 secondi.
The siren will chirp and the hazard lights flash twice to confirm that the code has La sirena si chirp e il pericolo luci flash due volte per confermare che il codice è
been learned. state tratte. Follow the same procedure for second, third and fourth remote transmitter. Seguire la stessa procedura per la seconda, terza e quarta telecomando trasmettitore.
c> If the ignition is turned OFF or button (1) is not pressed within 10 seconds, the system will c> Se l'accensione è spento o pulsante (1) non è premuto entro 10 secondi, il sistema
quit the code-learning mode. chiudere il codice di modalità di apprendimento. If this happens you must start again from the first step. In tal caso si deve ricominciare dal primo passo.
d> Up to 4 remote control transmitters can be programmed to the system. d> Fino a 4 trasmettitori telecomando può essere programmato per il sistema.
D) Installation Notes D) Note di installazione
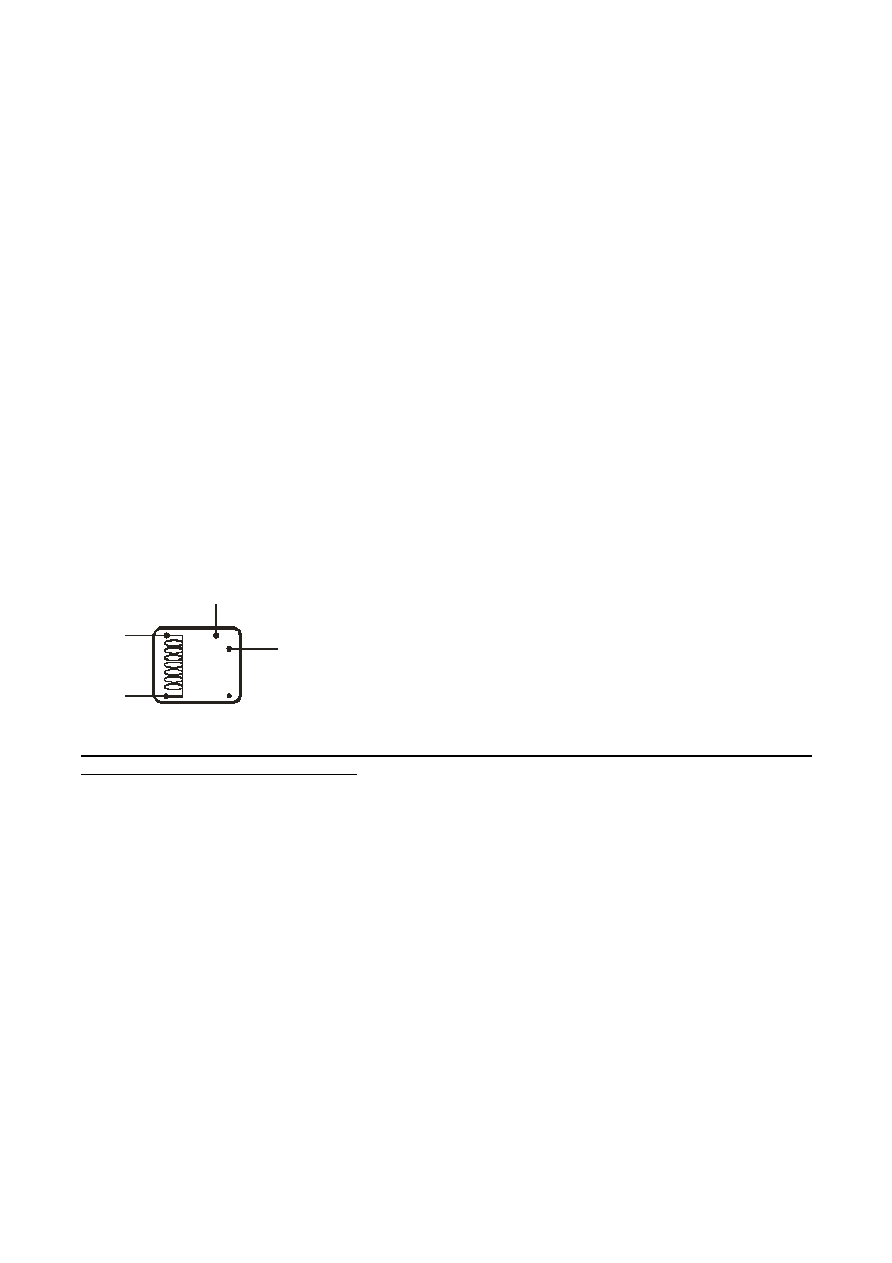
D-1) Ignition 2 Connection D-1) accensione di connessione 2
If a vehicle has ignition 2 (ACC 2), the yellow/black wire (C4-2) must be connected to Ignition 2 Se un veicolo è di accensione 2 (ACC 2), il giallo / nero filo (C4-2) deve essere collegato ad accensione 2
(ACC 2) via a 30A relay as shown below. (ACC 2) tramite un relè 30A, come indicato qui di seguito.
C4-2 (-) C4-2 (-)
Ignition 2 2 motori ad accensione spontanea
+12V +12 V
86 86
87 87
30 30
87A 87A
85 85
+12V +12 V
Important: Importante:
This wire must be connected to Ignition 2 (ACC 2) in the vehicle. Questo filo deve essere collegato ad accensione 2 (ACC 2) nel veicolo. Or it will affect O che interesserà
performance of remote engine start. prestazioni del motore di avviare remoto.
D-2) Installation without Remote Starter Features D-2) senza installazione remota Starter Caratteristiche
If the remote starter and turbo timer features are not required, the following wires do not need Se il telecomando di avviamento e turbo timer funzioni non sono richieste le seguenti fili non è necessario
to be connected: essere collegati:
C1-2Yellow/Green To Ignition Start C1-2Yellow/Green di accensione Inizio
C1-3Blue/WhiteTo Ignition Acc C1-3Blue/WhiteTo accensione acc
C3-5Black/RedTo handbrake light C3-5Black/RedTo freno di luce
C4-1Green To RPM C4-1Green Per RPM
C4-2Yellow/BlackTo ignition 2 C4-2Yellow/BlackTo accensione 2
C4-3Red/BlackTo alternator C4-3Red/BlackTo alternatore

8 8
E) Suggested Location of Installing the Antenna E) Posizione suggerita di Installazione L'antenna
* Install the antenna at the right or left upper of the windshield * Installare l'antenna a destra oa sinistra superiore del parabrezza
* Keep the antenna at least 5cm away from the car frame * Tenere l'antenna almeno 5 centimetri di distanza dal telaio auto
* Don't power on the main unit if the antenna is not connected * Non potere sui principali unità se l'antenna non è collegato
* Keep the antenna at least 5cm apart from solar control window film * Tenere l'antenna almeno 5 centimetri oltre a controllo solare finestra film
9 9
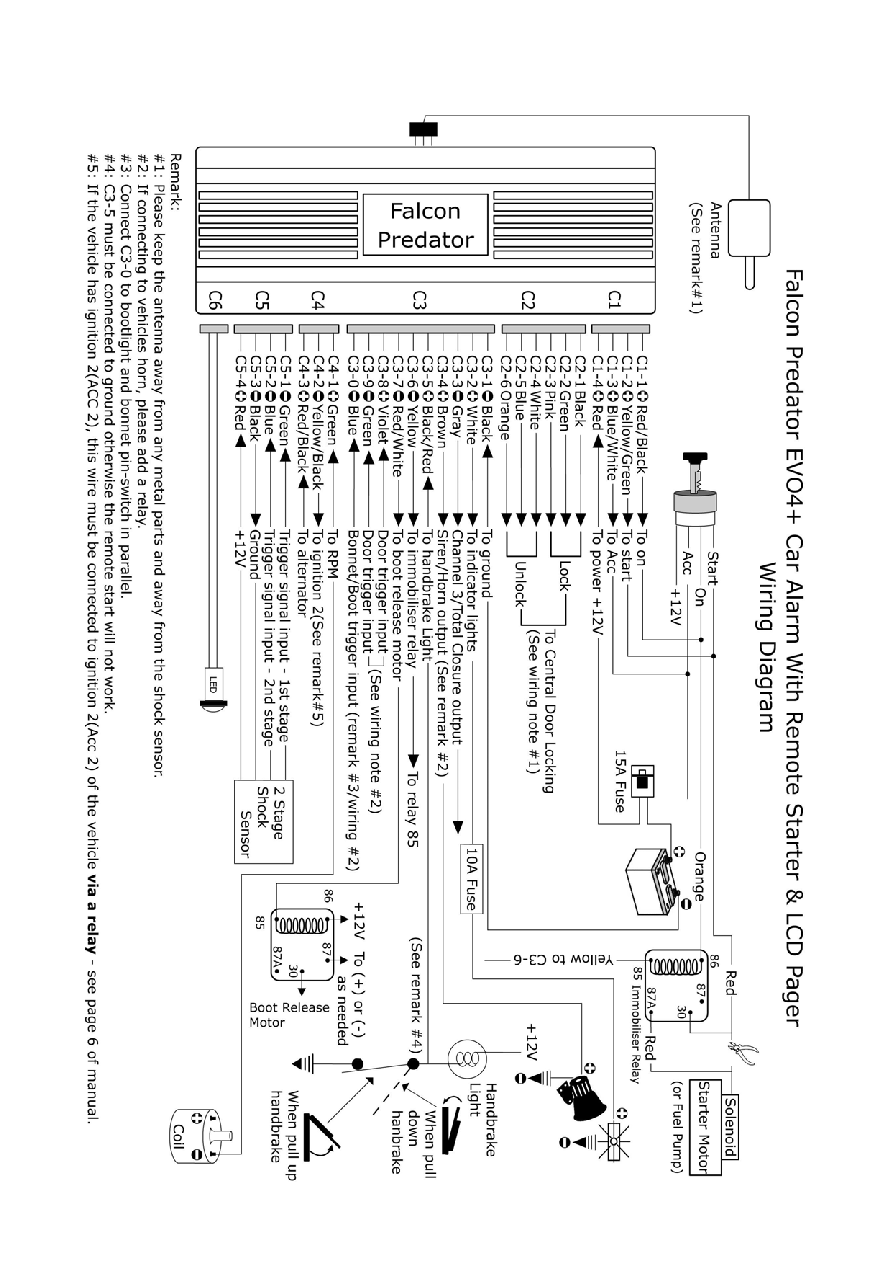
F) Wiring Diagram F) Schema di cablaggio
10 10
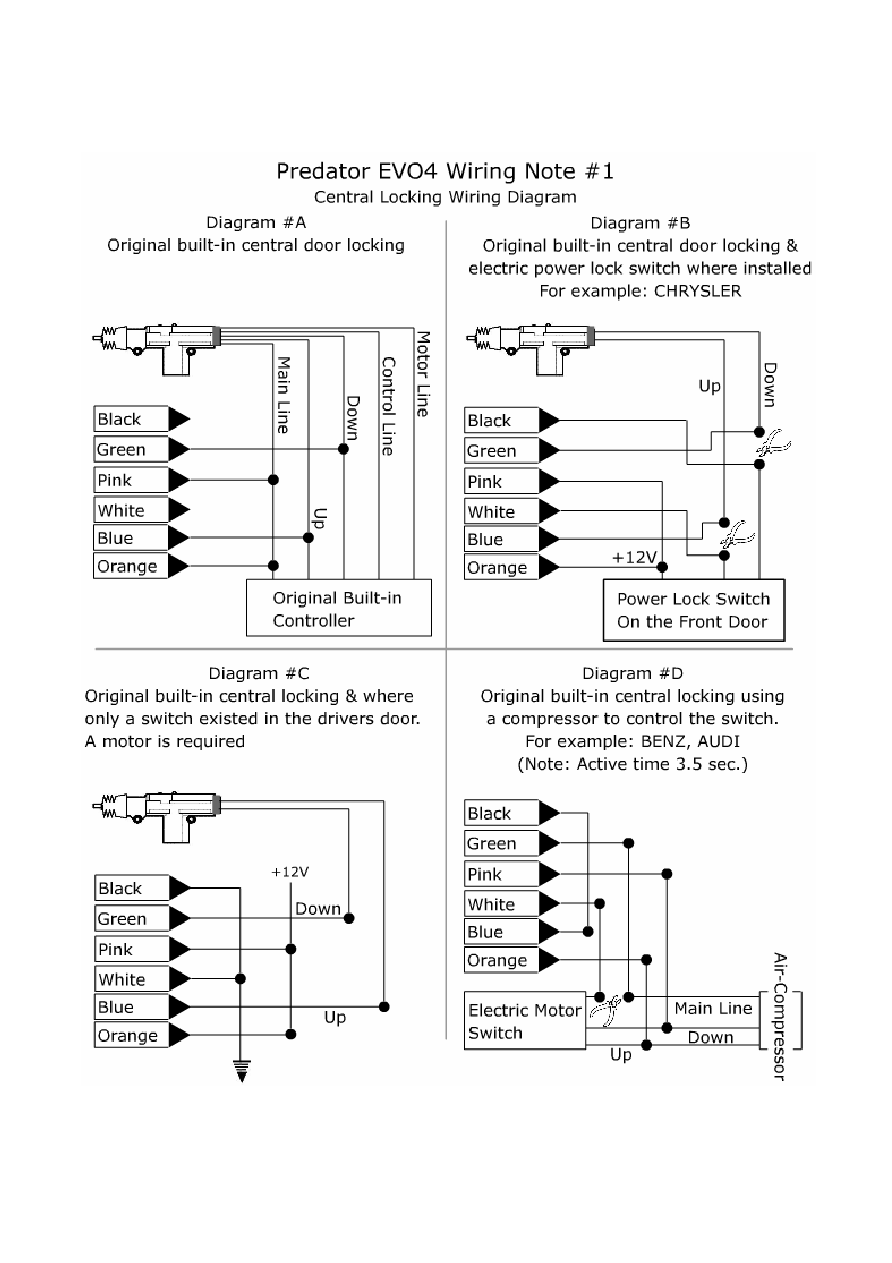
G) Wiring Note #1 G) Cablaggio Nota # 1
11 11
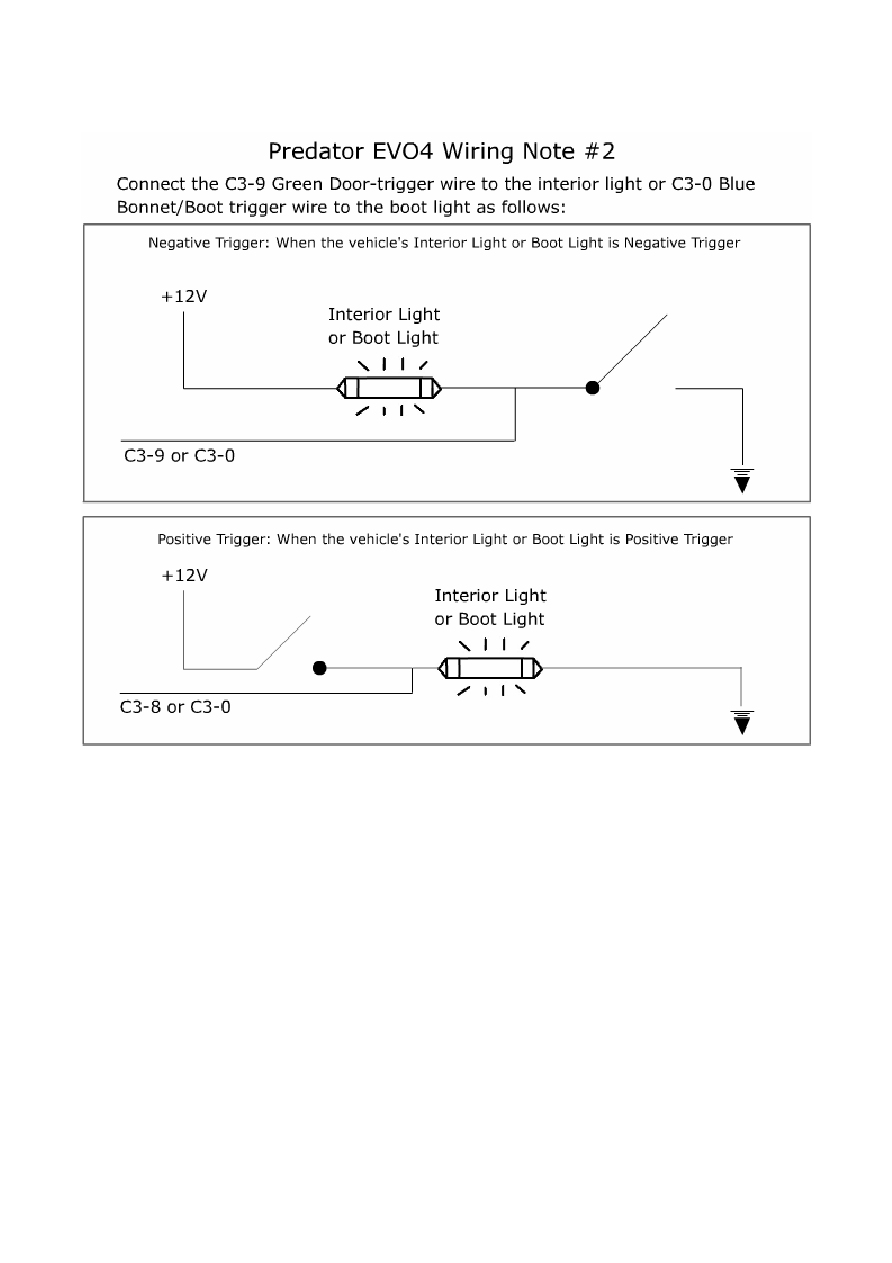
H) Wiring Note #2 H) Cablaggio Nota # 2


