
- --
FALCON FALCON
WORLD CLASS SECURITY World Class Sicherheit
FALCON PREDATOR XL3 FALCON Räuber XL3
Vehicle Security System with Anti-Hijack Vehicle Security System mit Anti-Hijack
Installer's Manual Installer's Manual
TABLE OF CONTENTS Inhaltsverzeichnis
1. 1. SYSTEM INSTALLATION ............................................... System-Installation ............................................... 2 2
1.1. 1,1. Power On ........................................................... Power am ................................................ ........... 2 2
1.2. 1,2. NO & NC Immobiliser Relay Wiring ......................... NO & NC-Wegfahrsperre Relay Verdrahtung ......................... 2 2
1.3. 1,3. Programming New Remote Controls ....................... Programmierung neuer Fernbedienungen ....................... 2 2
1.4. 1,4. Bypass Input (red/black wire: w3-7) ...................... Bypass-Eingang (rot / schwarzen Draht: W3-7) ...................... 2 2
1.5. 1,5. Start Output (pink wire: w3-9) .............................. Start-Ausgang (rosa Draht: W3-9) .............................. 2 2
1.6. 1,6. Interior Light Supervision (green/white wire: w3-6).. Interior Light Supervision (grün / weiß Draht: W3-6) .. 3 3
1.7. 1,7. Program the Optional Features (default=1 chirp)...... Programm der optionalen Funktionen (Standard = 1 zwitschern )...... 3 3
1.8. 1,8. Optional Programmable Features ........................... Optional programmierbare Funktionen ........................... 3 3
1.9. 1,9. Feature #20 Override Code (default=1 flash) .......... Dossier # 20 Override-Code (Standard = 1 flash) .......... 4 4
1.10. 1,10. Explanation of the Optional Features..................... Erläuterungen zu den optionalen Funktionen ..................... 4 4
2. 2. SYSTEM UPGRADE...................................................... System-Upgrade ................................................ ...... 8 8
3. 3. Wiring Diagram .......................................................... Anschlussbild ................................................ .......... 9 9
4. 4. Wiring Notes............................................................ Bordnetz-Notes ................................................ ............ 10 10
5. 5. Central Locking Wiring .............................................. Zentralverriegelung Verdrahtung .............................................. 11 11
- --
1. 1. SYSTEM INSTALLATION System-Installation
1.1. 1,1. Power On Power On
When powered on, the system will remain in the same status it was in when powered off. Wenn eingeschaltet, wird das System nach wie vor in den gleichen Status war es dann ein, wenn die Stromversorgung ausgeschaltet.
1.2. 1,2. NO & NC Immobiliser Relay Wiring NO & NC-Wegfahrsperre Relay Verdrahtung
The system offers two ways of wiring the immobiliser as shown below. Das System bietet zwei Möglichkeiten der Verdrahtung der Wegfahrsperre, wie unten gezeigt.
When wired for Normally Open the immobiliser relay is switched on when the alarm is disarmed Wenn Wired for Normalerweise Öffnen Sie die Wegfahrsperre Relais schaltet ein, wenn der Alarm wird entwaffnet
(fail secure). (nicht gesichert). When wired as Normally Closed the relay is on when the alarm is armed (fail safe). Bei der drahtgebundenen als normal geschlossen wird das Relais ein, wenn der Alarm wird bewaffneten (nicht sicher).
Wiring Diagram - Immobiliser Relay NO & NC Anschlussbild - Wegfahrsperre Relais & NO NC
Normally Closed Immobiliser Connection (Fail Safe) Normalerweise geschlossen Wegfahrsperre Verbindung (Fail Safe)
87a - Normally Closed 87a - Öffner
87 - Normally Open 87 - Schließer
Off Aus
Acc Acc
On Auf
Start Start
86 86
85 85
87 87
87a 87a
30 30
To +12V DC or Acc. Bis +12 V DC oder ACC.
W2-8 W2-8
fig. fig. 2 2
Normally Open Immobiliser Connection (Fail Secure) Normalerweise öffnen Wegfahrsperre Verbindung (nicht verschlüsselt)
87a - Normally Closed 87a - Öffner
87 - Normally Open 87 - Schließer
Off Aus
Acc Acc
On Auf
Start Start
86 86
85 85
87 87
87a 87a
30 30
To Acc. Zum Akkumulator.
W2-7 W2-7
fig. fig. 1 1
1.3. 1,3. Programming New Remote Controls Programmierung neuer Fernbedienungen
The included remote controls have been programmed to the system in the factory. Die mitgelieferte Fernbedienung steuert wurden so programmiert, dass das System in der Fabrik. Follow the Folgen Sie den
procedure below to program a new remote control to the system: unten beschriebenen Verfahren zu programmieren eine neue Fernbedienung für das System:
- Turn the ignition on with the system disarmed. -- Schalten Sie die Zündung an mit dem System entwaffnet.
- Within 10 seconds, press valet switch 3 times. -- Innerhalb von 10 Sekunden drücken Valet-Schalter 3 mal abgerufen. (or 6 times if pager upgrade is installed). (oder 6-mal, wenn Pager-Upgrade installiert ist).
- The siren sounds for 2 sec. -- Die Sirene ertönt 2 sek. to confirm the system is now in code learning mode. zu bestätigen, das System ist nun im Code-Modus Lernen.
- Within 10 sec., press any button of 1 -- Innerhalb von 10 sek., Drücken Sie eine beliebige Taste 1
st St
remote control Fernbedienung
The siren will sound for 1 sec. Die Sirene ertönt für 1 sek. and hazard lights flash twice to confirm the 1 Gefahren und Lichter blinken zweimal bestätigen die 1
st St
remote has Fernbedienung hat
been programmed to the system and all the previous codes in the system will be erased wurden so programmiert, dass das System und alle früheren Codes in das System wird gelöscht
entirely. voll und ganz.
- Within 10 sec., repeat for the 2 -- Innerhalb von 10 sek., Wiederholen Sie für die 2
nd ND
remote control and again for 3 Fernbedienung und nochmals für 3
rd Rd.
and 4 und 4
th th
remotes as Fernbedienungen als
applicable. anwendbar.
* Up to 4 remotes can be programmed to the system * Bis zu 4 Fernbedienungen können so programmiert werden, dass das System
* The system will leave the code learning mode after programming 4 remotes to the system * Das System wird aus dem Code-Modus Lernen nach Programmierung 4 Fernbedienungen auf das System
and the siren will sound for 2 seconds und die Sirene ertönt für 2 Sekunden
to confirm. bestätigen.
* If no buttons are pressed within 10 seconds, the system will leave the learning code mode * Wenn keine Tasten gedrückt werden innerhalb von 10 Sekunden, das System wird aus dem Lernen-Code-Modus
and the siren will sound for 2 seconds to confirm. und die Sirene ertönt für 2 Sekunden, um zu bestätigen.
* The system will leave the code learning mode if the ignition is turned off at any time and the * Das System wird aus dem Code Lernen-Modus, wenn die Zündung ausgeschaltet ist, jederzeit und der
siren will sound for 2 seconds to confirm. Sirene ertönt für 2 Sekunden, um zu bestätigen.
1.4. 1,4. Bypass Input (red/black wire: w3-7) Bypass-Eingang (rot / schwarzen Draht: W3-7)
This wire is designed for external engine start module or turbo timer. Dieser Draht ist für externe Motorstart-Modul oder Turbo-Timer. Feed this wire with Feed dieser Draht mit
ground when the external engine start module or turbo timer is activated and the system will Boden befinden, wenn das externe Modul Anlassen des Motors oder Turbo-Timer aktiviert ist und das System wird
bypass the ignition, shock sensor and immobiliser relay until the ground pulse is removed. Umfahrung der Zündung, Schock-Sensor und Relais-Wegfahrsperre, bis der Boden Puls wird entfernt.
1.5. 1,5. Start Output (pink wire: w3-9) Start-Ausgang (rosa Draht: W3-9)
Press and hold button #4, 3 sec. Drücken und halten Sie Taste # 4, 3 sek. later the system will send a 1 sec. später sendet das System eine 1 sek. pulse to activate the Impuls zur Aktivierung der
external engine start module. externe Motorstart-Modul. Pressing button #4 for 3 sec. Drücken der Taste # 4 für 3 sek. will send the pulse again to sendet der Puls wieder auf
deactivate the external engine start module. Deaktivieren des externen Motorstart-Modul.
- --
1.6. 1,6. Interior Light Supervision (green/white wire: w3-6) Interior Light Supervision (grün / weiß Draht: W3-6)
If connected: Wenn verbunden:
- --
The interior light will be turned on for 20 sec. Das Innere Licht wird eingeschaltet für 20 sek. when disarming unless the ignition is turned Entwaffnung, es sei denn, wenn die Zündung eingeschaltet ist
on. auf.
- --
The interior light will be turned on all the time whilst the alarm is sounding. Das Innere Licht wird eingeschaltet die ganze Zeit, während der Alarm wird klingenden.
1.7. 1,7. Program the Optional Features (default=1 chirp) Programm der optionalen Funktionen (Standard = 1 zwitschern)
Follow the steps below to program the Optional Features: Folgen Sie den unten stehenden Schritte, um das Programm optionalen Funktionen:
For example: To program the feature #5 as 15sec. Zum Beispiel: Um die Funktion Programm # 5 als 15sec.
- Turn the ignition on then off with the system disarmed. -- Schalten Sie die Zündung ausgeschaltet dann auf mit dem System entwaffnet.
- Within 10 sec., press the valet switch 3 times. -- Innerhalb von 10 sek., Drücken Sie die Valet-Schalter 3 mal abgerufen.
- The system enters the programming mode and the siren and LED will be on for 2 sec. -- Das System wechselt in den Programmier-Modus und die Sirene und LED leuchtet auf, für 2 sek. to zu
confirm. bestätigen.
* To Reset to Factory Default: * Zum Zurücksetzen auf die Werkseinstellungen zurück:
Within 10 seconds press button #4 for 3 sec., all the optional features will be reset to the Innerhalb von 10 Sekunden drücken Sie die Taste # 4 für 3 sek., Alle optionalen Funktionen werden auf der
factory default and the siren will sound for 2 sec. Werkseinstellung und die Sirene ertönt für 2 sek. to confirm leaving the programming bestätigen Verlassen der Programmierung
mode. Modus.
- Within 10 sec., press the valet switch 5 times. -- Innerhalb von 10 sek., Drücken Sie die Valet-Schalter 5 mal abgerufen.
- 1 sec. -- 1 SEC. later the siren will chirp 5 times to confirm. später wird die Sirene zwitschern 5 mal bestätigen.
- Press button #1 of the remote control 6 times to select 15 sec. -- Drücken Sie die Taste # 1 der Fernbedienung 6-mal, um 15 sek. and the siren will chirp 6 und die Sirene wird zwitschern 6
times to confirm the setting. mal um die Einstellung zu bestätigen.
- Press the valet switch again (from 1 to 21) within 10 sec. -- Drücken Sie den Schalter wieder Valet (von 1 bis 21) innerhalb von 10 Sekunden. to select the next feature for Zum Auswählen der nächsten Funktion zu
programming. Programmierung.
* The system will leave the programming mode and the siren will sound for 2 sec. * Das System wird aus dem Programmiermodus und die Sirene ertönt für 2 sek. to confirm bestätigen
if the ignition is turned off at any time during programming or if the valet switch or remote wenn die Zündung ausgeschaltet ist jederzeit während der Programmierung oder wenn der Valet-Schalter oder Fernbedienung
control button #1 has not been pressed within 10 sec. Taste # 1 wurde nicht gedrückt innerhalb von 10 Sekunden.
1.8. 1,8. Optional Programmable Features Optional programmierbare Funktionen
No Chirp Nr. Chirp
Function Funktion
1 Chirp 1 Chirp
2 Chirp 2 Chirp
3 Chirp 3 Chirp
4 Chirp 4 Chirp
1 1 chirp 1 1 zwitschern
Chirp Confirmation Chirp Bestätigung
On Off ON / OFF
2 2 chirp 2 2 zwitschern
Door Lock with Passive Arming Türverriegelung mit passiven Bewaffnung
Disable Enable Deaktivieren Sie Enable
3 3 chirp 3 3 Chirp
Ignition Lock Zündschloss
Disable Ignition Brake Deaktivieren Zündung Bremse
4 4 chirp 4 4 zwitschern
Ignition Unlock Ignition Entsperren
Disable Deaktivieren
Driver Treiber
All Alle
5 5 chirp 5 5 zwitschern
Door Lock Time(sec.) Türschloss Time (sec.)
1) 0.8 1) 0,8
2) 3.6 2) 3,6
3) 0.8*2 4) 0.8+15 3) 0,8 * 2 4) 0,8 +15
5) 5)
0.8+40 0,8 +40
6) 15 6) 15
7) 40 7) 40
6 6 chirp 6 6 zwitschern
Door Unlock Time(sec.) Door Unlock Time (sec.)
0.8 3.6 0.8*2 0,8 3,6 0,8 * 2
7 7 chirp 7 7 zwitschern
Door Unlock with Disarming Door Unlock mit Entwaffnung
Driver All Alle Treiber
8 8 chirp 8 8 zwitschern
Siren/Horn Output Siren / Horn-Ausgang
Siren Horn Siren Horn
9 9 chirp 9 9 zwitschern
Alarm Condition Cycle Duration Alarm-Zustand Periodendauer
30 30
sec. SEC. 60 60
sec. SEC.
10 10 chirp 10 10 zwitschern
Interior Light Delay Interior Light Verzögerung
Disable Deaktivieren
25 sec. 25 sek.
40 sec. 40 sek.
60 sec. 60 sek.
11 11 chirp 11 11 zwitschern
Auto. Auto. Rearming Aufrüstung
Disable Enable Deaktivieren Sie Enable
12 12 chirp 12 12 zwitschern
Auto. Auto. Engine Disable(AED) Engine deaktivieren (AED)
Disable Enable Deaktivieren Sie Enable
13 13 chirp 13 13 zwitschern
Door Open Alerts Tür offen Schlagzeilen
Disable Mode Disable Modus
1 Mode 1-Modus
2 2
14 14 chirp 14 14 zwitschern
Total/Comfort Closure Insgesamt / Komfort Schließung
Disable Deaktivieren
15 sec. 15 sek.
30 sec. 30 sek.
40 sec. 40 sek.
15 15 chirp 15 15 zwitschern
Disarm with Boot Release Entwaffnen mit Boot-Release
Disable Enable Deaktivieren Sie Enable
16 16 chirp 16 16 zwitschern
Anti-hijacking Countdown Anti-Entführung Countdown
30sec. 30Sec. 60sec. 60Sec.
17 17 chirp 17 17 zwitschern
Activate Anti-hijacking Countdown Aktivieren Sie Anti-Entführung Countdown
Normal Normal
Brake Brake
18 18 chirp 18 18 zwitschern
Anti-hijacking by Remotes Anti-Entführung von Fernbedienungen
Disable Enable Deaktivieren Sie Enable
19 19 chirp 19 19 zwitschern
Anti-hijacking by Ignition+Door Anti-Entführung durch die Zündung + Door
Disable Enable Deaktivieren Sie Enable
20 20 chirp 20 20 zwitschern
Override Code Override-Code
Flash 1 Flash 1
Flash 2~10 Flash 2 ~ 10
21 21 chirp 21 21 zwitschern
Hazard lights Output Hazard Lichter Ausgang
Normal Pulse Normale Pulse
Continuous Kontinuierliche
Factory Default = 1 Chirp Factory Default = 1 Chirp

- --
1.9. 1,9. Feature #20 Override Code (default=1 flash) Dossier # 20 Override-Code (Standard = 1 flash)
Follow the steps below to program: Folgen Sie den unten stehenden Schritte, um Programm:
- Turn the ignition on then off with the system disarmed. -- Schalten Sie die Zündung ausgeschaltet dann auf mit dem System entwaffnet.
- Within 10 sec., press the valet switch 3 times. -- Innerhalb von 10 sek., Drücken Sie die Valet-Schalter 3 mal abgerufen.
- The system enters the programming mode and the siren and LED will be on for 2 sec. -- Das System wechselt in den Programmier-Modus und die Sirene und LED leuchtet auf, für 2 sek. to zu
confirm. bestätigen.
- Within 10 seconds press the valet switch 20 times to select feature #20 -- Innerhalb von 10 Sekunden drücken Sie die Valet-Schalter 20-mal zu wählen Feature # 20
- 1 sec. -- 1 SEC. later the siren will chirp 20 times to confirm the selection. später wird die Sirene zwitschern 20 mal um die Auswahl zu bestätigen.
- The LED will start to flash 10 times slowly 2 sec. -- Die LED blinkt 10 mal langsam 2 sek. later. später.
- Press button #1 of remotes after the LED has flashed the number of times you want to set -- Drücken Sie die Taste # 1 von Fernbedienungen, nachdem die LED geblitzte hat die Zahl der Zeit wollen Sie
the code to; Eg. den Code an, zB. If you want to choose 6 as the code then press button #1 once after the Wenn Sie möchten, wählen Sie 6 als den Code dann drücken Sie die Taste # 1 einmal nach der
LED has flashed 6 times. LED hat geblitzte 6 mal abgerufen. The LED will turn off and siren sound for 1 sec. Die LED wird ausgeschaltet und Sirene-Sound für 1 sek. to confirm. bestätigen.
- Press the valet switch within 10 sec., to select the next feature for programming. -- Drücken Sie die Valet-Schalter innerhalb von 10 sek., Wählen Sie auf der nächsten Funktion für die Programmierung.
1.10. 1,10. Explanation of the Optional Features Erläuterungen zu den optionalen Funktionen
01. 01. Chirp Confirmation On/Off(default=on) Chirp Bestätigung On / Off (default = on)
When On: Wenn am:
The siren will chirp once for system arming and twice for disarming. Die Sirene wird einmal zwitschern System für Bewaffnung und zweimal für Entwaffnung. With this feature on, the Mit dieser Funktion zu aktivieren, die
silent arm/disarm button is still functional. silent arm / abrüsten-Taste ist immer noch funktionsfähig.
When Off: Wenn Aus:
The siren will not chirp for system arming and disarming but the hazard lights will flash as Die Sirene wird nicht Chirp-System für Bewaffnung und Entwaffnung, sondern die Gefahr Lichter blinken, wie
normal. normal.
02. 02. Door Lock with Passive Arming(default=disable) Türschloss mit passiven Arming (Standard = deaktiviert)
When Enabled: Wenn diese Funktion aktiviert ist:
The doors will also be locked when the system passively arms itself. Die Türen werden auch dann gesperrt, wenn das System selbst passiv Arme.
03. 03. Ignition Lock (default=disabled) Zündschloss (Standard = deaktiviert)
When set as Ignition: Bei der Einstellung wie Zündung:
- The doors will be locked 15 sec. -- Die Türen werden gesperrt 15 sek. after turning the ignition on if all the doors are closed nach dem Einschalten der Zündung auf, wenn alle Türen geschlossen sind
properly. richtig.
- The doors will not be locked if a door is not closed or has been opened during the 15 sec. -- Die Türen werden nicht gesperrt, wenn eine Tür nicht geschlossen oder geöffnet wurde während der 15 sek.
countdown. Countdown.
- If the doors are unlocked during driving they will be locked again automatically after -- Wenn die Türen entriegelt werden während der Fahrt werden sie automatisch wieder gesperrt, nachdem
stepping on the brake pedal. Verstärkung auf dem Bremspedal. (Brake light wire must be connected). (Bremslicht Draht muss angeschlossen sein).
When set as Brake: (Brake light wire must be connected) Bei der Einstellung als Bremse: (Bremslicht Draht muss angeschlossen sein)
- The doors will be locked when the brake is tapped with the ignition on if all the doors are -- Die Türen werden gesperrt, wenn die Bremse ist erschlossen mit der Zündung an, wenn alle Türen sind
closed properly. ordnungsgemäß geschlossen.
- If the doors are unlocked during driving they will be locked again automatically after -- Wenn die Türen entriegelt werden während der Fahrt werden sie automatisch wieder gesperrt, nachdem
stepping on the brake pedal. Verstärkung auf dem Bremspedal.
04. 04. Ignition Unlock(default=disable) Ignition Unlock (Standard = deaktiviert)
When set as Driver: Bei der Einstellung als Treiber:
After parking the car the drivers door will be unlocked when turning the ignition off. Nach dem Parkplatz das Auto die Fahrer Tür entriegelt wird beim Einschalten der Zündung ausgeschaltet.
When set as All: Bei der Einstellung als Alle:
After parking the car all the doors will be unlocked after turning the ignition off. Nach dem Parkplatz das Auto alle Türen entriegelt werden nach dem Einschalten der Zündung ausgeschaltet.
05. 05. Door Lock Time (default=0.8) Türschloss Time (default = 0,8)
When set as 0.8 sec.: Bei der Einstellung als 0,8 sek.:
The system will send a 0.8 sec. Das System sendet ein 0,8 sek. pulse when locking the doors. Puls, wenn Verriegelung der Türen.
When set as 3.6 sec.: Bei der Einstellung als 3,6 sek.:
The system will send a 3.6 sec. Das System sendet ein 3,6 sek. pulse when locking the doors. Puls, wenn Verriegelung der Türen.
When set as 0.8 sec.*2: Bei der Einstellung als 0,8 sec .* 2:
The system will send two 0.8 sec. Das System wird zwei 0,8 sek. pulses when locking the doors. Impulse bei der Verriegelung der Türen.
When set as 0.8 sec. Bei der Einstellung als 0,8 sek. + 15 sec.: + 15 sek.:
The system will send a 0.8 sec. Das System sendet ein 0,8 sek. pulse and then send a 15 sec. Puls und dann senden Sie bitte eine 15 sek. pulse when locking the doors. Puls, wenn Verriegelung der Türen.

- --
*When selecting 0.8 sec. * Bei der Auswahl 0,8 sek. + 15 sec. + 15 sek. for cars with total closure the windows will be closed für Fahrzeuge mit insgesamt Schließung der Fenster wird geschlossen
automatically during remote arming without enabling feature #14. automatisch während Remote-Bewaffnung ohne Funktion ermöglicht # 14.
When set as 0.8 sec. Bei der Einstellung als 0,8 sek. + 40 sec.: + 40 sek.:
The system will send a 0.8 sec. Das System sendet ein 0,8 sek. pulse and then send a 40 sec. Puls und dann senden Sie bitte eine 40 sek. pulse when locking the doors. Puls, wenn Verriegelung der Türen.
*When selecting 0.8 sec. * Bei der Auswahl 0,8 sek. + 40 sec. + 40 sek. for cars with total closure the windows will be closed für Fahrzeuge mit insgesamt Schließung der Fenster wird geschlossen
automatically during remote arming without enabling feature #14. automatisch während Remote-Bewaffnung ohne Funktion ermöglicht # 14.
When set as 15 sec.: Bei der Einstellung als 15 sek.:
The system will send a 15 sec. Das System sendet ein 15 sek. pulse when locking the doors. Puls, wenn Verriegelung der Türen.
*When selecting 15 sec. * Bei der Auswahl der 15 sek. for cars with total closure the windows will be closed automatically für Fahrzeuge mit insgesamt Schließung der Fenster wird automatisch geschlossen
during remote arming without enabling feature #14. während der Remote-Bewaffnung ohne Funktion ermöglicht # 14.
When set as 40 sec.: Bei der Einstellung als 40 sek.:
The system will send a 40 sec. Das System sendet ein 40 sek. pulse when locking the doors. Puls, wenn Verriegelung der Türen.
*When selecting 40 sec. * Bei der Auswahl der 40 sek. for cars with total closure the windows will be closed automatically für Fahrzeuge mit insgesamt Schließung der Fenster wird automatisch geschlossen
during remote arming without enabling feature #14. während der Remote-Bewaffnung ohne Funktion ermöglicht # 14.
06. 06. Door Unlock Time (default=0.8 sec.) Door Unlock Time "(Standard = 0,8 sek.)
When set as 0.8 sec.: Bei der Einstellung als 0,8 sek.:
The system will send a 0.8 sec. Das System sendet ein 0,8 sek. pulse when unlocking the doors. Impuls zum Entriegeln der Türen.
When set as 3.6 sec.: Bei der Einstellung als 3,6 sek.:
The system will send a 3.6 sec. Das System sendet ein 3,6 sek. when unlocking the doors. wenn das Entriegeln der Türen.
When set as 0.8 sec.*2: Bei der Einstellung als 0,8 sec .* 2:
The system will send two 0.8 sec. Das System wird zwei 0,8 sek. pulses when unlocking the doors. Impulse, wenn das Entriegeln der Türen.
07. 07. Door Unlock with Disarming (default=driver) Door Unlock mit Entwaffnung (Standard = Treiber)
When set as Driver: Bei der Einstellung als Treiber:
Only the drivers door will be unlocked when pressing button #2 to disarm the system. Nur der Fahrer Tür wird entriegelt Durch Drücken der Taste # 2 entwaffnen das System.
Pressing button #2 again within 3 seconds will unlock the rest of the doors. Drücken der Taste # 2 erneut innerhalb von 3 Sekunden entsperren den Rest der Türen.
When set as All: Bei der Einstellung als Alle:
All the doors will be unlocked when pressing button #2 to disarm the system. Alle Türen werden entriegelt Durch Drücken der Taste # 2 entwaffnen das System.
08. 08. Siren/Horn Output (default=siren) Siren / Horn-Ausgang (Standard = Sirene)
When set as Siren: Bei der Einstellung als Sirene:
Select the Siren option when connecting an external siren. Wählen Sie die Option Siren, wenn Sie eine externe Sirene.
When set as Horn: Bei der Einstellung als Horn:
Select the Horn option when connecting the output to the cars horn. Wählen Sie die Option Horn beim Herstellen einer Verbindung mit der Ausgabe an den Autos Horn. Note a relay must be used. Hinweis: Ein Relais zu verwenden.
09. 09. Alarm Condition Cycle Duration (default=30 sec.) Alarm-Zustand Periodendauer (Standard = 30 sek.)
When set as 30 sec. Bei der Einstellung als 30 sek. or 60 sec.: oder 60 sek.:
The siren will sound for 30 sec. Die Sirene ertönt für 30 sek. (or 60 sec) when the system is triggered and released. (oder 60 sec), wenn das System ausgelöst und freigegeben. The Der
siren will sound for 30 sec. Sirene ertönt für 30 sek. (or 60sec) x 3 cycles if the system is triggered continuously. (oder 60Sec) x 3 Zyklen, wenn das System kontinuierlich ausgelöst.
10. 10. Interior Light Delay (default=disable=5 sec.) Interior Light Delay (default = disable = 5 sek.)
When set as Disable (=5 sec.): Bei der Einstellung wie deaktivieren (= 5 sek.):
The siren chirps 3 times and the hazard lights flash 3 times immediately if any of the doors, boot Die Sirene chirps 3-mal und die Gefahr Lichter blinken 3 mal sofort, wenn eine der Türen, Kofferraum
or bonnet are not closed properly when remote arming the system. oder Motorhaube nicht ordnungsgemäß geschlossen, wenn Remote-Aufrüstung des Systems. The relevant input will be Die entsprechenden Eingaben werden
bypassed until the door/boot/bonnet is closed. umgangen werden, bis die Tür / boot / Haube geschlossen ist.
When set as 25-40-60 sec.: Bei der Einstellung als 25-40-60 sek.:
The siren chirps 3 times and hazard lights flash 3 times immediately when remote arming the Die Sirene chirps 3 mal und Gefahr Lichter blinken 3 mal sofort, wenn die Remote-Aufrüstung
system if the boot or bonnet are not closed properly. System, wenn der Boot-oder Motorhaube nicht ordnungsgemäß geschlossen. The boot & bonnet will be bypassed until Die Boot & Motorhaube wird umgangen, bis
both are closed properly. beide ordnungsgemäß geschlossen sind.
The siren chirps 3 times and hazard lights flash 3 times in 25sec.(or 40, 60sec.) after remote Die Sirene chirps 3 mal und Gefahr Lichter blinken 3 mal in 25sec. (Oder 40, 60Sec.) Nach Fernbedienung
arming the system if the doors are not all closed properly. Aufrüstung des Systems, wenn die Türen sind nicht alle ordnungsgemäß geschlossen. The doors will be bypassed until they Die Türen werden umgangen, bis sie
are all closed properly. sind alle ordnungsgemäß geschlossen.

- --
11. 11. Auto. Auto. Rearming (default=disable) Aufrüstung (Standard = deaktiviert)
When set as Enable: The system will arm itself again automatically 30 seconds after disarming Bei der Einstellung als Enable: Das System wird Arm selbst wieder automatisch 30 Sekunden nach Entwaffnung
the system if no doors are opened. das System, wenn keine Türen werden geöffnet. Opening a door after disarming the system will deactivate Das Öffnen einer Tür nach der Entwaffnung der System deaktivieren
the auto rearming feature. die Funktion Auto-Aufrüstung.
12. 12. AED, Auto Engine Disable (default=disable) AED, Auto Motor deaktivieren (Standard = deaktiviert)
When as Enable: After parking the car, turning the ignition off and opening and then closing Wann, wie Aktivieren: Nach dem Parkplatz der Auto-, Dreh-die Zündung ausgeschaltet und dann zur Eröffnung und Schliessung
the door the engine disable relay will activate within 10 seconds but the system will still be die Tür der Motor deaktivieren Relais wird aktiviert innerhalb von 10 Sekunden, aber das System bleibt
disarmed. entwaffnet.
- The 10 sec. -- Die 10 sek. countdown will be interrupted immediately when opening a door, the countdown Countdown wird sofort unterbrochen, wenn die Öffnung einer Tür, der Countdown
will restart when the door is closed. wird neu gestartet, wenn die Tür geschlossen ist.
- Pressing the remote to arm the system during the 10 sec. -- Durch Drücken der Fernbedienung auf die Arm-System während der 10 sek. countdown will activate the AED Countdown aktivieren, wird die AED
immediately. sofort.
- To deactivate the AED: -- Zur Deaktivierung der AED:
a) With the system disarmed, remote arming the system then disarming will deactivate the a) Mit dem System entwaffnet, Fernbedienung Aufrüstung des Systems wird dann Entwaffnung deaktivieren
AED at the same time. AED zur gleichen Zeit.
b) With the system armed, remote disarming the system will deactivate the AED at the same b) Mit dem System bewaffneten, Fernbedienung Entwaffnung wird das System deaktivieren Sie die AED in der gleichen
time. Zeit.
c) By override (when the system is disarmed). c) durch überschreiben (wenn das System entwaffnet).
* The AED will not active under valet mode. * Der AED wird nicht aktiv unter Valet-Modus. To disable the AED you must leave the valet Zum Deaktivieren der AED müssen Sie verlassen die Kammerdiener
mode. Modus.
* When the AED is activated, the system cannot enter the following modes: * Wenn der AED aktiviert ist, kann das System nicht in den folgenden Modi:
a) Code Learning a) Lernen des Codes
b) Programming Mode b) Programming Mode
c) Hazard lights Calibration Mode c) Hazard Lichter ABGLEICHMODUS
d) Anti-hijacking d) Anti-Entführung
13. 13. Door Open Alerts (default=disable) Tür offen Alerts (Standard = deaktiviert)
When set as Mode 1: Bei der Einstellung als Modus 1:
- The hazard lights will flash when a door is opened with the ignition on until the door is closed -- Die Gefahr Lichter blinken, wenn eine Tür geöffnet wird mit der Zündung, bis die Tür geschlossen ist
or the ignition is turned off. oder die Zündung ausgeschaltet ist.
* The feature will not be activated if the door is opened whilst the ignition is on. * Die Funktion wird nicht aktiviert werden, wenn die Tür geöffnet wird, während die Zündung eingeschaltet ist.
When set as Mode 2: Bei der Einstellung als Modus 2:
- The hazard lights will flash when a door is opened regardless of whether the ignition is on -- Die Gefahr Lichter blinken, wenn eine Tür geöffnet wird, unabhängig davon, ob die Zündung eingeschaltet ist
of off and until the door is closed. der aus-und bis die Tür geschlossen ist.
* The feature will be activated regardless of whether the ignition is turned on or off. * Die Funktion wird aktiviert, unabhängig davon, ob die Zündung eingeschaltet oder ausgeschaltet ist.
14. 14. Total/Comfort Closure (default=disable) Insgesamt / Komfort Schluss (Standard = deaktiviert)
The CH3 wire is designed for the option of automatically closing the windows when arming Die CH3 Draht ist für die Möglichkeit, automatisch Schließen der Fenster, wenn Aufrüstung
the system. das System. This feature requires that the vehicle has Total/Comfort Closure. Dieses Feature setzt voraus, dass das Fahrzeug hat Insgesamt / Komfort Schluss.
When set as Disable: Bei der Einstellung als Deaktivieren:
The CH3 output will not be activated when arming the system but can be controlled as Die CH3-Ausgabe wird nicht aktiviert, wenn Aufrüstung des Systems kann aber genauso kontrolliert werden
follows: folgt:
- With system armed or disarmed. -- Mit System bewaffneten oder entwaffnet.
- Press and hold button #1+3. -- Drücken und halten Sie Taste # 1 +3.
- After 1 sec. -- Nach 1 sek. the CH3 output will be activated until button #1 is released. die CH3-Ausgang wird aktiviert, bis Taste # 1 freigesetzt wird.
When set as 15, 30 or 40 sec.: Bei der Einstellung als 15, 30 oder 40 sek.:
When arming the system the CH3 will send a 15 sec.(or 30, 40) pulse to close the windows Bei der Aufrüstung des Systems der CH3 sendet ein 15 sek. (Oder 30, 40) Impuls zum Schließen der Fenster
automatically. automatisch. Pressing the remote to disarm the system during the 15 sec.(or 30, 40) will Durch Drücken der Fernbedienung zu entwaffnen das System während der 15 sek. (Oder 30, 40)
deactivate the CH3 output immediately. Deaktivieren des CH3-Ausgang sofort.
15. 15. Disarm with Boot Release (default=disable) Entwaffnen mit Boot-Release (Standard = deaktiviert)
When set as Disable: Bei der Einstellung als Deaktivieren:
When operating the remote boot release the system will remain armed but the shock sensor Beim Betrieb der Remote-Boot-Release wird das System nach wie vor bewaffnet, aber der Schock-Sensor
will be bypassed. wird umgangen. The boot will be protected and shock sensor reactivated 3 sec. Das Boot wird geschützt und Schock-Sensor reaktiviert 3 sek. after nach
closing the boot. Schließung der Schuh.
When set as Enable: Bei der Einstellung als Enable:
The system will be disarmed when operating the boot release, the siren will chirp twice and Das System wird entwaffnet, wenn der Boot-Release, wird die Sirene zwitschern und zweimal
hazard lights flash twice to confirm. Gefahr Lichter blinken zweimal bestätigen.
* The countdown of Auto. * Der Countdown von Auto. Rearming or Passive Arming will be interrupted when operating the Aufrüstung oder Passive Arming wird unterbrochen, wenn der Betrieb der

- --
boot release. Boot-Version.
* The remote boot release will still work with the ignition on. * Der Remote-Boot-Release wird immer noch mit der Zündung an.
16. 16. Anti-hijacking Countdown (default=30sec.) Anti-Entführung Countdown (Standard = 30Sec.)
When set as 30 or 60 sec.: Bei der Einstellung als 30 oder 60 sek.:
The system will enter the Anti-hijacking mode after 30 or 60 sec. Das System wird in die Anti-Hijacking-Modus nach 30 oder 60 sek. depending on the selection. abhängig von der Auswahl.
The siren will chirp 10 times before entering into the anti-hijacking mode as a last warning. Die Sirene wird zwitschern 10 mal vor dem Einlaufen in die Anti-Hijacking-Modus als letzte Warnung.
17. 17. Activate Anti-hijacking Countdown (default=normal) Aktivieren Sie Anti-Entführung Countdown (Standard = normal)
When set as Normal: Bei der Einstellung als Normal:
The countdown will start immediately when activating the anti-hijacking feature. Der Countdown beginnt sofort bei der Aktivierung der Anti-Hijacking-Funktion.
When set as Brake: Bei der Einstellung als Bremse:
The system will enter the Anti-hijacking mode after the footbrake is tapped. Das System wird in die Anti-Modus nach der Entführung der footbrake ist erschlossen.
* After the system starts the countdown, press the valet switch before the last 10 chirps * Nachdem das System startet den Countdown, drücken Sie die Valet-Schalter vor der letzten 10 chirps
warning to stop the countdown and deactivate the anti-hijacking. Warnung an den Countdown stoppen und deaktivieren Sie die Anti-Entführung.
18. 18. Anti-hijacking by Remotes (default=disable) Anti-Entführung von Fernbedienungen (Standard = deaktiviert)
When set as Enable: Bei der Einstellung als Enable:
The Anti-hijacking will be activated as follows: Der Anti-Entführung wird wie folgt aktiviert:
- With the system disarmed and the ignition on. -- Mit dem System entwaffnet und die Zündung an.
- Press button #1 for 2 sec. -- Drücken Sie die Taste # 1 zu 2 sek. to activate the anti-hijacking and the hazard lights flash once to zur Aktivierung der Anti-Hijacking und die Gefahr Lichter blinken auf einmal
confirm. bestätigen.
- The anti-hijacking countdown will start depending on the selection of feature #17. -- Die Anti-Entführung Countdown beginnt in Abhängigkeit von der Auswahl der Funktion # 17. The LED Die LED
will flash every 2 secs. blinkt alle 2 Sekunden. once the countdown starts. sobald der Countdown beginnt.
- After 30 or 60 sec. -- Nach 30 oder 60 sek. depending on the selection of feature #16, the system enters the abhängig von der Auswahl der Funktion # 16, das System wechselt in den
Anti-hijacking mode. Anti-Hijacking-Modus. 10 sec. 10 sek. before the countdown ends, the siren and hazard lights will vor dem Countdown endet, die Sirene und Gefahr Lichter werden
activate as a warning. aktivieren als Warnung.
- When the system is in anti-hijacking mode, the siren will sound and hazard lights flash until -- Wenn das System im Anti-Hijacking-Modus, die Sirene ertönt und Gefahr Lichter blinken, bis
the system is overridden using the emergency override procedure. das System ist überschrieben mit der Notfall-Verfahren.
19. 19. Anti-hijacking by Ignition+Door (default=disable) Anti-Entführung durch die Zündung + Door (Standard = deaktiviert)
When set as Enable: Bei der Einstellung als Enable:
The Anti-hijacking will be activated as follows: Der Anti-Entführung wird wie folgt aktiviert:
- With the system disarmed and the ignition on. -- Mit dem System entwaffnet und die Zündung an.
- Opening and closing a door will activate the anti-hijacking and the hazard lights will flash -- Öffnen und Schließen einer Tür, wird die Anti-Hijacking und die Gefahr Lichter blinken
once to confirm. einmal zu bestätigen.
- The anti-hijacking countdown will start depending on the selection of feature #17. -- Die Anti-Entführung Countdown beginnt in Abhängigkeit von der Auswahl der Funktion # 17. The LED Die LED
will flash every 2 secs. blinkt alle 2 Sekunden. once the countdown starts. sobald der Countdown beginnt.
- After 30 or 60 sec. -- Nach 30 oder 60 sek. depending on the selection of feature #16, the system enters the abhängig von der Auswahl der Funktion # 16, das System wechselt in den
Anti-hijacking mode. Anti-Hijacking-Modus. 10 sec. 10 sek. before the countdown ends, the siren and hazard lights will vor dem Countdown endet, die Sirene und Gefahr Lichter werden
activate as a warning. aktivieren als Warnung.
- When the system is in anti-hijacking mode, the siren will sound and hazard lights flash until -- Wenn das System im Anti-Hijacking-Modus, die Sirene ertönt und Gefahr Lichter blinken, bis
the system is overridden using the emergency override procedure. das System ist überschrieben mit der Notfall-Verfahren.
20. 20. Override Code (default= flash 1) Override-Code (Standard = Flash 1)
- Follow Section 1.9 to change the Override Code. -- Folgen Sie Abschnitt 1,9 zu ändern, die Override-Code.
- Follow Section 2.6b of the user manual to operate the Override. -- Abschnitt 2.6b Folgen Sie der Bedienungsanleitung für den Betrieb des Override.
- --
21. 21. Hazard lights Output (default=normal) Hazard Lichter Ausgang (Standard = normal)
When set as Normal: Bei der Einstellung als Normal:
Connect the hazard lights output as normal using the Y-splitter lead. Schließen Sie die Gefahr Lichter Ausgabe wie gewohnt mit dem Y-Splitter führen.
If the Normal connection does not work then connect the hazard lights output to the hazard Wenn die normale Verbindung nicht funktioniert, dann schließen Sie das Risiko Lichter Ausgabe auf die Gefahren
switch as shown below and set feature #21 as Pulse or Continuous depending on the type of Schalter wie unten gezeigt und die Funktion # 21 als Pulse oder kontinuierlich in Abhängigkeit von der Art der
hazard switch Hazard-Schalter
O O
I I
Control Unit Steuerstelle
Predator Predator
XL3 XL3
Hazard Hazard
Switch Schalter
Hazard Lights Hazard Lights
Output Ausgang
Hazard Hazard
Lights Leuchtet
When selecting Pulse or Continuous, try the factory default first (0.5sec). Bei der Auswahl der Pulse oder kontinuierlicher, probieren Sie die Werkseinstellungen ersten (0,5 s). If the hazard lights Wenn die Gefahr Lichter
do not flash as expected proceed to the hazard light learning as follows: nicht wie erwartet Flash, fahren Sie mit der Gefahr Licht Lernen Sie wie folgt vor:
- Turn the ignition on and off 3 times (on-off-on-off-on-off). -- Schalten Sie die Zündung ein-und ausschalten 3-mal (on-off-on-off-on-off).
- The siren will chirp once to confirm the system is in learning mode. -- Die Sirene wird zwitschern einmal zu bestätigen, das System ist in Lernen-Modus.
- Turn the vehicles hazard lights on and the hazard lights start to flash. -- Schalten Sie die Fahrzeuge Gefahr Beleuchtung und die Gefahr Lichter beginnen zu blinken.
- Within 10 sec. -- Innerhalb von 10 sek. press and hold the valet switch. drücken und halten Sie die Valet-Schalter.
- The LED will turn on to confirm the valet switch is pressed. -- Die LED wird wiederum auf die Bestätigung der Valet-Schalter gedrückt wird.
- Release the valet switch once the hazard lights have flashed 10 times. -- Lassen Sie die Valet-Schalter, wenn die Gefahr Lichter haben geblitzte 10 mal abgerufen.
- The LED will turn off and siren will chirp once to confirm the learning is complete. -- Die LED wird ausgeschaltet und Sirene werden zwitschern einmal zu bestätigen, den Lernprozess abgeschlossen ist.
* The system will leave the learning mode automatically if the valet switch is not pressed * Das System wird aus dem Lernen-Modus automatisch, wenn das Valet-Schalter ist nicht gedrückt
within 10 sec. innerhalb von 10 Sekunden. or if the ignition is turned on. oder wenn die Zündung eingeschaltet ist.
2. 2. SYSTEM UPGRADE System-Upgrade
Follow the steps below to upgrade the system to a 2-way paging alarm. Folgen Sie den unten stehenden Schritte, um das System-Upgrade zu einem 2-Wege-Paging-Alarm.
- Cut off the Red and White loops next to port W-1 (main unit). -- Cut-off die roten und weißen Schleifen neben Port W-1 (Zentraleinheit).
- Plug the 2-way transceiver into port W-1. -- Stecken Sie den 2-Wege-Transceiver in den Hafen W-1.
- Program the 2-way remotes to the system. -- Programm der 2-Wege-Fernbedienungen zu dem System.
* The original remote controls will not work once the 2-way upgrade has been installed. * Die Original-Fernbedienung steuert wird nicht funktionieren, wenn die 2-Wege-Upgrade installiert wurde. Only Nur
EVO 4 button or pager remote controls can be used with the pager upgrade. EVO 4-Taste oder Pager Fernbedienungen kann verwendet werden, mit dem Pager-Upgrade.
- --
3. 3. Wiring Diagram Anschlussbild
Door Tür
l l
o o
ck (nc) CK (NC)
Black Schwarz
W8-1 W8-1
Door Tür
l l
o o
ck (com) CK (com)
G G
reen reen
W8-2 W8-2
Door Tür
l l
o o
ck (no) CK (no)
Pink Rosa
W8-3 W8-3
Door Tür
unl UNL
ock (nc) ock (NC)
Whi WHI
te TE
W8-4 W8-4
Door Tür
unl UNL
ock (com) ock (com)
Blue Blau
W8-5 W8-5
W7-3 W7-3
Bl Bl.
ack ack
G G
ro ro
und und
W7-1 W7-1
Gr Gr
ee EE
n n
Shock se Schock SE
nsor nsor
1st stage 1. Etappe
i i
n n
put legen
W7-2 W7-2
Bl Bl.
ue UE
Shock se Schock SE
nsor nsor
2nd stage 2. Etappe
i i
n n
put legen
W7-4 W7-4
Red Rot
+12v +12 V
W6-3 W6-3
Bl Bl.
ack ack
G G
ro ro
und und
W6-4 W6-4
Red Rot
+12v +12 V
W6-1 W6-1
A A
u u
xiliary s xiliary s
en de
so so
r 1s r 1s
ts TS
ta TA
g g
e in e in
p p
u u
t t
W6-2 W6-2
A A
u u
xiliary s xiliary s
en de
so so
r 2n r 2n
d d
s s
ta TA
g g
e in e in
p p
u u
t t
To gr Um gr
ound or ound oder
+12V de +12 V de
pe PE
ndi NDI
n n
g on pol g in Pol
ar AR
ity of W2-2 (+/-) keit der W2-2 (+/-)
Whi WHI
te/Red TE / Red
W2-1 W2-1
Whi WHI
te TE
W2-2 W2-2
H H
azard azard
lig LIG
h h
ts TS
o o
u u
tp TP
u u
t ( t (
+ +
/- / --
b b
u u
ilt ILT
-in - in
relay) Relais)
Black Schwarz
W2-3 W2-3
To gr Um gr
ound ound
Y Y
ello ELLO
w w
W2-4 W2-4
Igni Igni
ti TI
on tr in tr
igge igge
ri ri
n n
put legen
Red Rot
W2-5 W2-5
To +12V battery Bis +12 V Batterie
Brown Braun
W2-6 W2-6
Si Si
re re
n/Hor n / Hor
n n
output (1A) Ausgang (1A)
Orange/Black Orange / Schwarz
W2-7 W2-7
Immob Immob.
ilis ilis
er out ER out
p p
ut UT
( (
n n
ormally op ormally op
en/ de /
-500mA) - 500mA)
Orange Orange
W2-8 W2-8
Immob Immob.
ilis ilis
er out ER out
p p
ut UT
( (
n n
ormally c ormally c
los Los
ed Ed
/- / --
500mA) 500mA)
W3-0 W3-0
Gr Gr
ee EE
n n
Door Tür
tr tr
igge igge
ri ri
n n
put (-) Put (-)
W3-1 W3-1
Pur Pur
p p
le Le
Door Tür
tr tr
igge igge
ri ri
n n
put (+) Put (+)
W3-2 W3-2
Bl Bl.
ack/Red ack / Red
To footbr Um footbr
ake Ake
l l
ig IG
ht HT
W3-3 W3-3
Gr Gr
ay ay
Boot release output (-500mA) Boot-Release-Ausgang (-500mA)
W3-4 W3-4
Gr Gr
ay/bl ay / BL
ack ack
Total/Comfort closure output (-500mA) Insgesamt / Komfort Schließung Ausgang (-500mA)
W3-5 W3-5
Bl Bl.
ue UE
/Whi / Wh
te TE
Door unlock2 output (-500mA) Door unlock2-Ausgang (-500mA)
W3-6 W3-6
Gr Gr
ee EE
n n
/Whi / Wh
te TE
Interior light output (-500mA) Interior Lichtleistung (-500mA)
W3-8 W3-8
Bl Bl.
ue UE
Boot/Bonne Boot / Bonne
t tr t tr
igge igge
ri ri
n n
put legen
W3-9 W3-9
Pink Rosa
Remote starter mo Remote-Starter-mo
dule output (-500mA) dule-Ausgang (-500mA)
W3-7 W3-7
Red/Bl Rot / Bl
ack ack
Bypass i Bypass-i
n n
put fr Fr,
om opti Om OPTI
onal onal
r r
emote emote
star Stern
te TE
r modul r Modul
e e
W5 P W5 P
lug-i lug-i
n Val n Val
et swi ET SWI
tch tch
W W
1 1
-P - P
lu Lu
g g
-in - in
2Way 2way
Tr Tr
anscei anscei
ver Ver
W4 Pl W4 Pl
ug-i UG-i
n LED i LED-i n
n n
di Di
cator kator
Whi WHI
te TE
Red Rot
Door Tür
unl UNL
ock (no) ock (no)
Orange Orange
W8-6 W8-6
- --
4. 4. Wiring Notes Bordnetz-Notes
CONNECT TO A FUSED +12 Herstellen einer Verbindung zu einem Fused +12
OR GROUND DEPENDING Oder gemahlen je
ON WIRING OF PIN 87 In Verdrahtung von PIN-87
Wiring Diagrams - Interior Light, Horn & Boot Release Schaltpläne - Interieur Licht, Horn & Boot-Release
Postive Interior Light Postive Interior Light
Negative Interior Light Negative Interior Light
To Positive Zu einer positiven
Interior Light Interior Light
87 87
85 85
86 86
87a 87a
30 30
+12 +12
White Weiß
W3-6 W3-6
87 87
85 85
86 86
87a 87a
30 30
To Negative Negative
Interior Light Interior Light
+12 +12
White Weiß
W3-6 W3-6
Positive Horn Honk Positive Horn Honk
Negative Horn Honk Negative Horn Honk
To Positive Zu einer positiven
Horn Wire Horn Wire
87 87
85 85
86 86
87a 87a
30 30
+12 +12
Brown Braun
W2-6 W2-6
87 87
85 85
86 86
87a 87a
30 30
To Negative Negative
Horn Wire Horn Wire
+12 +12
Brown Braun
W2-6 W2-6
Boot Release Wiring Release-Boot-Verkabelung
87 87
85 85
86 86
87a 87a
30 30
To Boot Release Um Boot-Release
Solenoid Solenoid
To Fused Um Fused
Battery Source Akku-Quelle
Gray Gray
W3-3 W3-3
- --
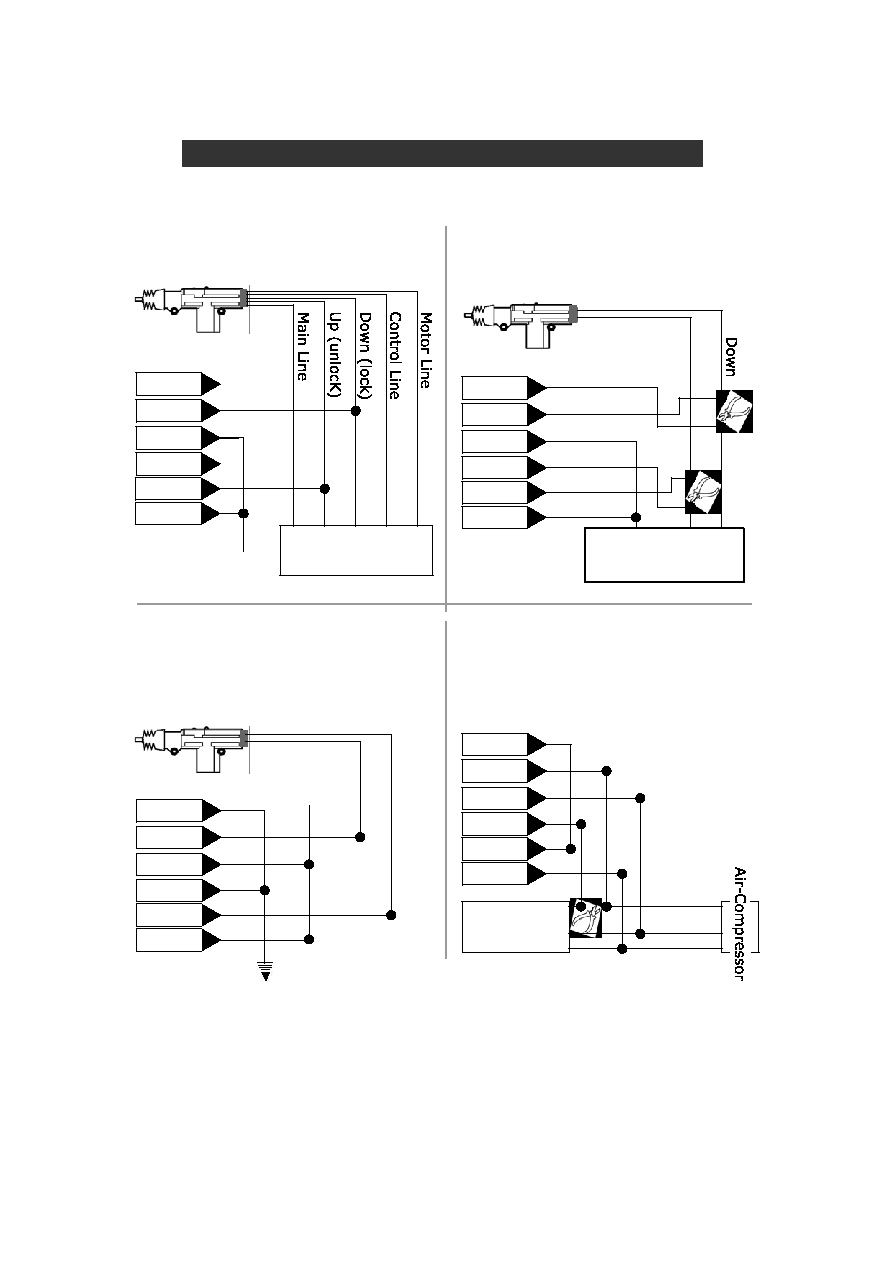
5. 5. Central Locking Wiring Zentralverriegelung Verdrahtung
Follow the diagrams below for wiring basic central locking systems Folgen Sie den unten Diagramme für die Verkabelung grundlegende Zentralverriegelung Systeme
+12V +12 V
Wiring Diagram - Predator XL3 Door Lock/Unlock - Basic Anschlussbild - Predator XL3 Door Lock / Unlock - Basic
Black Schwarz
Green Grün
Pink Rosa
White Weiß
Blue Blau
Orange Orange
Original Built-in Original Built-in
Controller Controller
Diagram #A Diagramm # A
Negative or Positive Locking Negative oder positive locking
Diagram #B Diagramm # B
Motor Interrupt Locking Motor Interrupt-Sperren
eg. zB. CHRYSLER CHRYSLER
Door Lock Switch Door Lock-Schalter
On the Front Door Auf der Haustür
Black Schwarz
Green Grün
Pink Rosa
White Weiß
Blue Blau
Orange Orange
Black Schwarz
Green Grün
Pink Rosa
White Weiß
Blue Blau
Orange Orange
Diagram #C Diagramm C #
Central locking where only a switch Zentralverriegelung, wo nur ein Schalter
is installed in the drivers door. installiert ist in der Fahrerwertung Tür.
An additional door motor is required. Eine zusätzliche Tür Motor ist nicht erforderlich.
Diagram #D Diagramm # D
Vacuum central locking Vakuum-Zentralverriegelung
eg: MERCEDES, AUDI zB: Mercedes, Audi
(Note: Set door lock/unlock time to 3.6 sec.) (Hinweis: Setzen Sie Tür sperren / entsperren Zeit zu 3,6 sek.)
Black Schwarz
Green Grün
Pink Rosa
White Weiß
Blue Blau
Orange Orange
Electric Motor Elektromotor
Switch Schalter
Main Line Main Line
Down Abwärts
Up Nach oben
Up Nach oben
+12V +12 V
Down Abwärts
Up Nach oben
To +12V or Ground Bis +12 V oder Masse
Depending on polarity Je nach Polarität
of locking system von Locking System
Polarity Reverses on a single wire Polarität Macht in einem einzigen Draht
Two wires resting at ground, one pulses Zwei Drähte Ruhe am Boden, ein Pulsen
12V for lock, one pulses 12V for unlock Sperre für 12V, 12V ein Impulse zu entsperren
Two wires resting open circuit one pulses 12V or Zwei Drähte Ruhe ein offener Kreis Hülsenfrüchte oder 12V
ground for lock, one pulses 12V or ground for unlock Grund für die Sperre, ein Impulse 12V oder Boden für entsperren
- --
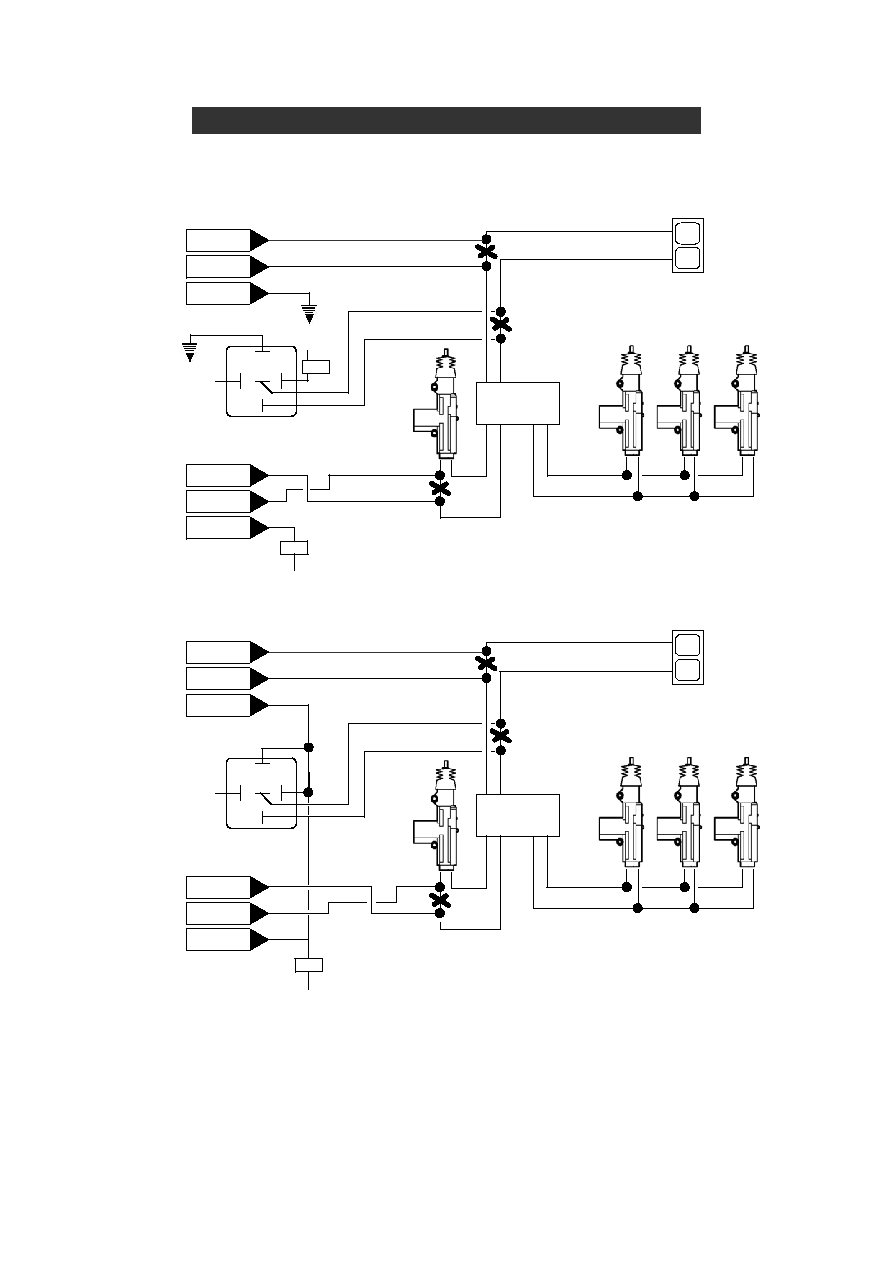
Two Stage Negative Trigger Zwei negative Phase auslösen
Two Stage Positive Trigger Zwei positive Phase auslösen
The Predator XL3 has a dedicated unlock-2 output allowing for two Der Räuber XL3 verfügt über eine eigene entsperren-2-Ausgang ermöglicht für zwei
stage door unlock operation. Stage Door entsperren.
Wiring Diagram - Predator XL3 Two Stage Door Unlock Anschlussbild - Predator XL3 zwei Stage Door Unlock
(-)UNLOCK-2 (-) UNLOCK-2
DOOR LOCK Türschloss
SWITCH SWITCH
UL UL
L L
FACTORY FACTORY
DOOR LOCK Türschloss
MODULE MODUL
PASSENGER DOOR PERSONENVERKEHR TÜR
MOTORS MOTORS
DRIVERS FAHRER
DOOR TÜR
MOTOR MOTOR
(+)DOOR LOCK WIRE (+) Türschloss WIRE
(+)DOOR UNLOCK WIRE (+) TÜR UNLOCK WIRE
Black Schwarz
Pink Rosa
Green Grün
(+)LOCK (+) LOCK
87 87
87a 87a
85 85
86 86
30 30
White Weiß
Blue Blau
Orange Orange
(+)UNLOCK (+) UNLOCK
+12V +12 V
15A 15A
(-)UNLOCK-2 (-) UNLOCK-2
DOOR LOCK Türschloss
SWITCH SWITCH
UL UL
L L
FACTORY FACTORY
DOOR LOCK Türschloss
MODULE MODUL
PASSENGER DOOR PERSONENVERKEHR TÜR
MOTORS MOTORS
DRIVERS FAHRER
DOOR TÜR
MOTOR MOTOR
(-)DOOR LOCK WIRE (-) Türschloss WIRE
(-)DOOR UNLOCK WIRE (-) TÜR UNLOCK WIRE
Black Schwarz
Pink Rosa
Green Grün
(-)LOCK (-) Sperre
87 87
87a 87a
85 85
86 86
30 30
+12V +12 V
15A 15A
White Weiß
Blue Blau
Orange Orange
(-)UNLOCK (-) UNLOCK
+12V +12 V
15A 15A
- --
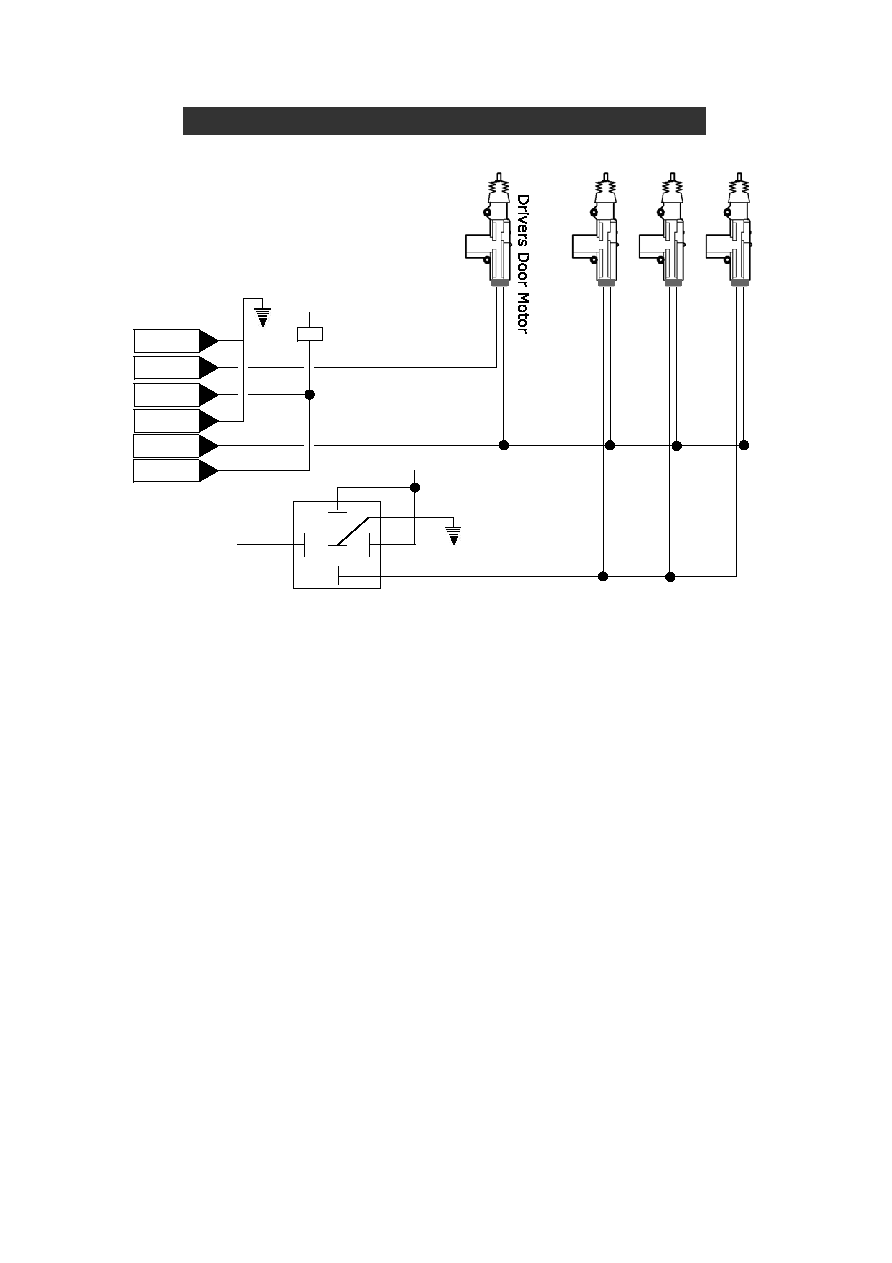
Wiring Diagram - Predator XL3 Two Stage Door Unlock Anschlussbild - Predator XL3 zwei Stage Door Unlock
Two Stage Adding Actuators Zwei Phase Hinzufügen von Aktoren
+12V +12 V
Black Schwarz
Green Grün
Pink Rosa
White Weiß
Blue Blau
Orange Orange
86 86
85 85
87a 87a
30 30
87 87
(-)Unlock-2 (-) Unlock-2
+12V +12 V
Passenger Door Motors Passagier-türig Motoren
15A 15A
LOCK LOCK
UNLOCK UNLOCK


