
- --
FALCON FALCON
WORLD CLASS SECURITY World Class sicurezza
FALCON PREDATOR XL3 Falco predatore XL3
Vehicle Security System with Anti-Hijack Veicolo con sistema di sicurezza anti-hijack
Installer's Manual Manuale di installazione
TABLE OF CONTENTS Tabella dei contenuti
1. 1. SYSTEM INSTALLATION ............................................... L'installazione di un sistema ............................................... 2 2
1.1. 1,1. Power On ........................................................... Il potere ................................................ ........... 2 2
1.2. 1,2. NO & NC Immobiliser Relay Wiring ......................... N & nc immobilitazione di collegamento per il cablaggio ......................... 2 2
1.3. 1,3. Programming New Remote Controls ....................... Nuova programmazione telecomandi ....................... 2 2
1.4. 1,4. Bypass Input (red/black wire: w3-7) ...................... By-pass di ingresso (rosso / nero filo: w3-7) ...................... 2 2
1.5. 1,5. Start Output (pink wire: w3-9) .............................. Inizio di uscita (filo rosa: w3-9) .............................. 2 2
1.6. 1,6. Interior Light Supervision (green/white wire: w3-6).. La luce interiore Vigilanza (verde / bianco filo: w3-6) .. 3 3
1.7. 1,7. Program the Optional Features (default=1 chirp)...... Il programma funzioni opzionali (impostazione predefinita = 1 chirp )...... 3 3
1.8. 1,8. Optional Programmable Features ........................... Programmabile opzionale caratteristiche ........................... 3 3
1.9. 1,9. Feature #20 Override Code (default=1 flash) .......... Funzione # 20 Codice Override (impostazione predefinita = 1 flash) .......... 4 4
1.10. 1,10. Explanation of the Optional Features..................... La spiegazione di caratteristiche opzionali ..................... 4 4
2. 2. SYSTEM UPGRADE...................................................... Aggiornamento del sistema ................................................ ...... 8 8
3. 3. Wiring Diagram .......................................................... Schema di cablaggio ................................................ .......... 9 9
4. 4. Wiring Notes............................................................ Note di cablaggio ................................................ ............ 10 10
5. 5. Central Locking Wiring .............................................. Chiusura centralizzata cablaggio .............................................. 11 11

- --
1. 1. SYSTEM INSTALLATION L'installazione di un sistema
1.1. 1,1. Power On Il potere
When powered on, the system will remain in the same status it was in when powered off. Quando acceso, il sistema rimane nello stesso stato è stato in quando spento.
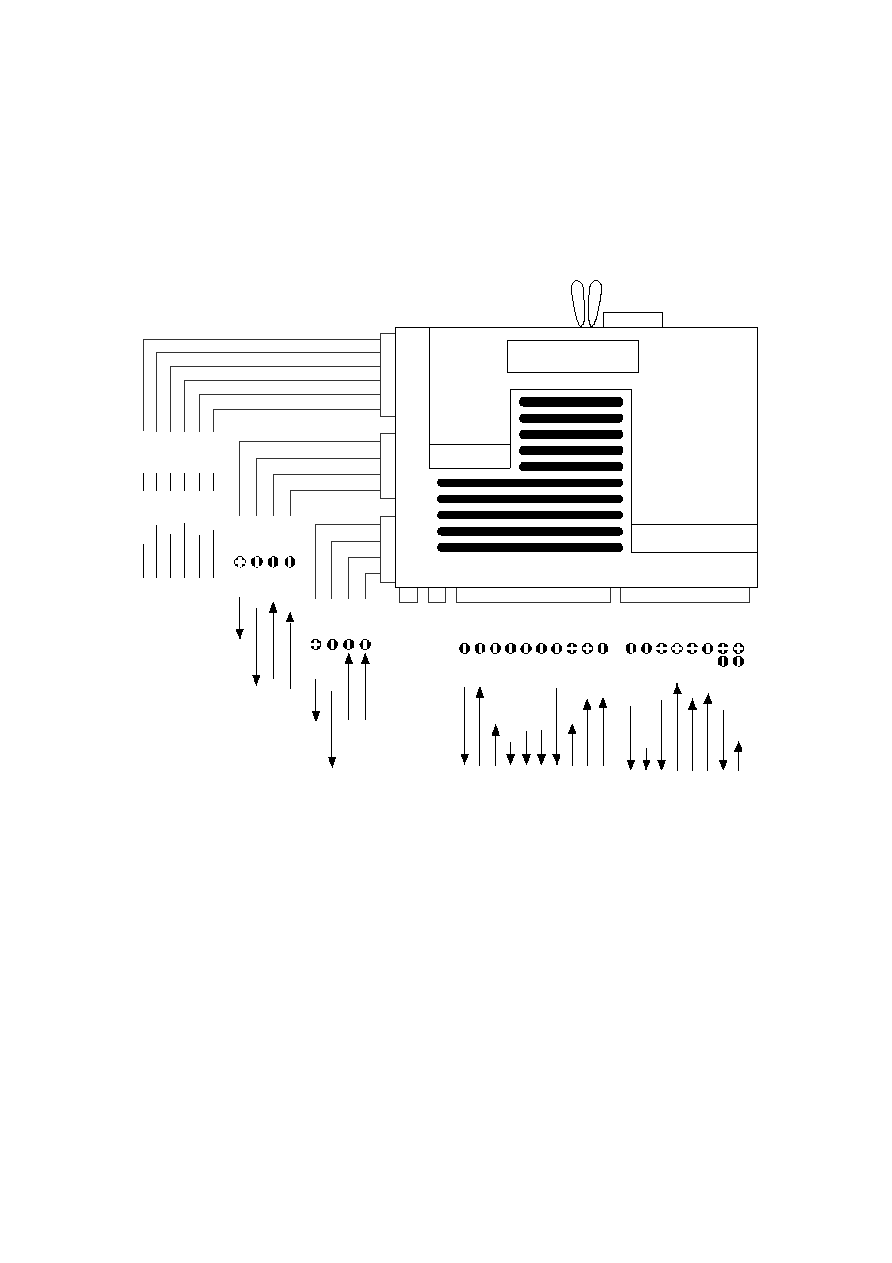
1.2. 1,2. NO & NC Immobiliser Relay Wiring N & nc immobilitazione di collegamento per il cablaggio
The system offers two ways of wiring the immobiliser as shown below. Il sistema offre due modi di cablaggio il Immobilizzatore, come indicato qui di seguito.
When wired for Normally Open the immobiliser relay is switched on when the alarm is disarmed Quando cablata per Normalmente aperto il immobilitazione relè è acceso quando l'allarme è disarmato
(fail secure). (non protetto). When wired as Normally Closed the relay is on when the alarm is armed (fail safe). Quando cablati come normalmente chiuso il relè è a quando l'allarme è armate (non sicuro).
Wiring Diagram - Immobiliser Relay NO & NC Schema di cablaggio - immobilitazione di collegamento non e nc
Normally Closed Immobiliser Connection (Fail Safe) Normalmente chiusa immobilitazione connessione (Fail Safe)
87a - Normally Closed 87 bis - Normalmente chiuso
87 - Normally Open 87 - Normalmente aperto
Off Chiuso
Acc Acc
On Su
Start Inizio
86 86
85 85
87 87
87a 87 bis
30 30
To +12V DC or Acc. A +12 V CC o acc.
W2-8 W2-8
fig. fig. 2 2
Normally Open Immobiliser Connection (Fail Secure) Normalmente aperto immobilitazione connessione (non sicuro)
87a - Normally Closed 87 bis - Normalmente chiuso
87 - Normally Open 87 - Normalmente aperto
Off Chiuso
Acc Acc
On Su
Start Inizio
86 86
85 85
87 87
87a 87 bis
30 30
To Acc. A Acc.
W2-7 W2-7
fig. fig. 1 1
1.3. 1,3. Programming New Remote Controls Nuova programmazione telecomandi
The included remote controls have been programmed to the system in the factory. Il telecomando incluso controlli sono stati programmati per il sistema in fabbrica. Follow the Seguire la
procedure below to program a new remote control to the system: procedura di seguito per un nuovo programma di controllo remoto per il sistema:
- Turn the ignition on with the system disarmed. -- Accendere l'accensione con il sistema disarmato.
- Within 10 seconds, press valet switch 3 times. -- Entro 10 secondi, premere valet passare 3 volte. (or 6 times if pager upgrade is installed). (o 6 volte se pager aggiornamento è installato).
- The siren sounds for 2 sec. -- La sirena suona per 2 sec. to confirm the system is now in code learning mode. per confermare il sistema è ora in codice modalità di apprendimento.
- Within 10 sec., press any button of 1 -- Entro 10 sec., Premere un tasto qualsiasi di 1
st St
remote control telecomando
The siren will sound for 1 sec. La sirena suona per 1 sec. and hazard lights flash twice to confirm the 1 e pericolo luci flash due volte per confermare il 1
st St
remote has ha remoto
been programmed to the system and all the previous codes in the system will be erased stato programmato per il sistema e tutte le precedenti codici del sistema verranno cancellati
entirely. interamente.
- Within 10 sec., repeat for the 2 -- Entro 10 sec., Ripetere per i 2
nd ND
remote control and again for 3 telecomando e di nuovo per 3
rd Rd
and 4 e 4
th °
remotes as come telecomandi
applicable. applicabile.
* Up to 4 remotes can be programmed to the system * Fino a 4 telecomandi può essere programmato per il sistema
* The system will leave the code learning mode after programming 4 remotes to the system * Il sistema lascerà il codice di apprendimento in modalità di programmazione dopo 4 telecomandi per il sistema
and the siren will sound for 2 seconds e la sirena suona per 2 secondi
to confirm. per confermare.
* If no buttons are pressed within 10 seconds, the system will leave the learning code mode * Se non vengono premuti i tasti entro 10 secondi, il sistema di lasciare il codice in modalità di apprendimento
and the siren will sound for 2 seconds to confirm. e la sirena suona per 2 secondi per confermare.
* The system will leave the code learning mode if the ignition is turned off at any time and the * Il sistema di lasciare il codice in modalità di apprendimento, se l'accensione è disattivata in qualsiasi momento e la
siren will sound for 2 seconds to confirm. sirena suona per 2 secondi per confermare.
1.4. 1,4. Bypass Input (red/black wire: w3-7) By-pass di ingresso (rosso / nero filo: w3-7)
This wire is designed for external engine start module or turbo timer. Questo filo è progettato per esterni motore di avviare modulo o turbo timer. Feed this wire with Mangimi con questo filo
ground when the external engine start module or turbo timer is activated and the system will terra quando il motore esterno iniziare modulo o turbo timer è attivato e il sistema
bypass the ignition, shock sensor and immobiliser relay until the ground pulse is removed. bypassare l'accensione, shock e sensore immobilitazione relè fino a quando il terreno è impulsi rimossi.
1.5. 1,5. Start Output (pink wire: w3-9) Inizio di uscita (filo rosa: w3-9)
Press and hold button #4, 3 sec. Premere e tenere premuto il pulsante # 4, 3 sec. later the system will send a 1 sec. successivamente il sistema invierà un 1 sec. pulse to activate the impulso per attivare il
external engine start module. motore esterno iniziare modulo. Pressing button #4 for 3 sec. Premendo il pulsante # 4 per 3 sec. will send the pulse again to invierà il polso di nuovo per
deactivate the external engine start module. disattivare il motore di avviare esterne modulo.
- --
1.6. 1,6. Interior Light Supervision (green/white wire: w3-6) La luce interiore Vigilanza (verde / bianco filo: w3-6)
If connected: Se collegato:
- --
The interior light will be turned on for 20 sec. L'interno sarà luce accesa per 20 sec. when disarming unless the ignition is turned quando a meno che il disarmo di accensione è attivata
on. su.
- --
The interior light will be turned on all the time whilst the alarm is sounding. L'interno luce sarà accesa tutto il tempo, mentre l'allarme è suono.
1.7. 1,7. Program the Optional Features (default=1 chirp) Il programma funzioni opzionali (impostazione predefinita = 1 chirp)
Follow the steps below to program the Optional Features: Seguire la seguente procedura per programmare le funzioni opzionali:
For example: To program the feature #5 as 15sec. Per esempio: Per programmare la funzione # 5 come 15sec.
- Turn the ignition on then off with the system disarmed. -- Accendere l'accensione sulla poi con il sistema disarmato.
- Within 10 sec., press the valet switch 3 times. -- Entro 10 sec., Premere il valet passare 3 volte.
- The system enters the programming mode and the siren and LED will be on for 2 sec. -- Il sistema entra nella modalità di programmazione e la sirena e LED a essere per 2 sec. to a
confirm. confermare.
* To Reset to Factory Default: * Per Factory Reset a Default:
Within 10 seconds press button #4 for 3 sec., all the optional features will be reset to the Entro 10 secondi premere il tasto # 4 per 3 sec., Tutte le funzioni opzionali saranno a reimpostare la
factory default and the siren will sound for 2 sec. default di fabbrica e la sirena suona per 2 sec. to confirm leaving the programming lasciando per confermare la programmazione
mode. modalità di attesa.
- Within 10 sec., press the valet switch 5 times. -- Entro 10 sec., Premere il passare valet 5 volte.
- 1 sec. -- 1 sec. later the siren will chirp 5 times to confirm. dopo la sirena si chirp 5 volte per confermare.
- Press button #1 of the remote control 6 times to select 15 sec. -- Premere il tasto # 1 del telecomando 6 volte per selezionare 15 secondi. and the siren will chirp 6 e la sirena si chirp 6
times to confirm the setting. volte a confermare l'impostazione.
- Press the valet switch again (from 1 to 21) within 10 sec. -- Premere il valet passare di nuovo (da 1 a 21) entro 10 sec. to select the next feature for per selezionare la funzione per il prossimo
programming. programmazione.
* The system will leave the programming mode and the siren will sound for 2 sec. * Il sistema di lasciare la modalità di programmazione e la sirena suona per 2 sec. to confirm per confermare
if the ignition is turned off at any time during programming or if the valet switch or remote se l'accensione è disattivata in qualsiasi momento nel corso di programmazione o se il valet switch o remoto
control button #1 has not been pressed within 10 sec. tasto di controllo # 1 non è stato premuto entro 10 sec.
1.8. 1,8. Optional Programmable Features Programmabile opzionale Caratteristiche
No Chirp N. Chirp
Function Funzione
1 Chirp 1 Chirp
2 Chirp 2 Chirp
3 Chirp 3 Chirp
4 Chirp 4 Chirp
1 1 chirp 1 1 chirp
Chirp Confirmation Conferma Chirp
On Off ON OFF
2 2 chirp 2 2 chirp
Door Lock with Passive Arming Porta con serratura passiva armare
Disable Enable Disattivare Attiva
3 3 chirp 3 3 chirp
Ignition Lock Blocco di accensione
Disable Ignition Brake Disattivare freno motore ad accensione spontanea
4 4 chirp 4 4 chirp
Ignition Unlock Accensione di sblocco
Disable Disattivare
Driver Driver
All Tutto
5 5 chirp 5 5 chirp
Door Lock Time(sec.) Blocca porta Tempo (sec.)
1) 0.8 1) 0,8
2) 3.6 2) 3,6
3) 0.8*2 4) 0.8+15 3) 0,8 * 2 4) 0,8 +15
5) 5)
0.8+40 0,8 +40
6) 15 6) 15
7) 40 7) 40
6 6 chirp 6 6 chirp
Door Unlock Time(sec.) Tempo di sblocco porta (Sezione)
0.8 3.6 0.8*2 0,8 3,6 0,8 * 2
7 7 chirp 7 7 chirp
Door Unlock with Disarming Porta a sbloccare il disarmo
Driver All Tutti i driver
8 8 chirp 8 8 chirp
Siren/Horn Output Sirena / output Corno
Siren Horn Corno sirena
9 9 chirp 9 9 chirp
Alarm Condition Cycle Duration Condizione di allarme ciclo di durata
30 30
sec. SEC. 60 60
sec. SEC.
10 10 chirp 10 10 chirp
Interior Light Delay Luce interiore ritardo
Disable Disattivare
25 sec. 25 sec.
40 sec. 40 sec.
60 sec. 60 sec.
11 11 chirp 11 11 chirp
Auto. Auto. Rearming Riarmarsi
Disable Enable Disattivare Attiva
12 12 chirp 12 12 chirp
Auto. Auto. Engine Disable(AED) Disattiva motore (DAE)
Disable Enable Disattivare Attiva
13 13 chirp 13 13 chirp
Door Open Alerts Porta aperta avvisi
Disable Mode Disattivare la modalità
1 Mode 1 Modo
2 2
14 14 chirp 14 14 chirp
Total/Comfort Closure Totale / chiusura comfort
Disable Disattivare
15 sec. 15 sec.
30 sec. 30 sec.
40 sec. 40 sec.
15 15 chirp 15 15 chirp
Disarm with Boot Release Disarmare con rilascio di boot
Disable Enable Disattivare Attiva
16 16 chirp 16 16 chirp
Anti-hijacking Countdown Anti-dirottamento Countdown
30sec. 30sec. 60sec. 60sec.
17 17 chirp 17 17 chirp
Activate Anti-hijacking Countdown Attivare la lotta antifrode dirottamento Countdown
Normal Normale
Brake Freno
18 18 chirp 18 18 chirp
Anti-hijacking by Remotes Anti-dirottamento di telecomandi
Disable Enable Disattivare Attiva
19 19 chirp 19 19 chirp
Anti-hijacking by Ignition+Door Anti-dirottamento di accensione + Door
Disable Enable Disattivare Attiva
20 20 chirp 20 20 chirp
Override Code Codice override
Flash 1 Flash 1
Flash 2~10 Flash 2 ~ 10
21 21 chirp 21 21 chirp
Hazard lights Output Luci rischio di uscita
Normal Pulse Normale Pulse
Continuous Continua
Factory Default = 1 Chirp Impostazione predefinita = 1 Chirp

- --
1.9. 1,9. Feature #20 Override Code (default=1 flash) Funzione # 20 Codice Override (impostazione predefinita = 1 flash)
Follow the steps below to program: Seguire la procedura riportata di seguito per programma:
- Turn the ignition on then off with the system disarmed. -- Accendere l'accensione sulla poi con il sistema disarmato.
- Within 10 sec., press the valet switch 3 times. -- Entro 10 sec., Premere il valet passare 3 volte.
- The system enters the programming mode and the siren and LED will be on for 2 sec. -- Il sistema entra nella modalità di programmazione e la sirena e LED a essere per 2 sec. to a
confirm. confermare.
- Within 10 seconds press the valet switch 20 times to select feature #20 -- Entro 10 secondi premere il passare valet 20 volte per selezionare funzione # 20
- 1 sec. -- 1 sec. later the siren will chirp 20 times to confirm the selection. dopo la sirena si chirp 20 volte per confermare la selezione.
- The LED will start to flash 10 times slowly 2 sec. -- Il LED inizierà a lampeggiare per 10 volte lentamente 2 sec. later. più tardi.
- Press button #1 of remotes after the LED has flashed the number of times you want to set -- Premere il tasto # 1 di telecomandi dopo il LED ha flashed il numero di volte che si desidera impostare
the code to; Eg. il codice di esempio. If you want to choose 6 as the code then press button #1 once after the Se si desidera scegliere 6, come il codice, quindi premere il pulsante # 1 una volta dopo il
LED has flashed 6 times. LED ha flashed 6 volte. The LED will turn off and siren sound for 1 sec. Il LED si spegne e sirena suona per 1 sec. to confirm. per confermare.
- Press the valet switch within 10 sec., to select the next feature for programming. -- Premere il valet passare entro 10 sec., Per selezionare la funzione per la prossima programmazione.
1.10. 1,10. Explanation of the Optional Features La spiegazione di caratteristiche opzionali
01. 01. Chirp Confirmation On/Off(default=on) Conferma Chirp On / Off (impostazione predefinita = on)
When On: Quando il:
The siren will chirp once for system arming and twice for disarming. La sirena si chirp sistema una volta per armare e disarmare per due volte. With this feature on, the Con questa funzione, il
silent arm/disarm button is still functional. silenziosa braccio / disarmare pulsante è ancora funzionale.
When Off: Quando Off:
The siren will not chirp for system arming and disarming but the hazard lights will flash as La sirena non chirp sistema per armare e disarmare, ma il pericolo luci lampeggiano come
normal. normale.
02. 02. Door Lock with Passive Arming(default=disable) Blocco porta con armamento passivo (default = disattiva)
When Enabled: Quando abilitata:
The doors will also be locked when the system passively arms itself. Le porte anche essere bloccato quando il sistema di armi passivamente stesso.
03. 03. Ignition Lock (default=disabled) Blocco di accensione (predefinito = disattivato)
When set as Ignition: Quando è impostato come motore ad accensione spontanea:
- The doors will be locked 15 sec. -- Le porte sarà bloccato 15 secondi. after turning the ignition on if all the doors are closed dopo aver acceso i motori ad accensione spontanea a se tutte le porte sono chiuse
properly. correttamente.
- The doors will not be locked if a door is not closed or has been opened during the 15 sec. -- Le porte non verrà bloccato se una porta non è chiuso o sono stati aperti durante la 15 secondi.
countdown. rovescia.
- If the doors are unlocked during driving they will be locked again automatically after -- Se le porte vengono sbloccati durante la guida saranno di nuovo bloccato automaticamente dopo
stepping on the brake pedal. a rafforzare il pedale del freno. (Brake light wire must be connected). (Freno luce filo deve essere collegato).
When set as Brake: (Brake light wire must be connected) Quando è impostato come freno: (Freno luce filo deve essere collegato)
- The doors will be locked when the brake is tapped with the ignition on if all the doors are -- Le porte verrà bloccato quando il freno è sfruttato con l'accensione a se tutte le porte sono
closed properly. chiuso correttamente.
- If the doors are unlocked during driving they will be locked again automatically after -- Se le porte vengono sbloccati durante la guida saranno di nuovo bloccato automaticamente dopo
stepping on the brake pedal. a rafforzare il pedale del freno.
04. 04. Ignition Unlock(default=disable) Accensione di sblocco (default = disattiva)
When set as Driver: Quando è impostato come driver:
After parking the car the drivers door will be unlocked when turning the ignition off. Dopo il parcheggio auto i driver porta sarà sbloccata quando la svolta di accensione spento.
When set as All: Quando è impostato come Tutti:
After parking the car all the doors will be unlocked after turning the ignition off. Dopo il parcheggio auto tutte le porte sarà sbloccato dopo aver acceso l'accensione spento.
05. 05. Door Lock Time (default=0.8) Time Lock porta (default = 0.8)
When set as 0.8 sec.: Quando è impostato come 0,8 sec.:
The system will send a 0.8 sec. Il sistema invierà un 0,8 sec. pulse when locking the doors. polso quando le porte di bloccaggio.
When set as 3.6 sec.: Quando è impostato come 3,6 sec.:
The system will send a 3.6 sec. Il sistema invierà un 3,6 sec. pulse when locking the doors. polso quando le porte di bloccaggio.
When set as 0.8 sec.*2: Quando è impostato come 0,8 sec .* 2:
The system will send two 0.8 sec. Il sistema invierà due 0,8 sec. pulses when locking the doors. impulsi di bloccaggio quando le porte.
When set as 0.8 sec. Quando è impostato come 0,8 sec. + 15 sec.: + 15 sec.:
The system will send a 0.8 sec. Il sistema invierà un 0,8 sec. pulse and then send a 15 sec. polso e poi inviare un 15 secondi. pulse when locking the doors. polso quando le porte di bloccaggio.

- --
*When selecting 0.8 sec. * Quando si seleziona 0,8 sec. + 15 sec. + 15 sec. for cars with total closure the windows will be closed per le automobili con la chiusura totale finestre verrà chiuso
automatically during remote arming without enabling feature #14. automaticamente durante remoto senza armare funzione che consente # 14.
When set as 0.8 sec. Quando è impostato come 0,8 sec. + 40 sec.: + 40 sec.:
The system will send a 0.8 sec. Il sistema invierà un 0,8 sec. pulse and then send a 40 sec. polso e poi inviare un 40 sec. pulse when locking the doors. polso quando le porte di bloccaggio.
*When selecting 0.8 sec. * Quando si seleziona 0,8 sec. + 40 sec. + 40 sec. for cars with total closure the windows will be closed per le automobili con la chiusura totale finestre verrà chiuso
automatically during remote arming without enabling feature #14. automaticamente durante remoto senza armare funzione che consente # 14.
When set as 15 sec.: Quando è impostato come 15 secondi.:
The system will send a 15 sec. Il sistema invierà un 15 secondi. pulse when locking the doors. polso quando le porte di bloccaggio.
*When selecting 15 sec. * Quando si seleziona 15 secondi. for cars with total closure the windows will be closed automatically per le automobili con la chiusura totale finestre verranno chiusi automaticamente
during remote arming without enabling feature #14. durante remoto senza armare funzione che consente # 14.
When set as 40 sec.: Quando è impostato come 40 sec.:
The system will send a 40 sec. Il sistema invierà un 40 sec. pulse when locking the doors. polso quando le porte di bloccaggio.
*When selecting 40 sec. * Quando si seleziona 40 sec. for cars with total closure the windows will be closed automatically per le automobili con la chiusura totale finestre verranno chiusi automaticamente
during remote arming without enabling feature #14. durante remoto senza armare funzione che consente # 14.
06. 06. Door Unlock Time (default=0.8 sec.) Tempo di sblocco porta (default = 0,8 sec.)
When set as 0.8 sec.: Quando è impostato come 0,8 sec.:
The system will send a 0.8 sec. Il sistema invierà un 0,8 sec. pulse when unlocking the doors. polso quando liberare le porte.
When set as 3.6 sec.: Quando è impostato come 3,6 sec.:
The system will send a 3.6 sec. Il sistema invierà un 3,6 sec. when unlocking the doors. quando liberare le porte.
When set as 0.8 sec.*2: Quando è impostato come 0,8 sec .* 2:
The system will send two 0.8 sec. Il sistema invierà due 0,8 sec. pulses when unlocking the doors. impulsi quando liberare le porte.
07. 07. Door Unlock with Disarming (default=driver) Sbloccare con porta Disarmare (default = conducente)
When set as Driver: Quando è impostato come driver:
Only the drivers door will be unlocked when pressing button #2 to disarm the system. Solo il driver di porta verrà sbloccata quando si preme il pulsante # 2 a disarmare il sistema.
Pressing button #2 again within 3 seconds will unlock the rest of the doors. Premendo il pulsante # 2 nuovamente entro 3 secondi, sbloccare il resto delle porte.
When set as All: Quando è impostato come Tutti:
All the doors will be unlocked when pressing button #2 to disarm the system. Tutte le porte saranno sbloccati quando si preme il pulsante # 2 a disarmare il sistema.
08. 08. Siren/Horn Output (default=siren) Sirena / Corno di uscita (default = sirena)
When set as Siren: Quando è impostato come Siren:
Select the Siren option when connecting an external siren. Selezionare la Sirena opzione quando si collega un altro sirena.
When set as Horn: Quando è impostato come Corno:
Select the Horn option when connecting the output to the cars horn. Selezionare il Corno opzione quando si collega l'uscita alle auto corno. Note a relay must be used. Nota un relè deve essere usato.
09. 09. Alarm Condition Cycle Duration (default=30 sec.) Condizione del ciclo di allarme Durata (default = 30 sec.)
When set as 30 sec. Quando è impostato come 30 sec. or 60 sec.: o 60 sec.:
The siren will sound for 30 sec. La sirena suona per 30 sec. (or 60 sec) when the system is triggered and released. (o 60 sec) quando il sistema è attivato e rilasciato. The Il
siren will sound for 30 sec. sirena suona per 30 sec. (or 60sec) x 3 cycles if the system is triggered continuously. (o 60sec) x 3 cicli se il sistema è attivato in continuazione.
10. 10. Interior Light Delay (default=disable=5 sec.) La luce interiore Delay (default = disable = 5 sec.)
When set as Disable (=5 sec.): Quando è impostato come Disattiva (= 5 sec.):
The siren chirps 3 times and the hazard lights flash 3 times immediately if any of the doors, boot La sirena chirps 3 volte e le luci flash rischio 3 volte immediatamente se una qualsiasi di queste porte, avvio
or bonnet are not closed properly when remote arming the system. cofano o non sono chiusi correttamente quando remoto armare il sistema. The relevant input will be Il contributo adeguato verrà
bypassed until the door/boot/bonnet is closed. ignorato fino a quando la porta / boot / cofano è chiusa.
When set as 25-40-60 sec.: Quando è impostato come 25-40-60 sec.:
The siren chirps 3 times and hazard lights flash 3 times immediately when remote arming the La sirena chirps 3 volte e luci flash di rischio 3 volte immediatamente nel momento in cui armare il telecomando
system if the boot or bonnet are not closed properly. se il sistema di avvio o cofano non sono chiusi correttamente. The boot & bonnet will be bypassed until Il boot & cofano verrà ignorato fino a quando
both are closed properly. entrambi sono chiusi correttamente.
The siren chirps 3 times and hazard lights flash 3 times in 25sec.(or 40, 60sec.) after remote La sirena chirps 3 volte e luci flash di rischio 3 volte nel 25sec. (O 40, 60sec.) Dopo il telecomando
arming the system if the doors are not all closed properly. armare il sistema se le porte non sono tutti chiusi correttamente. The doors will be bypassed until they Le porte sarà ignorato fino a quando non
are all closed properly. sono tutti chiusi correttamente.

- --
11. 11. Auto. Auto. Rearming (default=disable) Riarmarsi (default = disattiva)
When set as Enable: The system will arm itself again automatically 30 seconds after disarming Quando è impostato come Attiva: Il sistema braccio di nuovo automaticamente 30 secondi dopo il disarmo
the system if no doors are opened. il sistema se non porte sono aperte. Opening a door after disarming the system will deactivate Aprire una porta dopo disarmare il sistema disattiva
the auto rearming feature. la funzione di auto riarmarsi.
12. 12. AED, Auto Engine Disable (default=disable) AED, Auto Motore Disattiva (default = disattiva)
When as Enable: After parking the car, turning the ignition off and opening and then closing Come quando Attiva: Dopo il parcheggio auto, trasformando l'accensione tantum e di apertura e di chiusura poi
the door the engine disable relay will activate within 10 seconds but the system will still be la porta il motore disattivare relè si attiva entro 10 secondi ma il sistema sarà ancora
disarmed. disarmato.
- The 10 sec. -- Il 10 sec. countdown will be interrupted immediately when opening a door, the countdown rovescia verrà interrotto immediatamente quando si apre una porta, il conto alla rovescia
will restart when the door is closed. verrà riavviato quando la porta è chiusa.
- Pressing the remote to arm the system during the 10 sec. -- Premendo il telecomando per il sistema braccio nel corso della 10 sec. countdown will activate the AED rovescia attiverà il DAE
immediately. immediatamente.
- To deactivate the AED: -- Per disattivare il DAE:
a) With the system disarmed, remote arming the system then disarming will deactivate the a) con il sistema disarmato, telecomando armare il sistema di disarmo sarà quindi disattivare il
AED at the same time. AED allo stesso tempo.
b) With the system armed, remote disarming the system will deactivate the AED at the same b) con il sistema armati, telecomando disarmare il sistema disattiva l'AED allo stesso
time. tempo.
c) By override (when the system is disarmed). c) Con override (quando il sistema è disarmato).
* The AED will not active under valet mode. * L'AED non attiva la modalità sotto valet. To disable the AED you must leave the valet Per disattivare l'AED è necessario lasciare il valet
mode. modalità di attesa.
* When the AED is activated, the system cannot enter the following modes: * Quando l'AED è attivato, il sistema non può inserire le seguenti modalità:
a) Code Learning a) Codice di apprendimento
b) Programming Mode b) Modalità di programmazione
c) Hazard lights Calibration Mode c), del pericolo luci Modalità di calibrazione
d) Anti-hijacking d), anti-dirottamento
13. 13. Door Open Alerts (default=disable) Porte aperte Alert (default = disattiva)
When set as Mode 1: Quando è impostato come Modalità 1:
- The hazard lights will flash when a door is opened with the ignition on until the door is closed -- Il pericolo luci lampeggia quando una porta si apre con l'accensione a fino a quando la porta è chiusa
or the ignition is turned off. o quello di accensione è spento.
* The feature will not be activated if the door is opened whilst the ignition is on. * La funzione non sarà attivato se la porta è aperta, mentre l'accensione è accesa.
When set as Mode 2: Quando è impostato come Modalità 2:
- The hazard lights will flash when a door is opened regardless of whether the ignition is on -- Il pericolo luci lampeggia quando una porta si apre indipendentemente dal fatto che l'accensione è a
of off and until the door is closed. di decollo e fino a quando la porta è chiusa.
* The feature will be activated regardless of whether the ignition is turned on or off. * La funzione verrà attivata indipendentemente dal fatto che l'accensione è attivata o disattivata.
14. 14. Total/Comfort Closure (default=disable) Totale / Comfort Chiusura (default = disattiva)
The CH3 wire is designed for the option of automatically closing the windows when arming CH3 il filo è progettato per l'opzione di chiusura automatica delle finestre quando armare
the system. il sistema. This feature requires that the vehicle has Total/Comfort Closure. Questa funzionalità è necessario che il veicolo ha Totale / Comfort chiusura.
When set as Disable: Quando è impostato come Disattiva:
The CH3 output will not be activated when arming the system but can be controlled as CH3 la produzione non verrà attivato quando il sistema di armi, ma può essere controllata come
follows: segue:
- With system armed or disarmed. -- Con sistema armati o disarmati.
- Press and hold button #1+3. -- Premere e tenere premuto il pulsante # 1 +3.
- After 1 sec. -- Dopo 1 sec. the CH3 output will be activated until button #1 is released. CH3 la produzione verrà attivato fino a quando il pulsante # 1 è svincolata.
When set as 15, 30 or 40 sec.: Quando è impostato come 15, 30 o 40 sec.:
When arming the system the CH3 will send a 15 sec.(or 30, 40) pulse to close the windows Quando il sistema di armare il CH3 invierà un 15 sec. (O 30, 40) impulsi per chiudere le finestre
automatically. automaticamente. Pressing the remote to disarm the system during the 15 sec.(or 30, 40) will Premendo il telecomando per disarmare il sistema durante i 15 sec. (O 30, 40)
deactivate the CH3 output immediately. CH3 disattivare l'uscita immediatamente.
15. 15. Disarm with Boot Release (default=disable) Disarmare con Boot Release (default = disattiva)
When set as Disable: Quando è impostato come Disattiva:
When operating the remote boot release the system will remain armed but the shock sensor Durante il funzionamento del telecomando rilascio di boot del sistema rimarrà armati, ma lo shock sensore
will be bypassed. verrà ignorato. The boot will be protected and shock sensor reactivated 3 sec. L'avvio essere protetta e riattivata shock sensore 3 sec. after dopo
closing the boot. chiusura di boot.
When set as Enable: Quando è impostato come Attiva:
The system will be disarmed when operating the boot release, the siren will chirp twice and Il sistema sarà disarmato durante il funzionamento del rilascio di boot, la sirena di due volte e chirp
hazard lights flash twice to confirm. pericolo luci flash due volte per confermare.
* The countdown of Auto. * Il conto alla rovescia di Auto. Rearming or Passive Arming will be interrupted when operating the Riarmarsi o passiva armare verrà interrotto durante il funzionamento del

- --
boot release. rilascio di boot.
* The remote boot release will still work with the ignition on. * Il telecomando rilascio di boot continua a funzionare con l'accensione.
16. 16. Anti-hijacking Countdown (default=30sec.) Anti-dirottamento Countdown (default = 30sec.)
When set as 30 or 60 sec.: Quando è impostato come 30 o 60 sec.:
The system will enter the Anti-hijacking mode after 30 or 60 sec. Il sistema entra Anti-dirottamento modalità dopo 30 o 60 sec. depending on the selection. a seconda della selezione.
The siren will chirp 10 times before entering into the anti-hijacking mode as a last warning. La sirena si chirp 10 volte prima di entrare in campo anti-dirottamento modalità come ultimo avvertimento.
17. 17. Activate Anti-hijacking Countdown (default=normal) Attivare la lotta antifrode dirottamento Countdown (default = normale)
When set as Normal: Quando è impostato come normale:
The countdown will start immediately when activating the anti-hijacking feature. Il conto alla rovescia inizierà immediatamente quando l'attivazione di anti-pirateria aerea funzione.
When set as Brake: Quando è impostato come freno:
The system will enter the Anti-hijacking mode after the footbrake is tapped. Il sistema entra Anti-dirottamento modalità dopo la footbrake è sfruttato.
* After the system starts the countdown, press the valet switch before the last 10 chirps * Dopo il sistema inizia il conto alla rovescia, premere il cameriere prima di passare gli ultimi 10 chirps
warning to stop the countdown and deactivate the anti-hijacking. avvertimento per fermare il conto alla rovescia e disattivare l'anti-pirateria aerea.
18. 18. Anti-hijacking by Remotes (default=disable) Anti-dirottamento di telecomandi (default = disattiva)
When set as Enable: Quando è impostato come Attiva:
The Anti-hijacking will be activated as follows: Anti-pirateria aerea verrà attivato come segue:
- With the system disarmed and the ignition on. -- Con il sistema di disarmo e di quello di accensione.
- Press button #1 for 2 sec. -- Premere il tasto # 1 per 2 sec. to activate the anti-hijacking and the hazard lights flash once to per attivare l'anti-pirateria aerea e il pericolo luci flash di una volta
confirm. confermare.
- The anti-hijacking countdown will start depending on the selection of feature #17. -- L'anti-dirottamento rovescia inizierà a seconda della selezione di funzione # 17. The LED Il LED
will flash every 2 secs. lampeggia ogni 2 secondi. once the countdown starts. una volta che inizia il conto alla rovescia.
- After 30 or 60 sec. -- Dopo 30 o 60 sec. depending on the selection of feature #16, the system enters the a seconda della selezione di funzione # 16, il sistema entra nella
Anti-hijacking mode. Anti-dirottamento modalità di attesa. 10 sec. 10 sec. before the countdown ends, the siren and hazard lights will prima che il conto alla rovescia finisce, la sirena e di luci di rischio
activate as a warning. attivare come un avvertimento.
- When the system is in anti-hijacking mode, the siren will sound and hazard lights flash until -- Quando il sistema è in anti-dirottamento modo, la sirena suona e pericolo fino a quando le luci flash
the system is overridden using the emergency override procedure. il sistema viene sovrascritto con la procedura di emergenza.
19. 19. Anti-hijacking by Ignition+Door (default=disable) Anti-dirottamento di accensione + Door (default = disattiva)
When set as Enable: Quando è impostato come Attiva:
The Anti-hijacking will be activated as follows: Anti-pirateria aerea verrà attivato come segue:
- With the system disarmed and the ignition on. -- Con il sistema di disarmo e di quello di accensione.
- Opening and closing a door will activate the anti-hijacking and the hazard lights will flash -- Apertura e la chiusura di una porta ad attivare l'anti-pirateria aerea e il pericolo luci lampeggiano
once to confirm. una volta per confermare.
- The anti-hijacking countdown will start depending on the selection of feature #17. -- L'anti-dirottamento rovescia inizierà a seconda della selezione di funzione # 17. The LED Il LED
will flash every 2 secs. lampeggia ogni 2 secondi. once the countdown starts. una volta che inizia il conto alla rovescia.
- After 30 or 60 sec. -- Dopo 30 o 60 sec. depending on the selection of feature #16, the system enters the a seconda della selezione di funzione # 16, il sistema entra nella
Anti-hijacking mode. Anti-dirottamento modalità di attesa. 10 sec. 10 sec. before the countdown ends, the siren and hazard lights will prima che il conto alla rovescia finisce, la sirena e di luci di rischio
activate as a warning. attivare come un avvertimento.
- When the system is in anti-hijacking mode, the siren will sound and hazard lights flash until -- Quando il sistema è in anti-dirottamento modo, la sirena suona e pericolo fino a quando le luci flash
the system is overridden using the emergency override procedure. il sistema viene sovrascritto con la procedura di emergenza.
20. 20. Override Code (default= flash 1) Override Codice (flash default = 1)
- Follow Section 1.9 to change the Override Code. -- Seguire Sezione 1,9 per cambiare il codice di ignorare.
- Follow Section 2.6b of the user manual to operate the Override. -- Seguire 2.6b sezione del manuale per il funzionamento del override.

- --
21. 21. Hazard lights Output (default=normal) Luci rischio di uscita (default = normale)
When set as Normal: Quando è impostato come normale:
Connect the hazard lights output as normal using the Y-splitter lead. Collegare il pericolo luci di uscita nel modo normale usando i Y-splitter piombo.
If the Normal connection does not work then connect the hazard lights output to the hazard Se la normale connessione non funziona quindi collegare il pericolo luci output a rischio
switch as shown below and set feature #21 as Pulse or Continuous depending on the type of passare, come indicato qui di seguito e impostare funzione # 21 come Pulse o continuo a seconda del tipo di
hazard switch interruttore rischio
O O
I Io
Control Unit Unità di controllo
Predator Predator
XL3 XL3
Hazard Pericolo
Switch Interruttore
Hazard Lights Luci di rischio
Output Output
Hazard Pericolo
Lights Luci
When selecting Pulse or Continuous, try the factory default first (0.5sec). Al momento della selezione di impulsi o continuo, provare il default di fabbrica primo (0.5sec). If the hazard lights Se il pericolo luci
do not flash as expected proceed to the hazard light learning as follows: non in flash come previsto procedere alla luce il pericolo di apprendimento come segue:
- Turn the ignition on and off 3 times (on-off-on-off-on-off). -- Accendere l'accensione e scendere 3 volte (on-off-on-off-on-off).
- The siren will chirp once to confirm the system is in learning mode. -- La sirena si chirp una volta per confermare il sistema è in modalità di apprendimento.
- Turn the vehicles hazard lights on and the hazard lights start to flash. -- Accendere i veicoli di luci a rischio e il pericolo luci iniziano a lampeggiare.
- Within 10 sec. -- Entro 10 sec. press and hold the valet switch. premere e tenere premuto l'interruttore valet.
- The LED will turn on to confirm the valet switch is pressed. -- Il LED si accende per confermare il cameriere viene premuto il tasto.
- Release the valet switch once the hazard lights have flashed 10 times. -- Rilasciare il valet passare una volta il pericolo luci hanno flashed 10 volte.
- The LED will turn off and siren will chirp once to confirm the learning is complete. -- Il LED si spegne e si sirena chirp una volta per confermare l'apprendimento è completo.
* The system will leave the learning mode automatically if the valet switch is not pressed * Il sistema di lasciare la modalità di apprendimento automaticamente se il valet interruttore non è premuto
within 10 sec. entro 10 sec. or if the ignition is turned on. o se l'accensione è attivata.
2. 2. SYSTEM UPGRADE Aggiornamento del sistema
Follow the steps below to upgrade the system to a 2-way paging alarm. Seguire la procedura riportata di seguito per aggiornare il sistema ad un 2 vie di paging allarme.
- Cut off the Red and White loops next to port W-1 (main unit). -- Tagliare il Rosso e Bianco loop accanto al porto W-1 (unità principale).
- Plug the 2-way transceiver into port W-1. -- Collegare il 2 vie transceiver in porto W-1.
- Program the 2-way remotes to the system. -- Il Programma 2 vie telecomandi al sistema.
* The original remote controls will not work once the 2-way upgrade has been installed. * L'originale di controllo remoto non funziona ancora una volta il 2 vie aggiornamento è stato installato. Only Solo
EVO 4 button or pager remote controls can be used with the pager upgrade. EVO 4 pulsante o pager telecomando può essere utilizzato con il pager aggiornamento.
- --
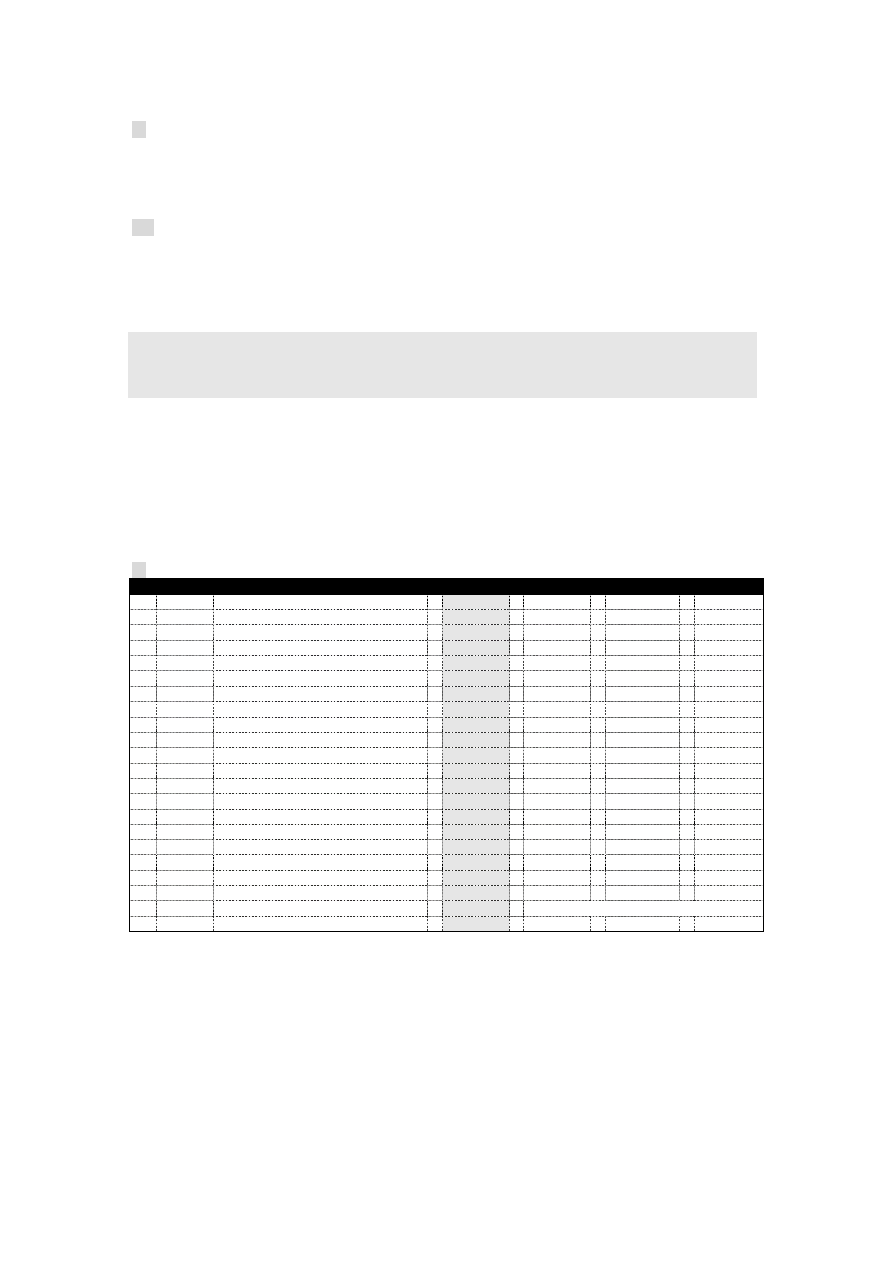
3. 3. Wiring Diagram Schema di cablaggio
Door Porta
l l
o o
ck (nc) CK (NC)
Black Nero
W8-1 W8-1
Door Porta
l l
o o
ck (com) CK (COM)
G G
reen reen
W8-2 W8-2
Door Porta
l l
o o
ck (no) CK (no)
Pink Rosa
W8-3 W8-3
Door Porta
unl UNL
ock (nc) ock (NC)
Whi Whi
te TE
W8-4 W8-4
Door Porta
unl UNL
ock (com) ock (COM)
Blue Blu
W8-5 W8-5
W7-3 W7-3
Bl Bl
ack ack
G G
ro Ro
und UND
W7-1 W7-1
Gr Gr
ee EE
n n
Shock se SE shock
nsor nsor
1st stage 1 ° piano
i io
n n
put mettere
W7-2 W7-2
Bl Bl
ue UE
Shock se SE shock
nsor nsor
2nd stage 2a tappa
i io
n n
put mettere
W7-4 W7-4
Red Rosso
+12v +12 V
W6-3 W6-3
Bl Bl
ack ack
G G
ro Ro
und UND
W6-4 W6-4
Red Rosso
+12v +12 V
W6-1 W6-1
A Un
u e
xiliary s xiliary s
en it
so così
r 1s r 1s
ts TS
ta TA
g g
e in E in
p p
u e
t t
W6-2 W6-2
A Un
u e
xiliary s xiliary s
en it
so così
r 2n r 2n
d d
s s
ta TA
g g
e in E in
p p
u e
t t
To gr A GR
ound or ound o
+12V de +12 V de
pe PE
ndi NDI
n n
g on pol g su Pol
ar AR
ity of W2-2 (+/-) lità di W2-2 (+/-)
Whi Whi
te/Red TE / Rosso
W2-1 W2-1
Whi Whi
te TE
W2-2 W2-2
H H
azard azard
lig LIG
h h
ts TS
o o
u e
tp TP
u e
t ( t (
+ +
/- / --
b b
u e
ilt ILT
-in - in
relay) relè)
Black Nero
W2-3 W2-3
To gr A GR
ound ound
Y Y
ello Ello
w w
W2-4 W2-4
Igni Igni
ti TI
on tr a tr
igge igge
ri RI
n n
put mettere
Red Rosso
W2-5 W2-5
To +12V battery A +12 V batteria
Brown Marrone
W2-6 W2-6
Si Se
re ri
n/Hor n / Hor
n n
output (1A) output (1A)
Orange/Black Arancio / nero
W2-7 W2-7
Immob Immob
ilis ILIS
er out ER fuori
p p
ut UT
( (
n n
ormally op ormally op
en/ it /
-500mA) - 500mA)
Orange Arancione
W2-8 W2-8
Immob Immob
ilis ILIS
er out ER fuori
p p
ut UT
( (
n n
ormally c c ormally
los Los
ed Ed
/- / --
500mA) 500mA)
W3-0 W3-0
Gr Gr
ee EE
n n
Door Porta
tr TR
igge igge
ri RI
n n
put (-) mettere (-)
W3-1 W3-1
Pur Pur
p p
le Le
Door Porta
tr TR
igge igge
ri RI
n n
put (+) mettere (+)
W3-2 W3-2
Bl Bl
ack/Red ack / Rosso
To footbr A footbr
ake Ake
l l
ig IG
ht HT
W3-3 W3-3
Gr Gr
ay è
Boot release output (-500mA) Boot rilascio di uscita (-500mA)
W3-4 W3-4
Gr Gr
ay/bl è / BL
ack ack
Total/Comfort closure output (-500mA) Totale / Comfort chiusura di uscita (-500mA)
W3-5 W3-5
Bl Bl
ue UE
/Whi / Whi
te TE
Door unlock2 output (-500mA) Unlock2 porta di uscita (-500mA)
W3-6 W3-6
Gr Gr
ee EE
n n
/Whi / Whi
te TE
Interior light output (-500mA) Interni luce di uscita (-500mA)
W3-8 W3-8
Bl Bl
ue UE
Boot/Bonne Boot / Bonne
t tr t tr
igge igge
ri RI
n n
put mettere
W3-9 W3-9
Pink Rosa
Remote starter mo Mo remote starter
dule output (-500mA) dule di uscita (-500mA)
W3-7 W3-7
Red/Bl Rosso / BL
ack ack
Bypass i I by-pass
n n
put fr mettere fr
om opti Om OPTI
onal Onal
r r
emote emote
star stella
te TE
r modul r Modul
e e
W5 P W5 P
lug-i lug-i
n Val n Val
et swi ET Svi
tch TCH
W W
1 1
-P - P
lu Lu
g g
-in - in
2Way 2Way
Tr Tr
anscei anscei
ver Ver
W4 Pl W4 Pl
ug-i UG-i
n LED i n i LED
n n
di Di
cator cator
Whi Whi
te TE
Red Rosso
Door Porta
unl UNL
ock (no) ock (no)
Orange Arancione
W8-6 W8-6
- --
4. 4. Wiring Notes Note di cablaggio
CONNECT TO A FUSED +12 Connettersi a un fuso +12
OR GROUND DEPENDING O macinati a seconda
ON WIRING OF PIN 87 Di cablaggio a 87 pin
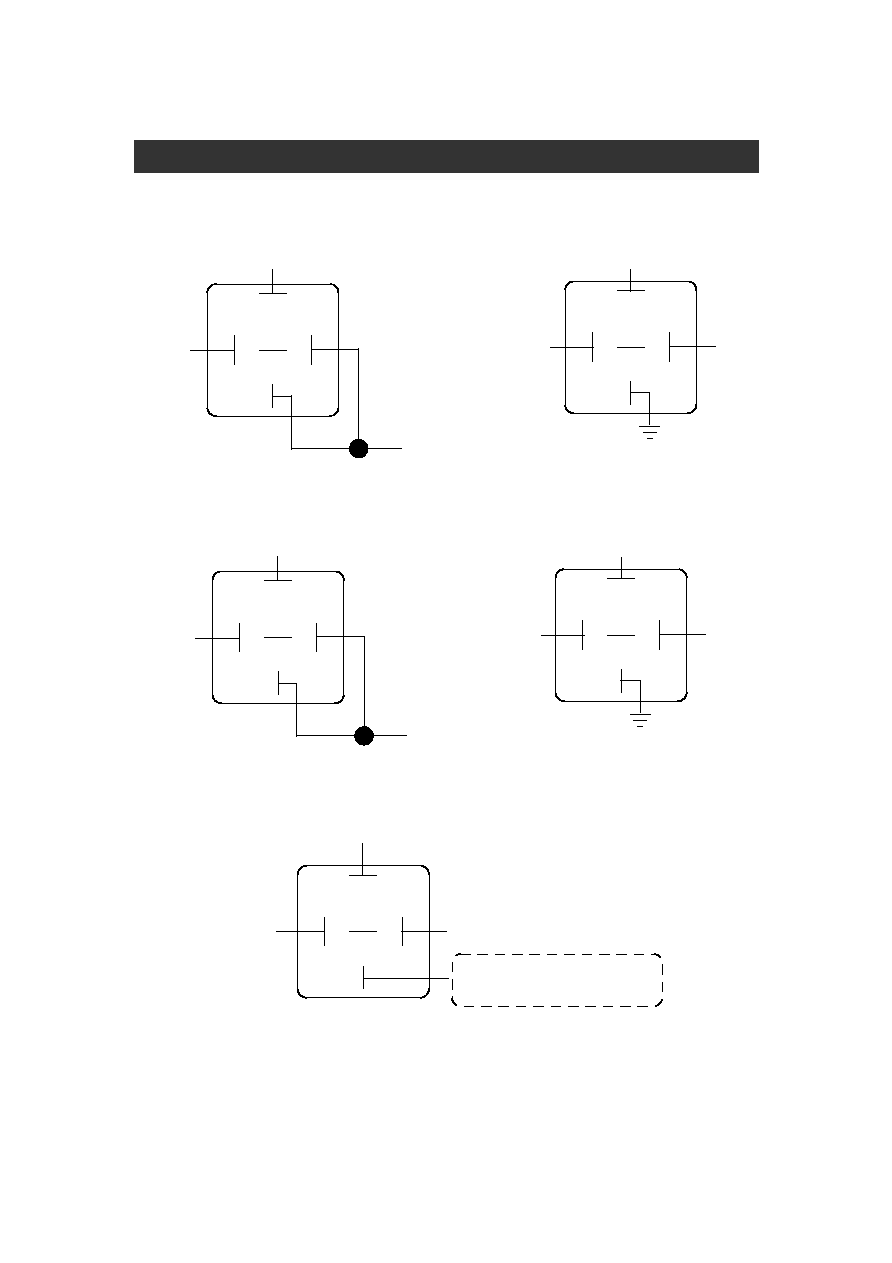
Wiring Diagrams - Interior Light, Horn & Boot Release Schemi di cablaggio - luce interiore, corno e di avvio di rilascio
Postive Interior Light Postive luce interiore
Negative Interior Light Interni luce negativa
To Positive A Positivo
Interior Light La luce interiore
87 87
85 85
86 86
87a 87 bis
30 30
+12 +12
White Bianco
W3-6 W3-6
87 87
85 85
86 86
87a 87 bis
30 30
To Negative A negativo
Interior Light La luce interiore
+12 +12
White Bianco
W3-6 W3-6
Positive Horn Honk Corno positivo Honk
Negative Horn Honk Corno negativo Honk
To Positive A Positivo
Horn Wire Corno Wire
87 87
85 85
86 86
87a 87 bis
30 30
+12 +12
Brown Marrone
W2-6 W2-6
87 87
85 85
86 86
87a 87 bis
30 30
To Negative A negativo
Horn Wire Corno Wire
+12 +12
Brown Marrone
W2-6 W2-6
Boot Release Wiring Boot rilascio di cablaggio
87 87
85 85
86 86
87a 87 bis
30 30
To Boot Release Per l'avvio di rilascio
Solenoid Solenoide
To Fused A Fused
Battery Source Fonte batteria
Gray Grigio
W3-3 W3-3
- --
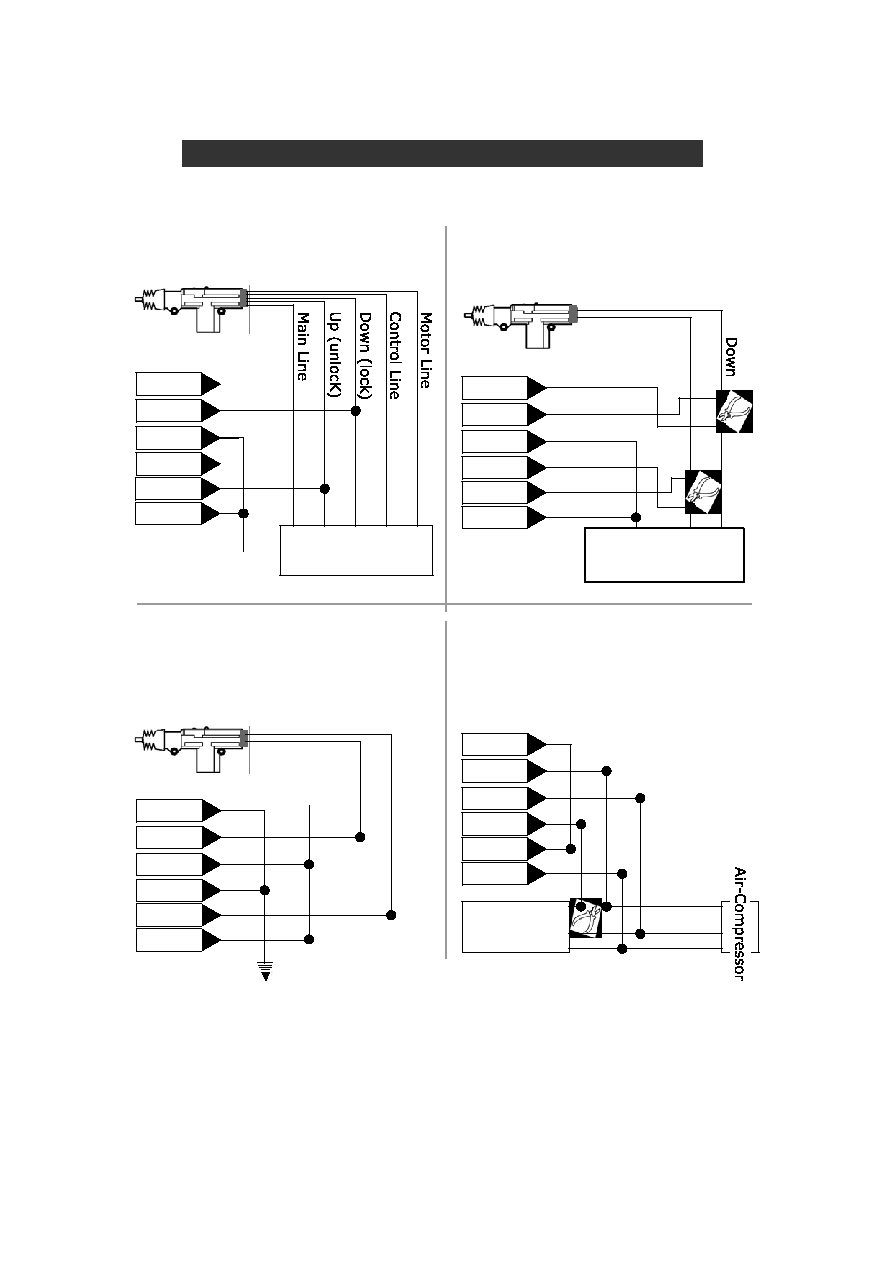
5. 5. Central Locking Wiring Chiusura centralizzata cablaggio
Follow the diagrams below for wiring basic central locking systems Seguire i diagrammi di seguito per il cablaggio di base centrale di bloccaggio
+12V +12 V
Wiring Diagram - Predator XL3 Door Lock/Unlock - Basic Schema di cablaggio - Predator XL3 porta bloccare / sbloccare - di base
Black Nero
Green Verde
Pink Rosa
White Bianco
Blue Blu
Orange Arancione
Original Built-in Originale Built-in
Controller Controller
Diagram #A Un diagramma #
Negative or Positive Locking Negativi o positivi di bloccaggio
Diagram #B Diagramma # B
Motor Interrupt Locking Interrompere motore di bloccaggio
eg. ad es. CHRYSLER CHRYSLER
Door Lock Switch Porta blocco switch
On the Front Door Sulla porta di casa
Black Nero
Green Verde
Pink Rosa
White Bianco
Blue Blu
Orange Arancione
Black Nero
Green Verde
Pink Rosa
White Bianco
Blue Blu
Orange Arancione
Diagram #C Diagramma C #
Central locking where only a switch Chiusura centralizzata in cui solo uno switch
is installed in the drivers door. è installato il driver in porta.
An additional door motor is required. Porta un ulteriore motore è obbligatorio.
Diagram #D Diagramma # D
Vacuum central locking Vuoto centrale di bloccaggio
eg: MERCEDES, AUDI ad esempio: MERCEDES, AUDI
(Note: Set door lock/unlock time to 3.6 sec.) (Nota: Imposta la porta bloccare / sbloccare il tempo di 3,6 sec.)
Black Nero
Green Verde
Pink Rosa
White Bianco
Blue Blu
Orange Arancione
Electric Motor Motore elettrico
Switch Interruttore
Main Line Main Line
Down Giù
Up Su
Up Su
+12V +12 V
Down Giù
Up Su
To +12V or Ground A +12 V o Ground
Depending on polarity A seconda della polarità
of locking system del sistema di bloccaggio
Polarity Reverses on a single wire Inverte la polarità su un unico filo
Two wires resting at ground, one pulses Due fili di riposo a terra, uno impulsi
12V for lock, one pulses 12V for unlock 12V per bloccare, uno impulsi 12V per sbloccare
Two wires resting open circuit one pulses 12V or Due fili di riposo circuito aperto uno o impulsi 12V
ground for lock, one pulses 12V or ground for unlock terreno per bloccare, uno o impulsi 12V terreno per sbloccare
- --
Two Stage Negative Trigger Due trigger fase negativa
Two Stage Positive Trigger Due trigger fase positiva
The Predator XL3 has a dedicated unlock-2 output allowing for two Il Predator XL3 ha una dedicata sbloccare-2 che permette di uscita per due
stage door unlock operation. Stage Door sbloccare operazione.
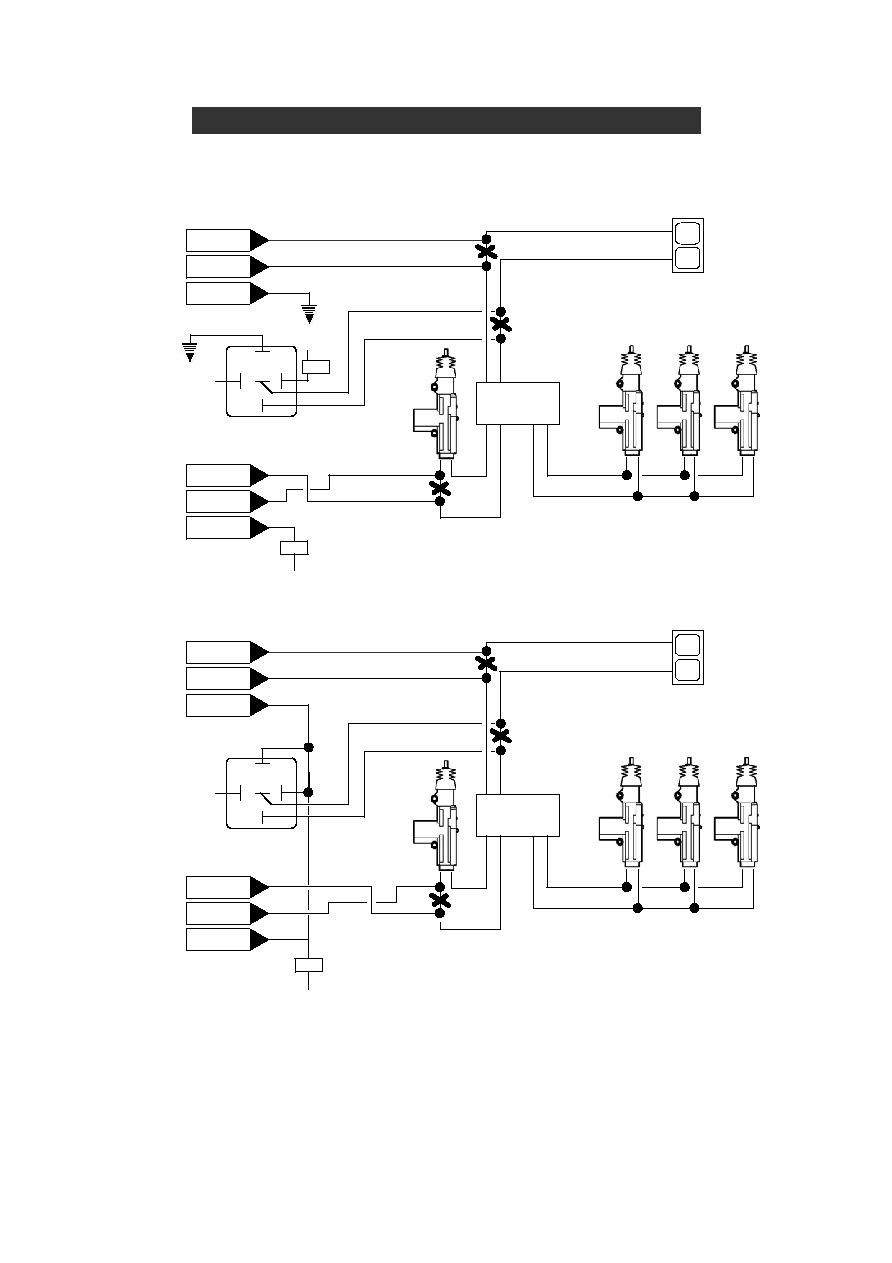
Wiring Diagram - Predator XL3 Two Stage Door Unlock Schema di cablaggio - Predator XL3 due Stage Door sbloccare
(-)UNLOCK-2 (-) Unlock-2
DOOR LOCK PORTA BLOC
SWITCH SWITCH
UL UL
L L
FACTORY FACTORY
DOOR LOCK PORTA BLOC
MODULE MODULO
PASSENGER DOOR PORTA PASSEGGERI
MOTORS MOTORI
DRIVERS DRIVERS
DOOR PORTA
MOTOR MOTORE
(+)DOOR LOCK WIRE (+) PORTA BLOC WIRE
(+)DOOR UNLOCK WIRE (+) PORTA SBLOCCO WIRE
Black Nero
Pink Rosa
Green Verde
(+)LOCK (+) BLOC
87 87
87a 87 bis
85 85
86 86
30 30
White Bianco
Blue Blu
Orange Arancione
(+)UNLOCK (+) Unlock
+12V +12 V
15A 15A
(-)UNLOCK-2 (-) Unlock-2
DOOR LOCK PORTA BLOC
SWITCH SWITCH
UL UL
L L
FACTORY FACTORY
DOOR LOCK PORTA BLOC
MODULE MODULO
PASSENGER DOOR PORTA PASSEGGERI
MOTORS MOTORI
DRIVERS DRIVERS
DOOR PORTA
MOTOR MOTORE
(-)DOOR LOCK WIRE (-) PORTA BLOC WIRE
(-)DOOR UNLOCK WIRE (-) PORTA SBLOCCO WIRE
Black Nero
Pink Rosa
Green Verde
(-)LOCK (-) BLOC
87 87
87a 87 bis
85 85
86 86
30 30
+12V +12 V
15A 15A
White Bianco
Blue Blu
Orange Arancione
(-)UNLOCK (-) Unlock
+12V +12 V
15A 15A

- --
Wiring Diagram - Predator XL3 Two Stage Door Unlock Schema di cablaggio - Predator XL3 due Stage Door sbloccare
Two Stage Adding Actuators Aggiunta di fase due attuatori
+12V +12 V
Black Nero
Green Verde
Pink Rosa
White Bianco
Blue Blu
Orange Arancione
86 86
85 85
87a 87 bis
30 30
87 87
(-)Unlock-2 (-) Sblocca-2
+12V +12 V
Passenger Door Motors Passeggero porta motori
15A 15A
LOCK LOCK
UNLOCK SBLOCCO


