
- --
FALCON FALCON
WORLD CLASS SECURITY Seguridad de clase mundial
FALCON PREDATOR XL3 Halcón depredador XL3
Vehicle Security System with Anti-Hijack De vehículos con sistema de seguridad anti-secuestro
Installer's Manual Manual del Instalador
TABLE OF CONTENTS TABLA DE CONTENIDO
1. 1. SYSTEM INSTALLATION ............................................... La instalación de un sistema ............................................... 2 2
1.1. 1,1. Power On ........................................................... Encendido ................................................ ........... 2 2
1.2. 1,2. NO & NC Immobiliser Relay Wiring ......................... NO & NC inmovilizador relé cableado ......................... 2 2
1.3. 1,3. Programming New Remote Controls ....................... Nueva Programación controles remotos ....................... 2 2
1.4. 1,4. Bypass Input (red/black wire: w3-7) ...................... By-pass de entrada (rojo / negro hilo: w3-7) ...................... 2 2
1.5. 1,5. Start Output (pink wire: w3-9) .............................. Inicio de salida (cable rosa: w3-9) .............................. 2 2
1.6. 1,6. Interior Light Supervision (green/white wire: w3-6).. Luz Interior Supervisión (verde / cable blanco: w3-6) .. 3 3
1.7. 1,7. Program the Optional Features (default=1 chirp)...... Programa de las opciones de funcionamiento (por defecto = 1 sonido )...... 3 3
1.8. 1,8. Optional Programmable Features ........................... Opcional características programables ........................... 3 3
1.9. 1,9. Feature #20 Override Code (default=1 flash) .......... Característica # 20 Override Código (por defecto = 1 flash) .......... 4 4
1.10. 1,10. Explanation of the Optional Features..................... Explicación de las funciones opcionales ..................... 4 4
2. 2. SYSTEM UPGRADE...................................................... Actualización del sistema ................................................ ...... 8 8
3. 3. Wiring Diagram .......................................................... El diagrama de cableado ................................................ .......... 9 9
4. 4. Wiring Notes............................................................ Notas de cableado ................................................ ............ 10 10
5. 5. Central Locking Wiring .............................................. Central de bloqueo cableado .............................................. 11 11
- --
1. 1. SYSTEM INSTALLATION SISTEMA DE INSTALACIÓN
1.1. 1,1. Power On Encendido
When powered on, the system will remain in the same status it was in when powered off. Cuando encendido, el sistema se mantendrá en el mismo estado que cuando fue a apagado.
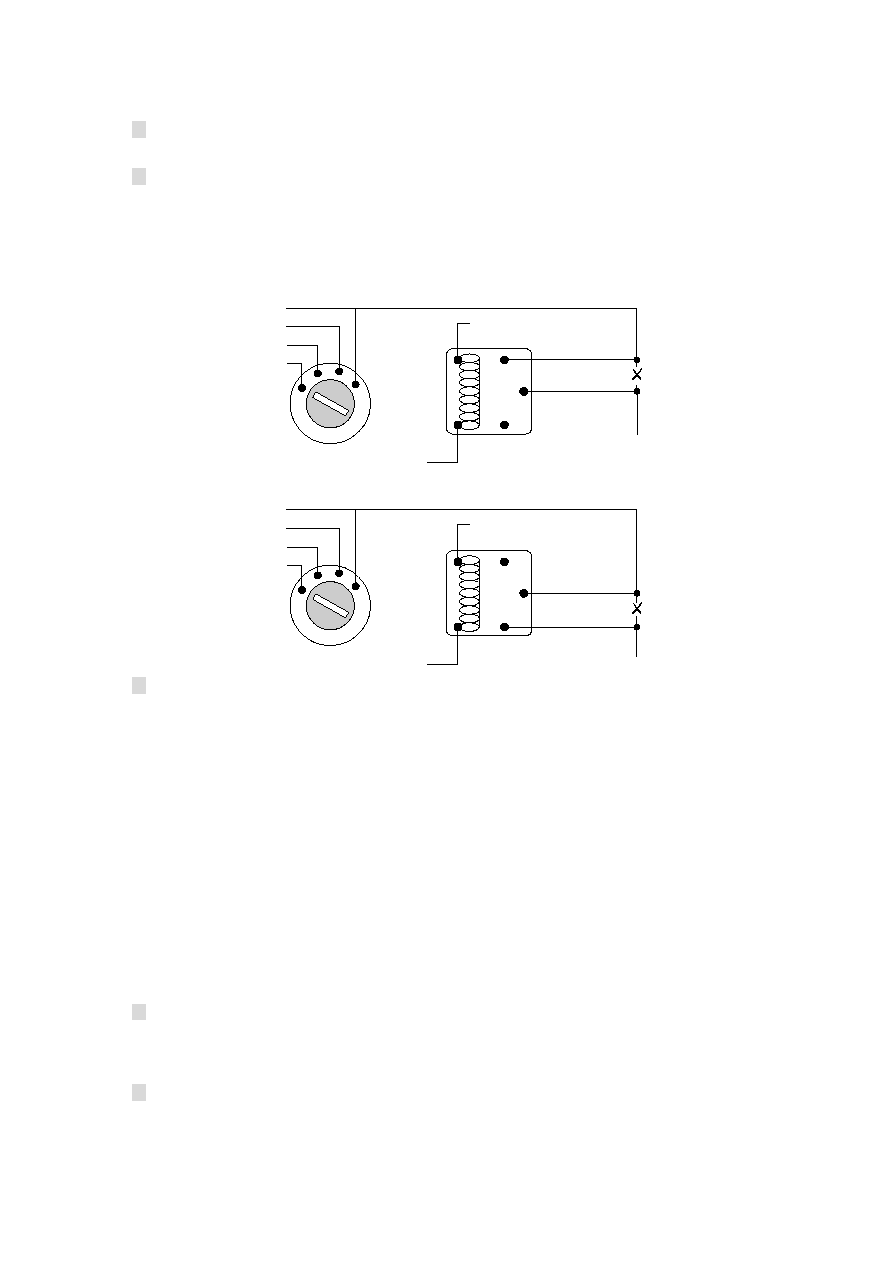
1.2. 1,2. NO & NC Immobiliser Relay Wiring NO & NC inmovilizador relé cableado
The system offers two ways of wiring the immobiliser as shown below. El sistema ofrece dos formas de cableado el inmovilizador como se indica a continuación.
When wired for Normally Open the immobiliser relay is switched on when the alarm is disarmed Cuando cable Normalmente abierto para el inmovilizador relé está encendido cuando la alarma está desactivada
(fail secure). (no seguro). When wired as Normally Closed the relay is on when the alarm is armed (fail safe). Cuando cableada como normalmente cerrada el relé está en cuando la alarma está armado (no seguro).
Wiring Diagram - Immobiliser Relay NO & NC El diagrama de cableado - inmovilizador no Relay & NC
Normally Closed Immobiliser Connection (Fail Safe) Normalmente cerrado inmovilizador conexión (Fail Safe)
87a - Normally Closed 87a - normalmente cerrada
87 - Normally Open 87 - Normalmente abierto
Off Apagado
Acc Acc
On Encendido
Start Iniciar
86 86
85 85
87 87
87a 87a
30 30
To +12V DC or Acc. A +12 V DC o Acc.
W2-8 W2-8
fig. fig. 2 2
Normally Open Immobiliser Connection (Fail Secure) Normalmente abierto inmovilizador conexión (Fail Secure)
87a - Normally Closed 87a - normalmente cerrada
87 - Normally Open 87 - Normalmente abierto
Off Apagado
Acc Acc
On Encendido
Start Iniciar
86 86
85 85
87 87
87a 87a
30 30
To Acc. Para Acc.
W2-7 W2-7
fig. fig. 1 1
1.3. 1,3. Programming New Remote Controls Nueva Programación controles remotos
The included remote controls have been programmed to the system in the factory. El incluidos controles remotos se han programado para el sistema en la fábrica. Follow the Siga las
procedure below to program a new remote control to the system: procedimiento descrito a continuación para un nuevo programa de control remoto para el sistema:
- Turn the ignition on with the system disarmed. -- Gire el encendido con el sistema desarmado.
- Within 10 seconds, press valet switch 3 times. -- Dentro de 10 segundos, pulse valet interruptor 3 veces. (or 6 times if pager upgrade is installed). (6 veces o buscapersonas si se ha instalado la actualización).
- The siren sounds for 2 sec. -- La sirena suena durante 2 seg. to confirm the system is now in code learning mode. para confirmar que el sistema está en modo de código de aprendizaje.
- Within 10 sec., press any button of 1 -- Dentro de 10 seg., Pulse cualquier botón de 1
st St
remote control control remoto
The siren will sound for 1 sec. La sirena sonará durante 1 seg. and hazard lights flash twice to confirm the 1 y los peligros luces de flash dos veces para confirmar el 1
st St
remote has a distancia ha
been programmed to the system and all the previous codes in the system will be erased sido programado para el sistema y todos los anteriores códigos en el sistema se borrará
entirely. totalmente.
- Within 10 sec., repeat for the 2 -- Dentro de 10 seg., Para repetir la 2
nd ND
remote control and again for 3 control remoto y otra vez durante 3
rd Rd
and 4 y 4
th º
remotes as remotos como
applicable. aplicables.
* Up to 4 remotes can be programmed to the system * Hasta 4 mandos a distancia se puede programar al sistema
* The system will leave the code learning mode after programming 4 remotes to the system * El sistema abandonará el modo de aprendizaje de código de programación después de 4 mandos a distancia para el sistema
and the siren will sound for 2 seconds y la sirena sonará durante 2 segundos
to confirm. para confirmar.
* If no buttons are pressed within 10 seconds, the system will leave the learning code mode * Si no se presionan los botones dentro de los 10 segundos, el sistema dejará el modo de aprendizaje de código
and the siren will sound for 2 seconds to confirm. y la sirena sonará durante 2 segundos para confirmar.
* The system will leave the code learning mode if the ignition is turned off at any time and the * El sistema abandonará el modo de aprendizaje de código si la ignición se apaga en cualquier momento y la
siren will sound for 2 seconds to confirm. sirena sonará durante 2 segundos para confirmar.
1.4. 1,4. Bypass Input (red/black wire: w3-7) By-pass de entrada (rojo / negro hilo: w3-7)
This wire is designed for external engine start module or turbo timer. Este cable está diseñado para exteriores de arranque del motor turbo o módulo temporizador. Feed this wire with Este cable de alimentación con
ground when the external engine start module or turbo timer is activated and the system will cuando el terreno externo de arranque del motor turbo o módulo temporizador y se activa el sistema
bypass the ignition, shock sensor and immobiliser relay until the ground pulse is removed. el encendido de circunvalación, sensores de choque y inmovilizador de relevo hasta el terreno del pulso es eliminado.
1.5. 1,5. Start Output (pink wire: w3-9) Inicio de salida (cable rosa: w3-9)
Press and hold button #4, 3 sec. Pulse y mantenga pulsado el botón # 4, 3 seg. later the system will send a 1 sec. más tarde, el sistema enviará un 1 seg. pulse to activate the pulso para activar la
external engine start module. exterior del módulo de arranque del motor. Pressing button #4 for 3 sec. Al pulsar el botón # 4 por 3 seg. will send the pulse again to enviará de nuevo el pulso a
deactivate the external engine start module. desactivar el arranque del motor externo módulo.
- --
1.6. 1,6. Interior Light Supervision (green/white wire: w3-6) Luz Interior Supervisión (verde / cable blanco: w3-6)
If connected: Si está conectado:
- --
The interior light will be turned on for 20 sec. La luz interior se enciende por 20 seg. when disarming unless the ignition is turned cuando desarmar a menos que el de encendido está activado
on. encendido.
- --
The interior light will be turned on all the time whilst the alarm is sounding. La luz interior se enciende todo el tiempo mientras la alarma está sonando.
1.7. 1,7. Program the Optional Features (default=1 chirp) Programa de las opciones de funcionamiento (por defecto = 1 sonido)
Follow the steps below to program the Optional Features: Siga los siguientes pasos para programar las funciones opcionales:
For example: To program the feature #5 as 15sec. Por ejemplo: Para programar la característica # 5 como 15sec.
- Turn the ignition on then off with the system disarmed. -- Gire el encendido a continuación, con el sistema desarmado.
- Within 10 sec., press the valet switch 3 times. -- Dentro de 10 seg., Pulse el interruptor valet 3 veces.
- The system enters the programming mode and the siren and LED will be on for 2 sec. -- El sistema entra en el modo de programación y la sirena y el indicador luminoso se para en 2 segundos. to para
confirm. confirmar.
* To Reset to Factory Default: * Para Restablecer a la fábrica por defecto:
Within 10 seconds press button #4 for 3 sec., all the optional features will be reset to the Dentro de los 10 segundos pulse el botón # 4 por 3 seg., Todas las funciones opcionales se restablecerá a las
factory default and the siren will sound for 2 sec. predeterminada de fábrica y la sirena sonará durante 2 seg. to confirm leaving the programming dejando para confirmar la programación
mode. modo de espera.
- Within 10 sec., press the valet switch 5 times. -- Dentro de 10 seg., Pulse el interruptor valet 5 veces.
- 1 sec. -- 1 seg. later the siren will chirp 5 times to confirm. más tarde la sirena sonido 5 veces para confirmar.
- Press button #1 of the remote control 6 times to select 15 sec. -- Pulse el botón # 1 del control remoto 6 veces para seleccionar 15 segundos. and the siren will chirp 6 y la sirena sonido 6
times to confirm the setting. veces para confirmar la configuración.
- Press the valet switch again (from 1 to 21) within 10 sec. -- Presione el interruptor de nuevo valet (de 1 a 21) dentro de 10 seg. to select the next feature for para seleccionar la siguiente función para
programming. programación.
* The system will leave the programming mode and the siren will sound for 2 sec. * El sistema abandonará el modo de programación y la sirena sonará durante 2 seg. to confirm a confirmar
if the ignition is turned off at any time during programming or if the valet switch or remote si la ignición se apaga en cualquier momento durante la programación o si el valet interruptor o mando a distancia
control button #1 has not been pressed within 10 sec. botón de control # 1 no ha sido presionado dentro de los 10 seg.
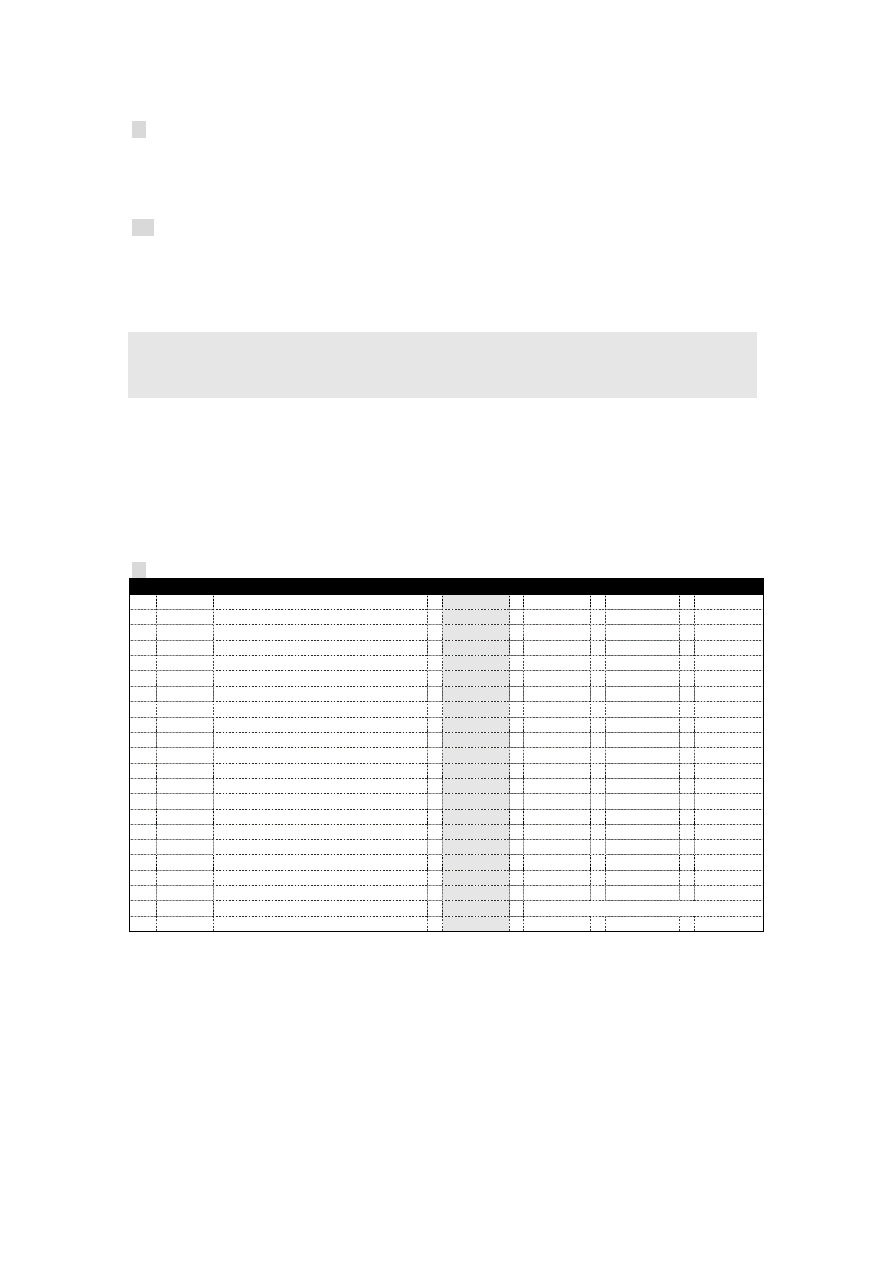
1.8. 1,8. Optional Programmable Features Opcional características programables
No Chirp No sonido
Function Función
1 Chirp 1 sonido
2 Chirp 2 sonido
3 Chirp 3 sonido
4 Chirp 4 sonido
1 1 chirp 1 1 sonido
Chirp Confirmation Confirmación de sonido
On Off On Off
2 2 chirp 2 2 sonido
Door Lock with Passive Arming Door Lock pasiva con el suministro de armas
Disable Enable Desactivar Activar
3 3 chirp 3 3 sonido
Ignition Lock Bloqueo de encendido
Disable Ignition Brake Desactivar encendido Brake
4 4 chirp 4 4 sonido
Ignition Unlock Desbloqueo de encendido
Disable Desactivar
Driver Driver
All Todo
5 5 chirp 5 5 sonido
Door Lock Time(sec.) Door Lock Time (Sec.)
1) 0.8 1) 0,8
2) 3.6 2) 3,6
3) 0.8*2 4) 0.8+15 3) 0,8 * 2 4) 0,8 +15
5) 5)
0.8+40 0,8 +40
6) 15 6) 15
7) 40 7) 40
6 6 chirp 6 6 sonido
Door Unlock Time(sec.) Apertura de puertas Time (Sec.)
0.8 3.6 0.8*2 0,8 3,6 0,8 * 2
7 7 chirp 7 7 sonido
Door Unlock with Disarming Apertura de puertas con el desarme de
Driver All Todos Driver
8 8 chirp 8 8 sonido
Siren/Horn Output Sirena / bocina de salida
Siren Horn Horn Siren
9 9 chirp 9 9 sonido
Alarm Condition Cycle Duration Condición de alarma duración del ciclo
30 30
sec. SEC. 60 60
sec. SEC.
10 10 chirp 10 10 sonido
Interior Light Delay Interior luz demora
Disable Desactivar
25 sec. 25 seg.
40 sec. 40 seg.
60 sec. 60 seg.
11 11 chirp 11 11 sonido
Auto. Auto. Rearming Rearme
Disable Enable Desactivar Activar
12 12 chirp 12 12 sonido
Auto. Auto. Engine Disable(AED) Motor de desactivación (AED)
Disable Enable Desactivar Activar
13 13 chirp 13 13 sonido
Door Open Alerts Alertas de apertura de puerta
Disable Mode Desactivar Modo
1 Mode Modo 1
2 2
14 14 chirp 14 14 sonido
Total/Comfort Closure Total / Comfort cierre
Disable Desactivar
15 sec. 15 seg.
30 sec. 30 seg.
40 sec. 40 seg.
15 15 chirp 15 15 sonido
Disarm with Boot Release Desarmar con la liberación de arranque
Disable Enable Desactivar Activar
16 16 chirp 16 16 sonido
Anti-hijacking Countdown Anti-secuestro Countdown
30sec. 30sec. 60sec. 60sec.
17 17 chirp 17 17 sonido
Activate Anti-hijacking Countdown Active Anti-secuestro Countdown
Normal Normal
Brake Brake
18 18 chirp 18 18 sonido
Anti-hijacking by Remotes Anti-secuestro de Remotos
Disable Enable Desactivar Activar
19 19 chirp 19 19 sonido
Anti-hijacking by Ignition+Door Anti-secuestro de la puerta de encendido +
Disable Enable Desactivar Activar
20 20 chirp 20 20 sonido
Override Code Sobrescribir Código
Flash 1 Flash 1
Flash 2~10 Flash 2 ~ 10
21 21 chirp 21 21 sonido
Hazard lights Output Riesgos luces de salida
Normal Pulse Pulso normal
Continuous Continuo
Factory Default = 1 Chirp Valores predeterminados de fábrica = 1 sonido

- --
1.9. 1,9. Feature #20 Override Code (default=1 flash) Característica # 20 Override Código (por defecto = 1 flash)
Follow the steps below to program: Siga los pasos que se indican a continuación para el programa:
- Turn the ignition on then off with the system disarmed. -- Gire el encendido a continuación, con el sistema desarmado.
- Within 10 sec., press the valet switch 3 times. -- Dentro de 10 seg., Pulse el interruptor valet 3 veces.
- The system enters the programming mode and the siren and LED will be on for 2 sec. -- El sistema entra en el modo de programación y la sirena y el indicador luminoso se para en 2 segundos. to para
confirm. confirmar.
- Within 10 seconds press the valet switch 20 times to select feature #20 -- Dentro de los 10 segundos pulse el interruptor valet 20 veces para seleccionar característica # 20
- 1 sec. -- 1 seg. later the siren will chirp 20 times to confirm the selection. más tarde la sirena sonido 20 veces para confirmar la selección.
- The LED will start to flash 10 times slowly 2 sec. -- El LED parpadea 10 veces lentamente 2 seg. later. posterior.
- Press button #1 of remotes after the LED has flashed the number of times you want to set -- Pulse el botón # 1 de mandos a distancia después de que el LED tiene destellaban el número de veces que desea configurar
the code to; Eg. el código para, por ejemplo. If you want to choose 6 as the code then press button #1 once after the Si desea elegir 6 como el código a continuación, pulse el botón # 1 una vez después de la
LED has flashed 6 times. LED ha destellaban 6 veces. The LED will turn off and siren sound for 1 sec. El LED se apagará y el sonido de la sirena 1 seg. to confirm. para confirmar.
- Press the valet switch within 10 sec., to select the next feature for programming. -- Presione el interruptor valet dentro de los 10 seg., Para seleccionar la siguiente función para la programación.
1.10. 1,10. Explanation of the Optional Features Explicación de las características opcionales
01. 01. Chirp Confirmation On/Off(default=on) Confirmación de sonido On / Off (por defecto = en)
When On: Cuando en:
The siren will chirp once for system arming and twice for disarming. La sirena sonido para el sistema una vez y dos veces el suministro de armas para desarmar. With this feature on, the Con esta característica, la
silent arm/disarm button is still functional. silencio arm / desarmar botón es todavía funcional.
When Off: Cuando Off:
The siren will not chirp for system arming and disarming but the hazard lights will flash as La sirena no sistema de sonido para armar y desarmar, pero el peligro luces de flash como
normal. normal.
02. 02. Door Lock with Passive Arming(default=disable) Door Lock con armado pasivo (por defecto = desactivar)
When Enabled: Cuando está activada:
The doors will also be locked when the system passively arms itself. Las puertas también se bloquea cuando el sistema de armas pasivamente.
03. 03. Ignition Lock (default=disabled) Bloqueo de encendido (valor predeterminado = desactivado)
When set as Ignition: Cuando se establece como encendido:
- The doors will be locked 15 sec. -- Las puertas serán cerradas 15 segundos. after turning the ignition on if all the doors are closed Después de encender la ignición en si todas las puertas están cerradas
properly. correctamente.
- The doors will not be locked if a door is not closed or has been opened during the 15 sec. -- Las puertas no será bloqueada si la puerta no está cerrada o se ha abierto durante los 15 segundos.
countdown. cuenta regresiva.
- If the doors are unlocked during driving they will be locked again automatically after -- Si las puertas se irán desbloqueando durante la conducción serán cerradas automáticamente después de
stepping on the brake pedal. pisar el pedal del freno. (Brake light wire must be connected). (Brake cable de la luz debe estar conectado).
When set as Brake: (Brake light wire must be connected) Cuando se ajusta como Brake: (Brake cable de la luz debe estar conectado)
- The doors will be locked when the brake is tapped with the ignition on if all the doors are -- Las puertas serán cerradas cuando el freno es explotado con el encendido por si todas las puertas están
closed properly. cerrado correctamente.
- If the doors are unlocked during driving they will be locked again automatically after -- Si las puertas se irán desbloqueando durante la conducción serán cerradas automáticamente después de
stepping on the brake pedal. pisar el pedal del freno.
04. 04. Ignition Unlock(default=disable) Desbloqueo de encendido (por defecto = desactivar)
When set as Driver: Cuando se ajusta como conductor:
After parking the car the drivers door will be unlocked when turning the ignition off. Después de estacionar el coche a los conductores puerta se desbloquea cuando se enciende el encendido apagado.
When set as All: Cuando se ajusta como todos:
After parking the car all the doors will be unlocked after turning the ignition off. Después de estacionar el coche todas las puertas se desbloquea después de convertir el encendido apagado.
05. 05. Door Lock Time (default=0.8) Tiempo de bloqueo de la puerta (por defecto = 0,8)
When set as 0.8 sec.: Cuando se ajusta como 0,8 seg.:
The system will send a 0.8 sec. El sistema enviará un 0,8 seg. pulse when locking the doors. pulso cuando el bloqueo de las puertas.
When set as 3.6 sec.: Cuando se ajusta como 3,6 seg.:
The system will send a 3.6 sec. El sistema enviará un 3,6 seg. pulse when locking the doors. pulso cuando el bloqueo de las puertas.
When set as 0.8 sec.*2: Cuando se ajusta como 0,8 segundos .* 2:
The system will send two 0.8 sec. El sistema le enviará dos 0,8 seg. pulses when locking the doors. pulsos de bloqueo cuando las puertas.
When set as 0.8 sec. Cuando se ajusta como 0,8 seg. + 15 sec.: + 15 seg.:
The system will send a 0.8 sec. El sistema enviará un 0,8 seg. pulse and then send a 15 sec. pulso y, a continuación, enviar a 15 seg. pulse when locking the doors. pulso cuando el bloqueo de las puertas.

- --
*When selecting 0.8 sec. * Al seleccionar 0,8 seg. + 15 sec. + 15 seg. for cars with total closure the windows will be closed para los vehículos con cierre total de las ventanas se cerrarán
automatically during remote arming without enabling feature #14. automáticamente durante remoto que permite armar sin característica # 14.
When set as 0.8 sec. Cuando se ajusta como 0,8 seg. + 40 sec.: + 40 seg.:
The system will send a 0.8 sec. El sistema enviará un 0,8 seg. pulse and then send a 40 sec. pulso y, a continuación, enviar un 40 seg. pulse when locking the doors. pulso cuando el bloqueo de las puertas.
*When selecting 0.8 sec. * Al seleccionar 0,8 seg. + 40 sec. + 40 seg. for cars with total closure the windows will be closed para los vehículos con cierre total de las ventanas se cerrarán
automatically during remote arming without enabling feature #14. automáticamente durante remoto que permite armar sin característica # 14.
When set as 15 sec.: Cuando se ajusta como 15 segundos.:
The system will send a 15 sec. El sistema le enviará a 15 seg. pulse when locking the doors. pulso cuando el bloqueo de las puertas.
*When selecting 15 sec. * En la selección de 15 segundos. for cars with total closure the windows will be closed automatically para los vehículos con cierre total de las ventanas se cerrarán automáticamente
during remote arming without enabling feature #14. durante el suministro de armas a distancia, sin permitir característica # 14.
When set as 40 sec.: Cuando se ajusta como 40 seg.:
The system will send a 40 sec. El sistema enviará un 40 seg. pulse when locking the doors. pulso cuando el bloqueo de las puertas.
*When selecting 40 sec. * En la selección de 40 seg. for cars with total closure the windows will be closed automatically para los vehículos con cierre total de las ventanas se cerrarán automáticamente
during remote arming without enabling feature #14. durante el suministro de armas a distancia, sin permitir característica # 14.
06. 06. Door Unlock Time (default=0.8 sec.) Apertura de puertas por tiempo (por defecto = 0,8 seg.)
When set as 0.8 sec.: Cuando se ajusta como 0,8 seg.:
The system will send a 0.8 sec. El sistema enviará un 0,8 seg. pulse when unlocking the doors. pulso cuando desbloquear las puertas.
When set as 3.6 sec.: Cuando se ajusta como 3,6 seg.:
The system will send a 3.6 sec. El sistema enviará un 3,6 seg. when unlocking the doors. cuando desbloquear las puertas.
When set as 0.8 sec.*2: Cuando se ajusta como 0,8 segundos .* 2:
The system will send two 0.8 sec. El sistema le enviará dos 0,8 seg. pulses when unlocking the doors. pulsos cuando desbloquear las puertas.
07. 07. Door Unlock with Disarming (default=driver) Apertura de puertas con el desarme (por defecto = conductor)
When set as Driver: Cuando se ajusta como conductor:
Only the drivers door will be unlocked when pressing button #2 to disarm the system. Sólo los conductores puerta se desbloquea al pulsar el botón # 2 para desarmar el sistema.
Pressing button #2 again within 3 seconds will unlock the rest of the doors. Al pulsar el botón # 2 de nuevo dentro de 3 segundos desbloquear el resto de las puertas.
When set as All: Cuando se ajusta como todos:
All the doors will be unlocked when pressing button #2 to disarm the system. Todas las puertas se desbloquea al pulsar el botón # 2 para desarmar el sistema.
08. 08. Siren/Horn Output (default=siren) Siren / Cuerno de salida (por defecto = sirena)
When set as Siren: Cuando se ajusta como Siren:
Select the Siren option when connecting an external siren. Seleccione la opción Siren cuando se conecta una sirena exterior.
When set as Horn: Cuando se ajusta como Cuerno:
Select the Horn option when connecting the output to the cars horn. Seleccione la opción de Hornos cuando se conecta la salida a los coches bocina. Note a relay must be used. Nota un relé se debe utilizar.
09. 09. Alarm Condition Cycle Duration (default=30 sec.) Condición de alarma duración del ciclo (por defecto = 30 seg.)
When set as 30 sec. Cuando se ajusta como 30 seg. or 60 sec.: o 60 seg.:
The siren will sound for 30 sec. La sirena sonará durante 30 segundos. (or 60 sec) when the system is triggered and released. (o 60 segundos) cuando el sistema está activado y puesto en libertad. The El
siren will sound for 30 sec. sirena sonará durante 30 segundos. (or 60sec) x 3 cycles if the system is triggered continuously. (o 60sec) x 3 ciclos si el sistema se dispara continuamente.
10. 10. Interior Light Delay (default=disable=5 sec.) Luz Interior de retardo (por defecto = desactivar = 5 seg.)
When set as Disable (=5 sec.): Cuando se ajusta como Desactivar (= 5 seg.):
The siren chirps 3 times and the hazard lights flash 3 times immediately if any of the doors, boot La sirena emite un sonido 3 veces el riesgo y luces de flash 3 veces inmediatamente si cualquiera de las puertas, arrancar
or bonnet are not closed properly when remote arming the system. capó o no se cierra correctamente cuando remoto armar el sistema. The relevant input will be Las aportaciones se
bypassed until the door/boot/bonnet is closed. al margen hasta que la puerta / maletero / capó está cerrado.
When set as 25-40-60 sec.: Cuando se ajusta como 25-40-60 seg.:
The siren chirps 3 times and hazard lights flash 3 times immediately when remote arming the La
sirena emite un sonido 3 veces y las luces de flash de riesgo 3 veces
inmediatamente cuando el suministro de armas a distancia
system if the boot or bonnet are not closed properly. si el sistema de arranque o capó no se cerró correctamente. The boot & bonnet will be bypassed until En el maletero y capó será dejado de lado hasta que
both are closed properly. ambos se han cerrado correctamente.
The siren chirps 3 times and hazard lights flash 3 times in 25sec.(or 40, 60sec.) after remote La sirena emite un sonido 3 veces y las luces de flash de riesgo 3 veces en 25sec. (O 40, 60sec.) Tras remoto
arming the system if the doors are not all closed properly. armar el sistema si las puertas no están cerradas todas correctamente. The doors will be bypassed until they Las puertas será dejado de lado hasta que
are all closed properly. están todos cerrados correctamente.

- --
11. 11. Auto. Auto. Rearming (default=disable) Rearme (por defecto = desactivar)
When set as Enable: The system will arm itself again automatically 30 seconds after disarming Cuando se ajusta como Activar: El sistema de armarse de nuevo automáticamente 30 segundos después de desarme
the system if no doors are opened. el sistema si no se abren las puertas. Opening a door after disarming the system will deactivate La apertura de una puerta después de desarmar el sistema desactivará
the auto rearming feature. la función de rearme automático.
12. 12. AED, Auto Engine Disable (default=disable) AED, Auto Motor de desactivación (por defecto = desactivar)
When as Enable: After parking the car, turning the ignition off and opening and then closing Cuando, como Activar: Después de estacionar el coche, girando el encendido apagado y la apertura y cierre a continuación,
the door the engine disable relay will activate within 10 seconds but the system will still be la puerta del motor desactivar relé se activará, en 10 segundos, pero el sistema seguirá siendo
disarmed. desarmados.
- The 10 sec. -- El 10 seg. countdown will be interrupted immediately when opening a door, the countdown cuenta atrás se interrumpió de inmediato al abrir una puerta, la cuenta regresiva
will restart when the door is closed. se reiniciará cuando la puerta esté cerrada.
- Pressing the remote to arm the system during the 10 sec. -- Si pulsa el mando a distancia para armar el sistema durante los 10 seg. countdown will activate the AED cuenta regresiva se activará la AED
immediately. inmediatamente.
- To deactivate the AED: -- Para desactivar la AED:
a) With the system disarmed, remote arming the system then disarming will deactivate the a) Con el sistema desarmado, a distancia armar el sistema de desarmar a continuación, se desactiva el
AED at the same time. AED al mismo tiempo.
b) With the system armed, remote disarming the system will deactivate the AED at the same b) Con el sistema de armado, a distancia desarmar el sistema desactivará la AED al mismo
time. tiempo.
c) By override (when the system is disarmed). c) Al anular (cuando el sistema está desarmado).
* The AED will not active under valet mode. * El AED no se activa en virtud del modo valet. To disable the AED you must leave the valet Para desactivar la AED, usted deberá abandonar el valet
mode. modo de espera.
* When the AED is activated, the system cannot enter the following modes: * Cuando la AED está activado, el sistema no puede entrar en los siguientes modos:
a) Code Learning a) Código de Aprendizaje
b) Programming Mode b) el modo de programación
c) Hazard lights Calibration Mode c) las luces de Riesgos modo de calibración
d) Anti-hijacking d) Lucha contra el secuestro
13. 13. Door Open Alerts (default=disable) Alertas de apertura de puerta (por defecto = desactivar)
When set as Mode 1: Cuando se ajusta como Modo 1:
- The hazard lights will flash when a door is opened with the ignition on until the door is closed -- El peligro de las luces a parpadear cuando una puerta se abre con el encendido hasta que la puerta esté cerrada
or the ignition is turned off. o el de encendido está apagado.
* The feature will not be activated if the door is opened whilst the ignition is on. * La función no se activará si la puerta se abre, mientras que el de encendido está activado.
When set as Mode 2: Cuando se ajusta como Modo 2:
- The hazard lights will flash when a door is opened regardless of whether the ignition is on -- El peligro de las luces a parpadear cuando una puerta se abre independientemente de que el encendido se encuentra en
of off and until the door is closed. de despegue y hasta que la puerta está cerrada.
* The feature will be activated regardless of whether the ignition is turned on or off. * La función se activa independientemente de que el encendido esté apagado o encendido.
14. 14. Total/Comfort Closure (default=disable) Total / Comfort Clausura (por defecto = desactivar)
The CH3 wire is designed for the option of automatically closing the windows when arming El CH3 cable está diseñado para la opción de cerrar automáticamente las ventanas cuando el suministro de armas
the system. el sistema. This feature requires that the vehicle has Total/Comfort Closure. Esta función requiere que el vehículo ha Total / Comfort Clausura.
When set as Disable: Cuando se ajusta como Desactivar:
The CH3 output will not be activated when arming the system but can be controlled as CH3 La salida no se activará cuando el sistema de suministro de armas, pero pueden ser controlados como
follows: la siguiente manera:
- With system armed or disarmed. -- Con el sistema armado o desarmado.
- Press and hold button #1+3. -- Pulse y mantenga pulsado el botón # 1 +3.
- After 1 sec. -- A partir del 1 de SEC. the CH3 output will be activated until button #1 is released. CH3 la salida se activará hasta el botón # 1 es puesto en libertad.
When set as 15, 30 or 40 sec.: Cuando se ajusta como 15, 30 o 40 seg.:
When arming the system the CH3 will send a 15 sec.(or 30, 40) pulse to close the windows Al armar el sistema de las CH3 enviará a 15 seg. (O 30, 40) el pulso para cerrar las ventanas
automatically. automáticamente. Pressing the remote to disarm the system during the 15 sec.(or 30, 40) will Al pulsar el mando a distancia para desarmar el sistema durante los 15 segundos. (O 30, 40)
deactivate the CH3 output immediately. CH3 desactivar la salida de inmediato.
15. 15. Disarm with Boot Release (default=disable) Desarmar con el módulo de arranque (por defecto = desactivar)
When set as Disable: Cuando se ajusta como Desactivar:
When operating the remote boot release the system will remain armed but the shock sensor Al operar el control remoto de arranque liberar el sistema seguirá siendo armado, pero el sensor de choque
will be bypassed. será dejado de lado. The boot will be protected and shock sensor reactivated 3 sec. El arranque será protegida y sensor de choque reactivado 3 seg. after después de
closing the boot. el cierre de arranque.
When set as Enable: Cuando se ajusta como Activar:
The system will be disarmed when operating the boot release, the siren will chirp twice and El sistema será desarmado cuando arranque el operativo de liberación, la sirena y el doble de sonido
hazard lights flash twice to confirm. peligro luces de flash dos veces para confirmar.
* The countdown of Auto. * La cuenta de Auto. Rearming or Passive Arming will be interrupted when operating the Rearme o pasiva armado será interrumpida durante el funcionamiento de la

- --
boot release. liberación de arranque.
* The remote boot release will still work with the ignition on. * El mando a distancia de arranque liberación seguirá siendo trabajar con la ignición.
16. 16. Anti-hijacking Countdown (default=30sec.) Anti-secuestro de cuenta (por defecto = 30sec.)
When set as 30 or 60 sec.: Cuando se ajusta como 30 o 60 seg.:
The system will enter the Anti-hijacking mode after 30 or 60 sec. El sistema entrará en la Lucha contra el secuestro modo después del 30 o 60 seg. depending on the selection. dependiendo de la selección.
The siren will chirp 10 times before entering into the anti-hijacking mode as a last warning. La sirena sonido 10 veces antes de entrar en la lucha contra el secuestro como un modo de último aviso.
17. 17. Activate Anti-hijacking Countdown (default=normal) Active Anti-secuestro de cuenta (por defecto = normal)
When set as Normal: Cuando se establece como normal:
The countdown will start immediately when activating the anti-hijacking feature. La cuenta regresiva se iniciará inmediatamente cuando se activa la lucha contra el secuestro característica.
When set as Brake: Cuando se ajusta como Brake:
The system will enter the Anti-hijacking mode after the footbrake is tapped. El sistema entrará en la Lucha contra el secuestro después de que el modo de footbrake es explotado.
* After the system starts the countdown, press the valet switch before the last 10 chirps * Después de que el sistema se inicia la cuenta atrás, pulse el interruptor valet antes de los últimos 10 emite un sonido
warning to stop the countdown and deactivate the anti-hijacking. advertencia para detener la cuenta regresiva y desactivar la lucha contra el secuestro.
18. 18. Anti-hijacking by Remotes (default=disable) Anti-secuestro de Remotos (por defecto = desactivar)
When set as Enable: Cuando se ajusta como Activar:
The Anti-hijacking will be activated as follows: El Anti-secuestro se activará de la siguiente manera:
- With the system disarmed and the ignition on. -- Con el sistema desarmado y el de encendido.
- Press button #1 for 2 sec. -- Pulse el botón # 1 de 2 seg. to activate the anti-hijacking and the hazard lights flash once to para activar la lucha contra el secuestro y el peligro de luces de flash una vez para
confirm. confirmar.
- The anti-hijacking countdown will start depending on the selection of feature #17. -- La lucha contra el secuestro de cuenta regresiva se iniciará dependiendo de la característica de selección # 17. The LED El LED
will flash every 2 secs. parpadeará cada 2 segundos. once the countdown starts. una vez que empieza la cuenta regresiva.
- After 30 or 60 sec. -- Después de 30 o 60 seg. depending on the selection of feature #16, the system enters the dependiendo de la característica de selección # 16, el sistema entra en la
Anti-hijacking mode. Anti-secuestro modo. 10 sec. 10 seg. before the countdown ends, the siren and hazard lights will antes de que la cuenta termina, la sirena y luces de peligro
activate as a warning. activar como una advertencia.
- When the system is in anti-hijacking mode, the siren will sound and hazard lights flash until -- Cuando el sistema esté en la lucha contra el secuestro modo, la sirena de sonido y luces de flash de peligro hasta que
the system is overridden using the emergency override procedure. el sistema está anulada mediante el procedimiento de emergencia.
19. 19. Anti-hijacking by Ignition+Door (default=disable) Anti-secuestro de encendido + puerta (por defecto = desactivar)
When set as Enable: Cuando se ajusta como Activar:
The Anti-hijacking will be activated as follows: El Anti-secuestro se activará de la siguiente manera:
- With the system disarmed and the ignition on. -- Con el sistema desarmado y el de encendido.
- Opening and closing a door will activate the anti-hijacking and the hazard lights will flash -- Apertura y cierre de una puerta se activará la lucha contra el secuestro y el peligro de luces de flash
once to confirm. una vez para confirmar.
- The anti-hijacking countdown will start depending on the selection of feature #17. -- La lucha contra el secuestro de cuenta regresiva se iniciará dependiendo de la característica de selección # 17. The LED El LED
will flash every 2 secs. parpadeará cada 2 segundos. once the countdown starts. una vez que empieza la cuenta regresiva.
- After 30 or 60 sec. -- Después de 30 o 60 seg. depending on the selection of feature #16, the system enters the dependiendo de la característica de selección # 16, el sistema entra en la
Anti-hijacking mode. Anti-secuestro modo. 10 sec. 10 seg. before the countdown ends, the siren and hazard lights will antes de que la cuenta termina, la sirena y luces de peligro
activate as a warning. activar como una advertencia.
- When the system is in anti-hijacking mode, the siren will sound and hazard lights flash until -- Cuando el sistema esté en la lucha contra el secuestro modo, la sirena de sonido y luces de flash de peligro hasta que
the system is overridden using the emergency override procedure. el sistema está anulada mediante el procedimiento de emergencia.
20. 20. Override Code (default= flash 1) Sobrescribir Código (por defecto flash = 1)
- Follow Section 1.9 to change the Override Code. -- Siga Sección de 1,9 a cambiar el Código Sobrescribir.
- Follow Section 2.6b of the user manual to operate the Override. -- Siga Sección 2.6b del manual de usuario para operar el sobrepaso.
- --
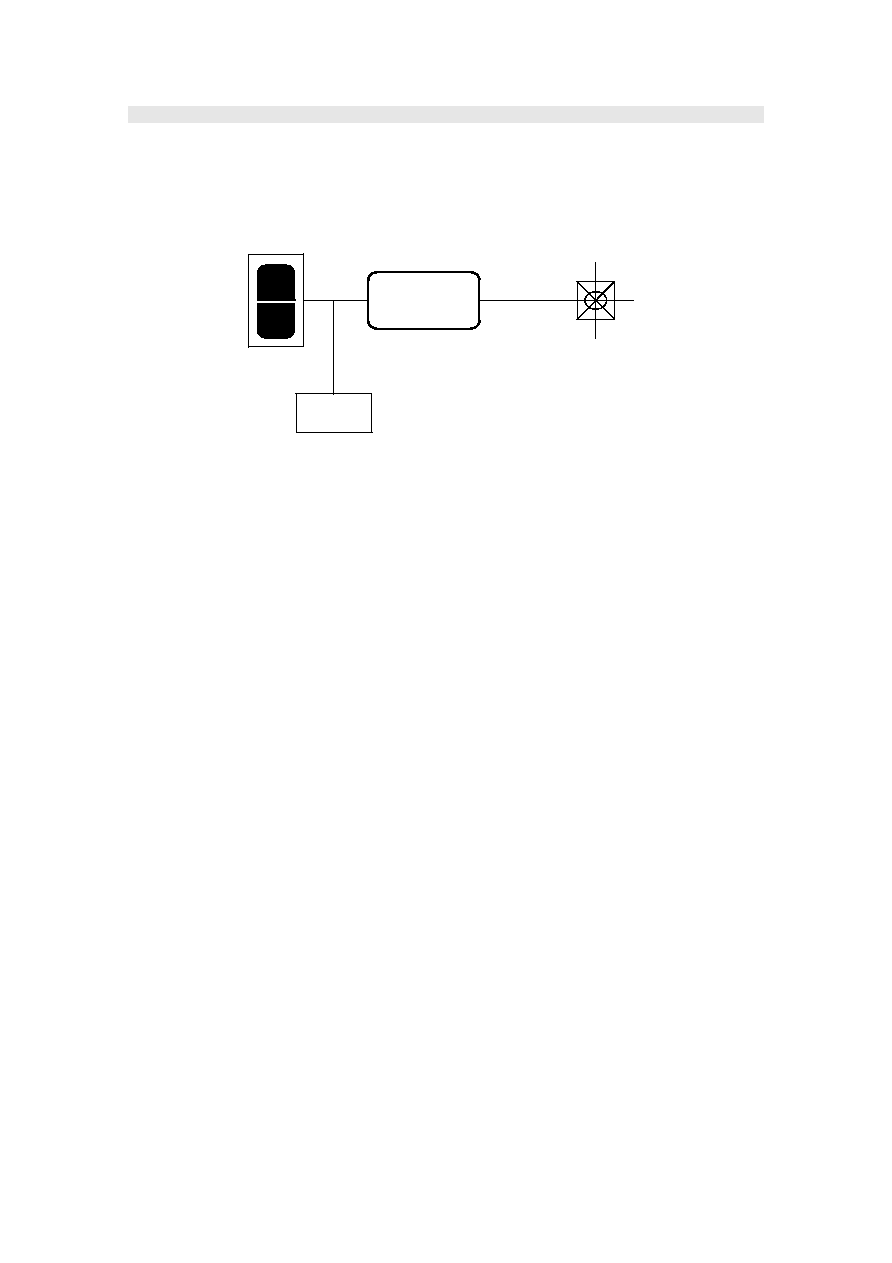
21. 21. Hazard lights Output (default=normal) Riesgos luces de salida (por defecto = normal)
When set as Normal: Cuando se establece como normal:
Connect the hazard lights output as normal using the Y-splitter lead. Conectar la salida de luces de peligro como normal utilizando el separador de Y-plomo.
If the Normal connection does not work then connect the hazard lights output to the hazard Si la conexión normal no funciona y luego conectar el peligro luces de salida al peligro
switch as shown below and set feature #21 as Pulse or Continuous depending on the type of cambiar como se muestra a continuación y establecer característica # 21 como pulso o continuo, dependiendo del tipo de
hazard switch peligro para cambiar
O O
I I
Control Unit Unidad de Control
Predator Predator
XL3 XL3
Hazard Peligros
Switch Cambiar de
Hazard Lights Luces de Riesgos
Output Salida
Hazard Peligros
Lights Luces
When selecting Pulse or Continuous, try the factory default first (0.5sec). Al seleccionar pulso o continua, intente la primera fábrica por defecto (0.5sec). If the hazard lights Si las luces de peligro
do not flash as expected proceed to the hazard light learning as follows: no flash como se espera proceder a la luz de peligro de aprendizaje de la siguiente manera:
- Turn the ignition on and off 3 times (on-off-on-off-on-off). -- Gire el encendido y fuera 3 veces (on-off-en-off-on-off).
- The siren will chirp once to confirm the system is in learning mode. -- La sirena sonido una vez para confirmar el sistema está en modo de aprendizaje.
- Turn the vehicles hazard lights on and the hazard lights start to flash. -- Gire a los vehículos en las luces de peligro y el riesgo luces comienzan a destellar.
- Within 10 sec. -- Dentro de 10 seg. press and hold the valet switch. pulse y mantenga el valet interruptor.
- The LED will turn on to confirm the valet switch is pressed. -- El LED se encenderá para confirmar el valet interruptor es presionado.
- Release the valet switch once the hazard lights have flashed 10 times. -- Suelte el interruptor valet una vez que el peligro destellaban luces tienen 10 veces.
- The LED will turn off and siren will chirp once to confirm the learning is complete. -- El LED se apagará y sirena sonido una vez que confirme el aprendizaje se ha completado.
* The system will leave the learning mode automatically if the valet switch is not pressed * El sistema abandonará el modo de aprendizaje automáticamente si el valet interruptor no se presiona
within 10 sec. dentro de 10 seg. or if the ignition is turned on. o si la ignición está encendida.
2. 2. SYSTEM UPGRADE Actualización del sistema
Follow the steps below to upgrade the system to a 2-way paging alarm. Siga estos pasos para actualizar el sistema a una 2-forma de radiobúsqueda de alarma.
- Cut off the Red and White loops next to port W-1 (main unit). -- Corta el Rojo y Blanco junto a los bucles puerto W-1 (unidad principal).
- Plug the 2-way transceiver into port W-1. -- Enchufe el 2 vías transceptor en el puerto W-1.
- Program the 2-way remotes to the system. -- Programa de la 2-forma remotos al sistema.
* The original remote controls will not work once the 2-way upgrade has been installed. * El original mandos a distancia no funcionará una vez que la 2-forma de actualización se ha instalado. Only Solamente
EVO 4 button or pager remote controls can be used with the pager upgrade. EVO 4 botón o pager controles remotos pueden ser utilizados con el pager actualización.
- --
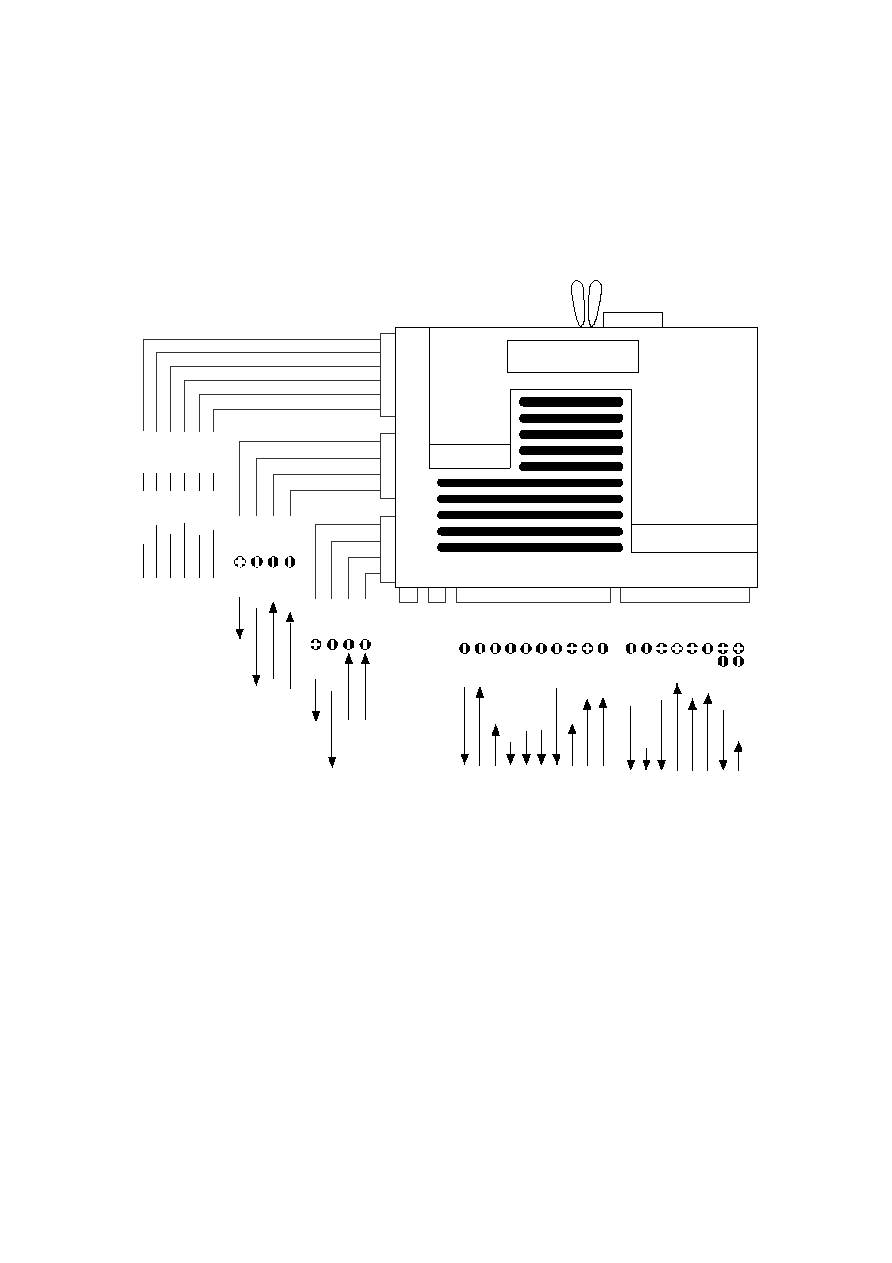
3. 3. Wiring Diagram El diagrama de cableado
Door Puerta
l l
o o
ck (nc) CK (NC)
Black Negro
W8-1 W8-1
Door Puerta
l l
o o
ck (com) CK (com)
G G
reen REEN
W8-2 W8-2
Door Puerta
l l
o o
ck (no) CK (no)
Pink Rosa
W8-3 W8-3
Door Puerta
unl UNL
ock (nc) ock (NC)
Whi WHI
te TE
W8-4 W8-4
Door Puerta
unl UNL
ock (com) ock (com)
Blue Azul
W8-5 W8-5
W7-3 W7-3
Bl Bl
ack ack
G G
ro Ro
und UND
W7-1 W7-1
Gr Gr
ee EE
n n
Shock se Choque SE
nsor nsor
1st stage 1 ª etapa
i i
n n
put poner
W7-2 W7-2
Bl Bl
ue UE
Shock se Choque SE
nsor nsor
2nd stage 2 ª etapa
i i
n n
put poner
W7-4 W7-4
Red Rojo
+12v +12 V
W6-3 W6-3
Bl Bl
ack ack
G G
ro Ro
und UND
W6-4 W6-4
Red Rojo
+12v +12 V
W6-1 W6-1
A Un
u u
xiliary s xiliary s
en en
so tan
r 1s r 1s
ts TS
ta TA
g g
e in e en
p p
u u
t t
W6-2 W6-2
A Un
u u
xiliary s xiliary s
en en
so tan
r 2n r 2n
d d
s s
ta TA
g g
e in e en
p p
u u
t t
To gr Para GR
ound or ound o
+12V de +12 V de
pe PE
ndi NDI
n n
g on pol g en Pol
ar AR
ity of W2-2 (+/-) dad de W2-2 (+/-)
Whi WHI
te/Red TE / Rojo
W2-1 W2-1
Whi WHI
te TE
W2-2 W2-2
H H
azard azard
lig LIG
h h
ts TS
o o
u u
tp TP
u u
t ( t (
+ +
/- / --
b b
u u
ilt ILT
-in - a
relay) relé)
Black Negro
W2-3 W2-3
To gr Para GR
ound ound
Y Y
ello Ello
w w
W2-4 W2-4
Igni Igni
ti TI
on tr en TR
igge igge
ri RI
n n
put poner
Red Rojo
W2-5 W2-5
To +12V battery A +12 V batería
Brown Marrón
W2-6 W2-6
Si Si
re volver
n/Hor n / Hor
n n
output (1A) de salida (1A)
Orange/Black Naranja / Negro
W2-7 W2-7
Immob Immob
ilis SIIT
er out ER a cabo
p p
ut UT
( (
n n
ormally op ormally op
en/ es /
-500mA) - 500mA)
Orange Naranja
W2-8 W2-8
Immob Immob
ilis SIIT
er out ER a cabo
p p
ut UT
( (
n n
ormally c c ormally
los Los
ed Ed
/- / --
500mA) 500mA)
W3-0 W3-0
Gr Gr
ee EE
n n
Door Puerta
tr TR
igge igge
ri RI
n n
put (-) poner (-)
W3-1 W3-1
Pur Pur
p p
le Le
Door Puerta
tr TR
igge igge
ri RI
n n
put (+) poner (+)
W3-2 W3-2
Bl Bl
ack/Red ack / Rojo
To footbr Para footbr
ake Ake
l l
ig IG
ht HT
W3-3 W3-3
Gr Gr
ay ay
Boot release output (-500mA) Boot liberación de salida (-500mA)
W3-4 W3-4
Gr Gr
ay/bl ay / BL
ack ack
Total/Comfort closure output (-500mA) Total / Comfort cierre de salida (-500mA)
W3-5 W3-5
Bl Bl
ue UE
/Whi / WHI
te TE
Door unlock2 output (-500mA) Unlock2 la puerta de salida (-500mA)
W3-6 W3-6
Gr Gr
ee EE
n n
/Whi / WHI
te TE
Interior light output (-500mA) Interior salida de luz (-500mA)
W3-8 W3-8
Bl Bl
ue UE
Boot/Bonne Boot / Bonne
t tr t TR
igge igge
ri RI
n n
put poner
W3-9 W3-9
Pink Rosa
Remote starter mo Arranque remoto Mo
dule output (-500mA) dule salida (-500mA)
W3-7 W3-7
Red/Bl Rojo / Bl
ack ack
Bypass i Bypass i
n n
put fr poner fr
om opti Om OPTI
onal onal
r r
emote emote
star estrella
te TE
r modul r Modul
e e
W5 P W5 P
lug-i lug-i
n Val n Val
et swi ET IBS
tch TCH
W W
1 1
-P - P
lu Lu
g g
-in - a
2Way 2Way
Tr Tr
anscei anscei
ver Ver
W4 Pl W4 Pl
ug-i UG-i
n LED i n i LED
n n
di Di
cator Cator
Whi WHI
te TE
Red Rojo
Door Puerta
unl UNL
ock (no) ock (no)
Orange Naranja
W8-6 W8-6
- --
4. 4. Wiring Notes Notas de cableado
CONNECT TO A FUSED +12 Conectar a un fundido +12
OR GROUND DEPENDING O terreno en función
ON WIRING OF PIN 87 En el cableado de 87 pines
Wiring Diagrams - Interior Light, Horn & Boot Release Diagramas de cableado - Interior de la luz, Cuerno de arranque y puesta en libertad
Postive Interior Light Postive luz interior
Negative Interior Light Negativo luz interior
To Positive Para positivos
Interior Light Luz Interior
87 87
85 85
86 86
87a 87a
30 30
+12 +12
White Blanco
W3-6 W3-6
87 87
85 85
86 86
87a 87a
30 30
To Negative Para negativas
Interior Light Luz Interior
+12 +12
White Blanco
W3-6 W3-6
Positive Horn Honk Horn Honk positivos
Negative Horn Honk Negativo Horn Honk
To Positive Para positivos
Horn Wire Cuerno Wire
87 87
85 85
86 86
87a 87a
30 30
+12 +12
Brown Marrón
W2-6 W2-6
87 87
85 85
86 86
87a 87a
30 30
To Negative Para negativas
Horn Wire Cuerno Wire
+12 +12
Brown Marrón
W2-6 W2-6
Boot Release Wiring Boot liberación de cableado
87 87
85 85
86 86
87a 87a
30 30
To Boot Release Para arrancar la liberación
Solenoid Solenoide
To Fused Para Fused
Battery Source Batería Fuente
Gray Gray
W3-3 W3-3
- --
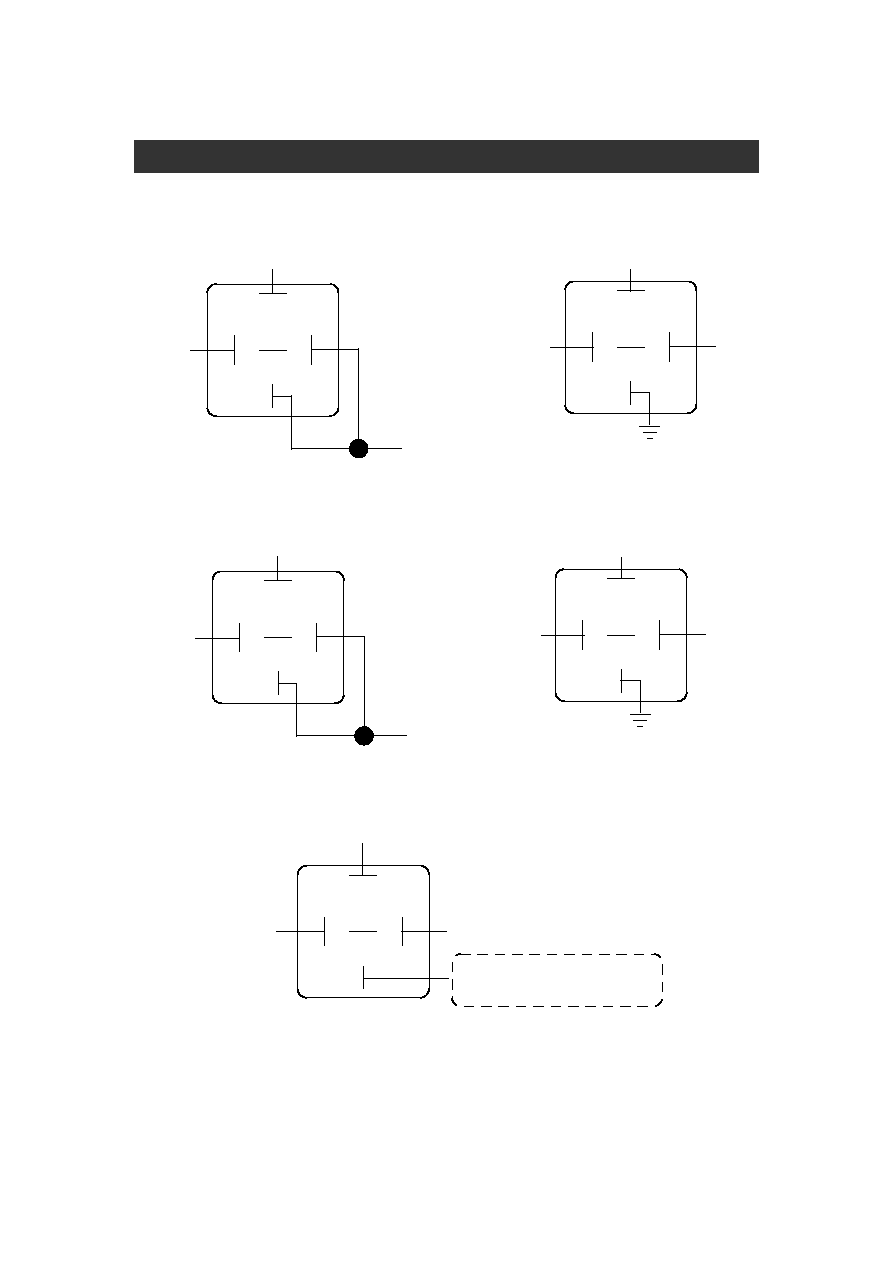
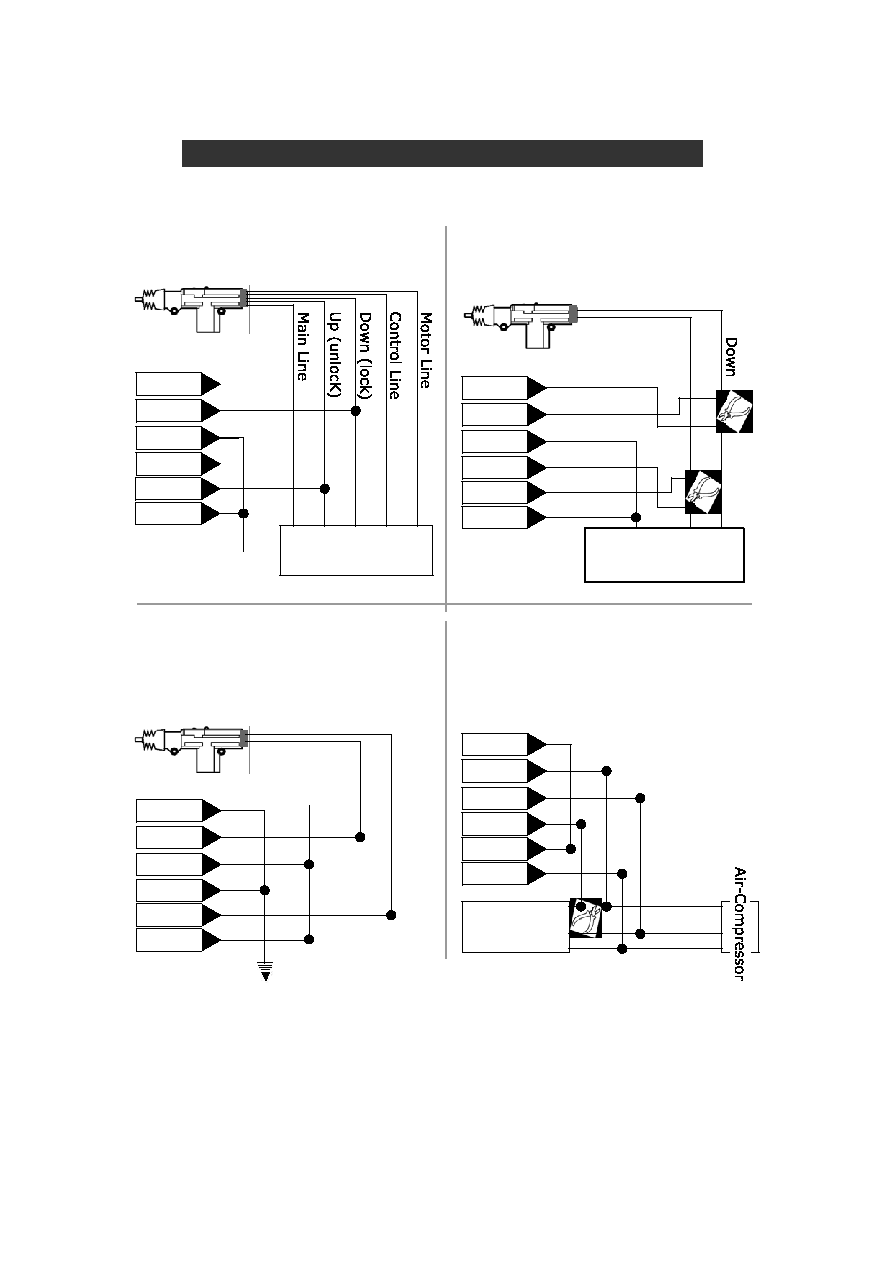
5. 5. Central Locking Wiring Central de bloqueo de cableado
Follow the diagrams below for wiring basic central locking systems Siga por debajo de los diagramas de cableado básico para los sistemas de bloqueo central
+12V +12 V
Wiring Diagram - Predator XL3 Door Lock/Unlock - Basic El diagrama de cableado - Predator XL3 puerta de bloqueo / desbloqueo - Básico
Black Negro
Green Verde
Pink Rosa
White Blanco
Blue Azul
Orange Naranja
Original Built-in Original-construido en
Controller Contralor
Diagram #A Diagrama # A
Negative or Positive Locking Negativo o positivo de bloqueo
Diagram #B Diagrama # B
Motor Interrupt Locking Motor de bloqueo de interrupción
eg. por ejemplo. CHRYSLER CHRYSLER
Door Lock Switch Door Lock Switch
On the Front Door En la puerta delantera
Black Negro
Green Verde
Pink Rosa
White Blanco
Blue Azul
Orange Naranja
Black Negro
Green Verde
Pink Rosa
White Blanco
Blue Azul
Orange Naranja
Diagram #C Diagrama C #
Central locking where only a switch Central de bloqueo en que sólo un interruptor
is installed in the drivers door. se instala en la puerta de los conductores.
An additional door motor is required. Otra puerta de motor es obligatorio.
Diagram #D Diagrama # D
Vacuum central locking Central de vacío de bloqueo
eg: MERCEDES, AUDI por ejemplo: MERCEDES, AUDI
(Note: Set door lock/unlock time to 3.6 sec.) (Nota: Set puerta bloqueo / desbloqueo tiempo a 3,6 seg.)
Black Negro
Green Verde
Pink Rosa
White Blanco
Blue Azul
Orange Naranja
Electric Motor Motor Eléctrico
Switch Cambiar de
Main Line Línea Principal
Down Abajo
Up Arriba
Up Arriba
+12V +12 V
Down Abajo
Up Arriba
To +12V or Ground A +12 V o terrestre
Depending on polarity Dependiendo de la polaridad
of locking system de sistema de bloqueo
Polarity Reverses on a single wire Invierte la polaridad en un solo cable
Two wires resting at ground, one pulses Dos cables de descanso en el suelo, uno pulsos
12V for lock, one pulses 12V for unlock 12V de bloqueo, uno pulsos de 12V para desbloquear
Two wires resting open circuit one pulses 12V or Dos cables de descanso un circuito abierto o legumbres 12V
ground for lock, one pulses 12V or ground for unlock motivo de bloqueo, uno o pulsos de 12V para desbloquear
- --
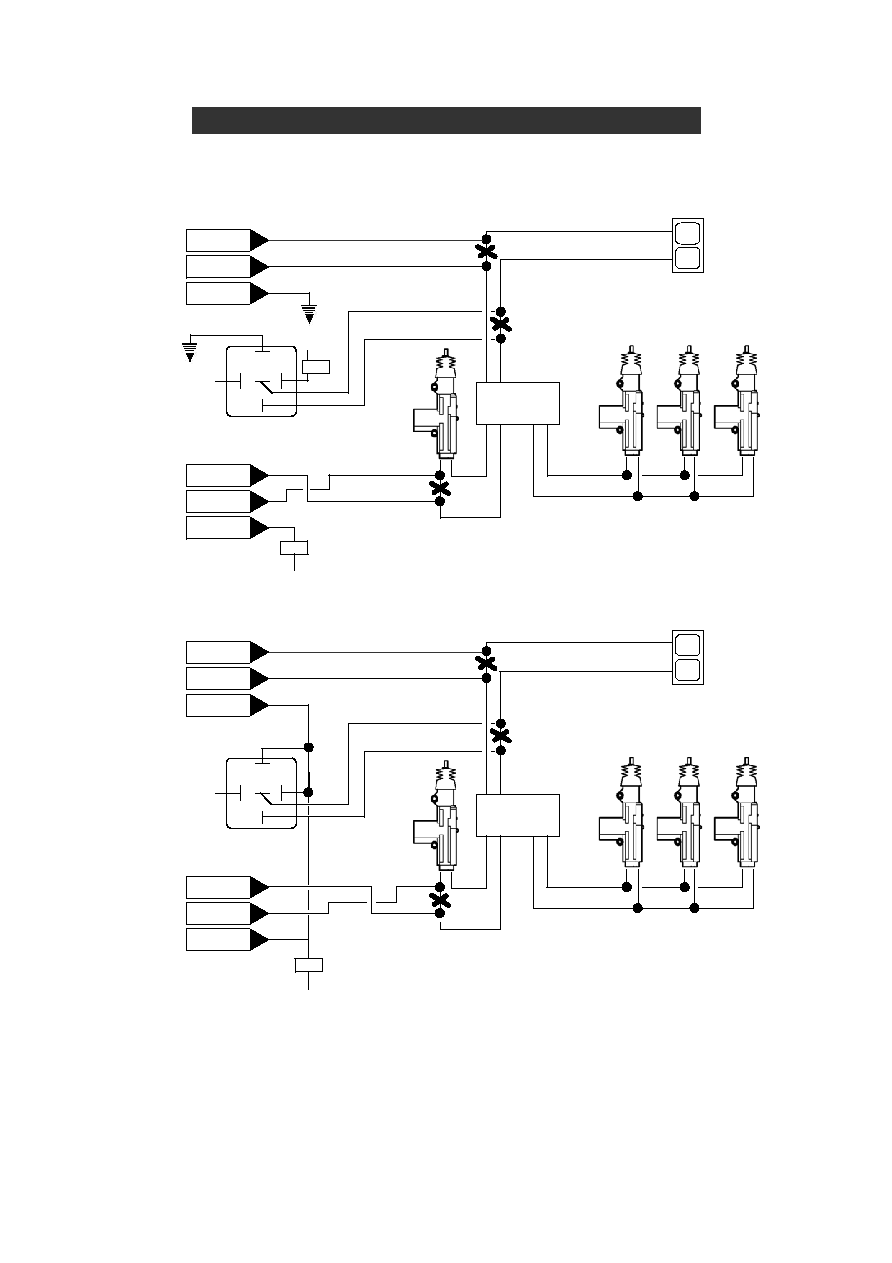
Two Stage Negative Trigger Dos etapas de activación negativa
Two Stage Positive Trigger Dos etapa positiva Trigger
The Predator XL3 has a dedicated unlock-2 output allowing for two El Predator tiene un XL3 dedicada desbloquear-2 que permite la salida para dos
stage door unlock operation. Apertura de puertas fase operación.
Wiring Diagram - Predator XL3 Two Stage Door Unlock El diagrama de cableado - Predator XL3 dos etapas Apertura de puertas
(-)UNLOCK-2 (-) UNLOCK-2
DOOR LOCK BLOQUEO DE PUERTA
SWITCH SWITCH
UL UL
L L
FACTORY FACTORY
DOOR LOCK BLOQUEO DE PUERTA
MODULE MÓDULO
PASSENGER DOOR PUERTA DE PASAJEROS
MOTORS MOTORES
DRIVERS CONDUCTORES
DOOR PUERTA
MOTOR MOTOR
(+)DOOR LOCK WIRE (+) Puerta WIRE
(+)DOOR UNLOCK WIRE (+) Apertura de puertas WIRE
Black Negro
Pink Rosa
Green Verde
(+)LOCK (+) LOCK
87 87
87a 87a
85 85
86 86
30 30
White Blanco
Blue Azul
Orange Naranja
(+)UNLOCK (+) UNLOCK
+12V +12 V
15A 15A
(-)UNLOCK-2 (-) UNLOCK-2
DOOR LOCK BLOQUEO DE PUERTA
SWITCH SWITCH
UL UL
L L
FACTORY FACTORY
DOOR LOCK BLOQUEO DE PUERTA
MODULE MÓDULO
PASSENGER DOOR PUERTA DE PASAJEROS
MOTORS MOTORES
DRIVERS CONDUCTORES
DOOR PUERTA
MOTOR MOTOR
(-)DOOR LOCK WIRE (-) Puerta WIRE
(-)DOOR UNLOCK WIRE (-) Apertura de puertas WIRE
Black Negro
Pink Rosa
Green Verde
(-)LOCK (-) LOCK
87 87
87a 87a
85 85
86 86
30 30
+12V +12 V
15A 15A
White Blanco
Blue Azul
Orange Naranja
(-)UNLOCK (-) UNLOCK
+12V +12 V
15A 15A
- --
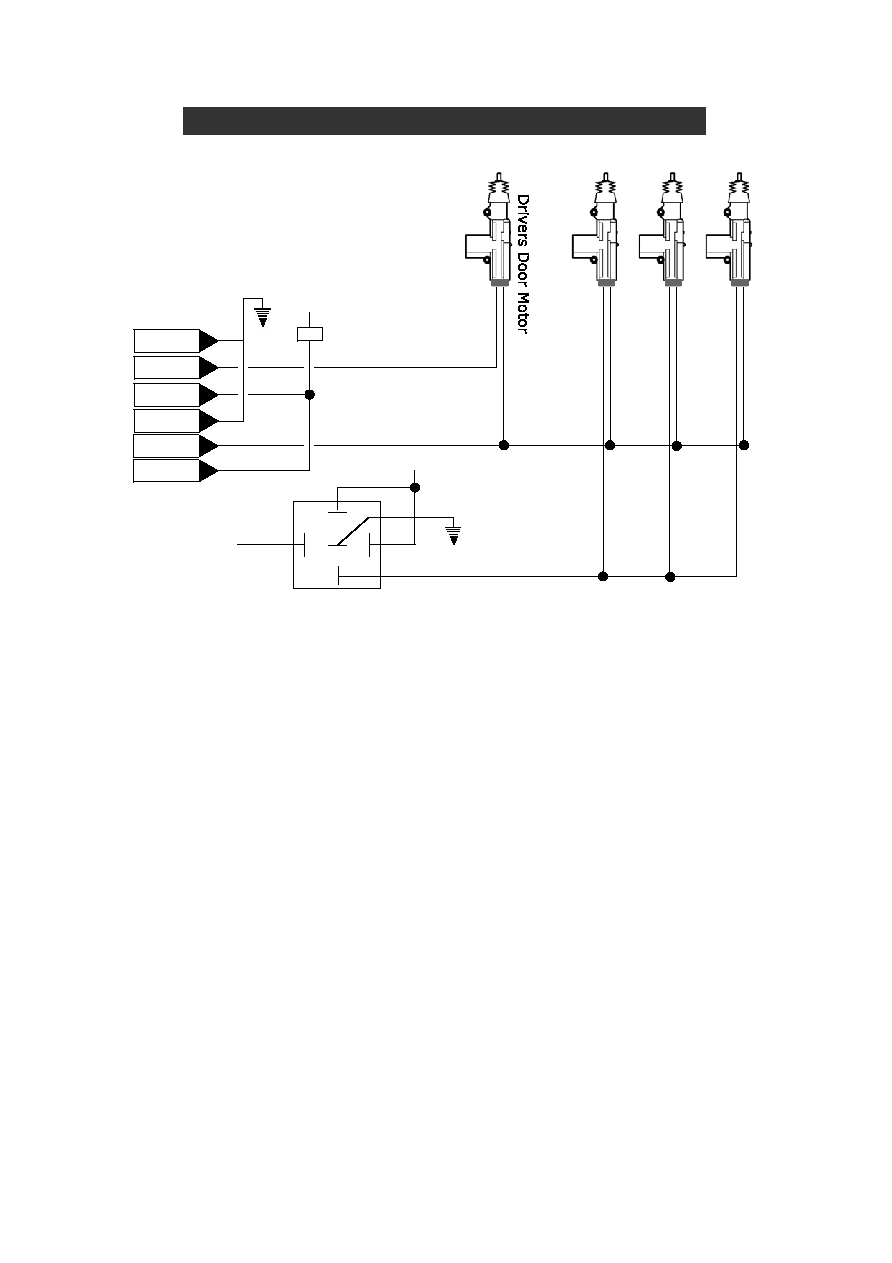
Wiring Diagram - Predator XL3 Two Stage Door Unlock El diagrama de cableado - Predator XL3 dos etapas Apertura de puertas
Two Stage Adding Actuators Dos etapa añadiendo actuadores
+12V +12 V
Black Negro
Green Verde
Pink Rosa
White Blanco
Blue Azul
Orange Naranja
86 86
85 85
87a 87a
30 30
87 87
(-)Unlock-2 (-) Desbloqueo-2
+12V +12 V
Passenger Door Motors Pasajeros puerta Motors
15A 15A
LOCK LOCK
UNLOCK UNLOCK


